Manuals
/
Liebert
/
Computer Equipment
/
Power Supply
Liebert
600TTM
installation manual
UPS Multi-Module Unit Block Diagram
Models:
600TTM
1
11
91
91
Download
91 pages
52.1 Kb
8
9
10
11
12
13
14
15
Install
Wiring Considerations
Battery Safety Precautions
Safety Precautions
Safety
Power Protection
Page 11
Image 11
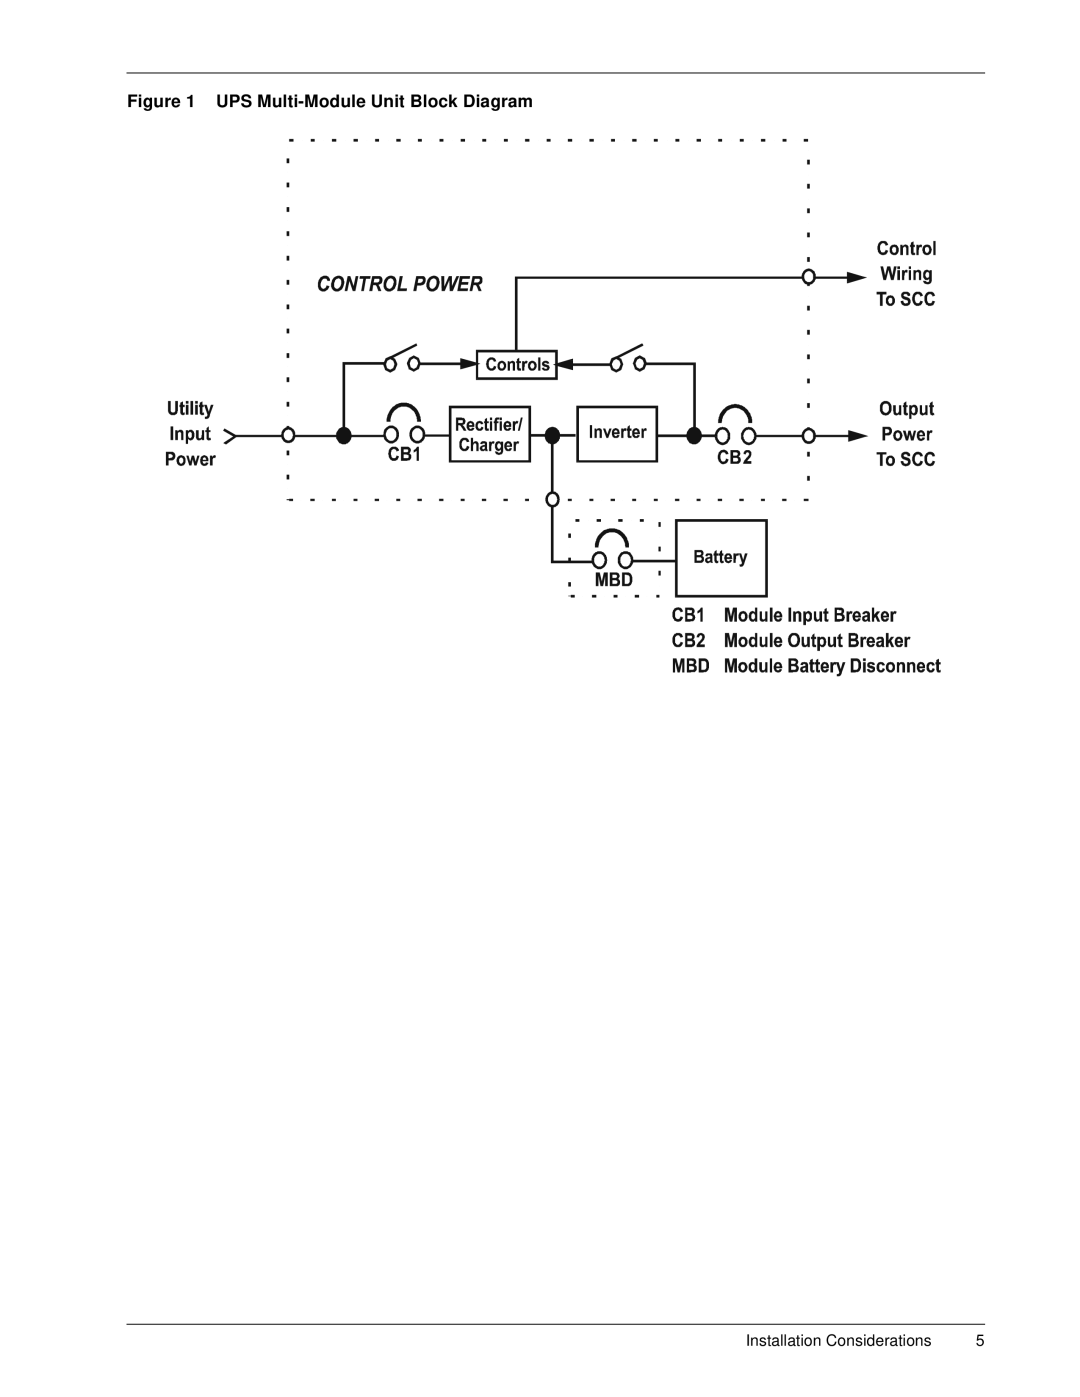
Figure 1 UPS
Multi-Module
Unit Block Diagram
Installation Considerations
5
Page 10
Page 12
Page 11
Image 11
Page 10
Page 12
Contents
Series 600T UPS
Power Protection
Arning Hazard
Table of Contents
Page
List of Figures
Page
Important Safety Instructions
Page
Safety Precautions
Handling Cabinet
Installation Considerations
UPS Multi-Module Unit Block Diagram
System Control Cabinets
Types of System Control Cabinets
Unloading and Handling
Inspections
External Inspections
Internal Inspections
Equipment Location
Battery Installation
Battery Safety Precautions
Battery Installation
Battery Installation
Non-Standard Batteries
Matching Battery Cabinets
Configuring Your Neutral and Ground Connections
Configuring Your Neutral and Ground Connections
Grounding Configuration with Ungrounded Delta Source Input
Preferred Grounding Configuration, Power-Tie Systems
Preferred Grounding Configuration with Power-Tie Switchgear
Battery Cabinet Grounding Configuration
Grounding Configurations, Battery Systems
Wiring Considerations
Power Wiring
Control Wiring
Equipment
Battery Wiring
Scct
Scci / Sccc
BFB BIB CB1 CB2 MBB MBD Mbfb MIB RIB SBB SBS
For Battery Cabinets
Power Wiring Terminals Factory Supplied
Wiring Inspection
Copper Aluminum or Copper-Clad Aluminum
Outline Drawing, 500 kVA Multi-Module UPS, 6-Pulse Rectifier
Installation Drawings
Installation Drawings
Installation Drawings
Installation Drawings
Outline Drawing, System Control Cabinet SCCT, 200-1200 Amps
Outline Drawing, System Control Cabinet SCCT, 1600-2500 Amps
Outline Drawing, System Control Cabinet SCCT, 3000 Amps
Outline Drawing, System Control Cabinet Scct 4000 Amps
Battery Power Pack, Size a
Battery Power Pack, Size B
Battery Power Pack, Three-Pack System
Base Mounting Patterns, 500 kVA Module, 12-Pulse Rectifier
Base Mounting Patterns, 625-750 kVA Module, 6-Pulse
Installation Drawings
Installation Drawings
Installation Drawings
Base Mounting Patterns SCCT, 3000 Amps
Base Mounting Patterns SCCT, 4000 Amps
Installation Drawings
Installation Drawings
Installation Drawings
Terminal Details, 500 kVA Module, 6-Pulse Rectifier
Terminal Details, 500 kVA Module, 12-Pulse Rectifier
Installation Drawings
Installation Drawings
Installation Drawings
Control Connection Location, 500 kVA Modules
Control Connection Location Diagram, 625 & 750 kVA Modules
Control Connection Location Diagram, Sccc & Scci
Control Connection Location Diagram, Scct
Installation Drawings
Installation Drawings
Installation Drawings
Installation Drawings
Installation Drawings
Option Wiring, Maintenance Bypass Interlock
Option Wiring, Remote Status Panel Interface
Option Wiring, Internal Modem
Installation Drawings
Installation Drawings
Option Wiring, Battery Temperature Sensor
Option Wiring, Snmp Interface
External Interconnections, Module 1/SCC, Cable Groups 21
External Interconnections, Module 2/SCC, Cable Groups 21
Wiring Configurations, UPS Video Display Terminal
Installation Drawings
Installation Drawings
Remote Status Panel, Surface Mount
Circuit Breaker Schedule, Multi-Module UPS, 300-750 kVA
Installation Drawings
Installation Drawings
500-750kVA Multi-Module Systems
Appendix a Site Planning Data
Series 600T Multi-Module Systems, 500-750 kVA 480 Volt Input
Series 600T Multi-Module Systems, 500-750 kVA 600 Volt Input
One-Hole Lugs
Appendix B Field Supplied Lugs
Appendix B Field Supplied Lugs
Series 600T UPS
Top
Page
Image
Contents