EN 73


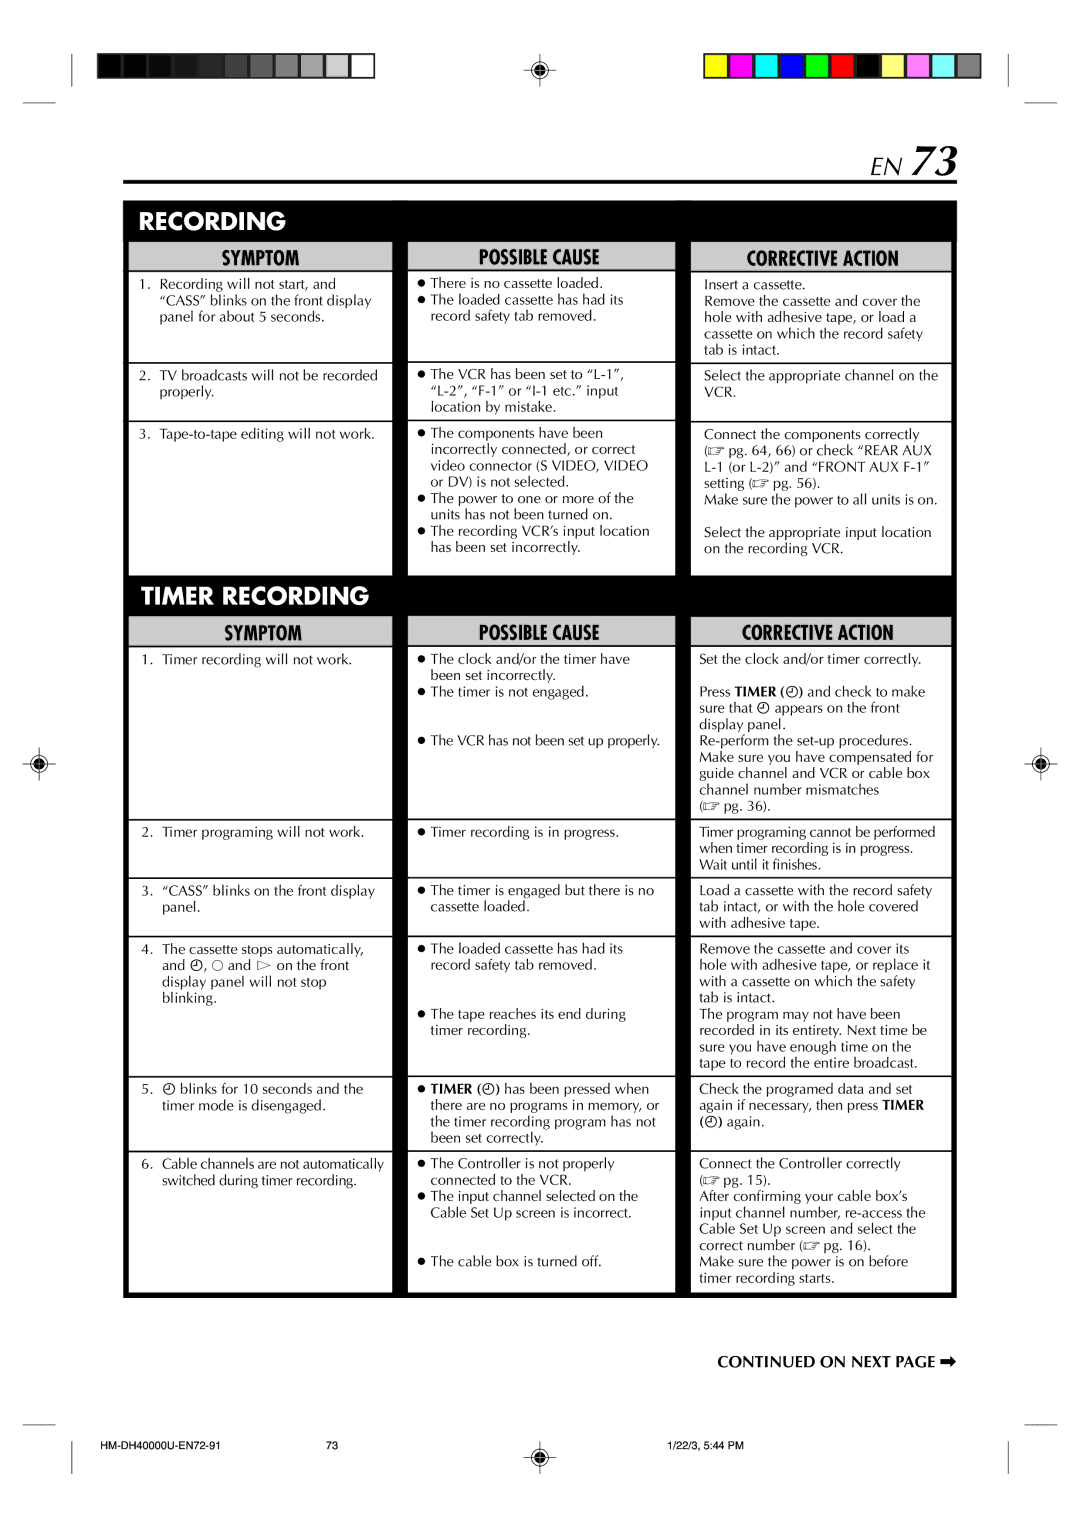
RECORDING


SYMPTOM


POSSIBLE CAUSE


CORRECTIVE ACTION


1.

Recording will not start, and


There is no cassette loaded.


Insert a cassette.


“CASS” blinks on the front display


The loaded cassette has had its


Remove the cassette and cover the


panel for about 5 seconds.


record safety tab removed.


hole with adhesive tape, or load a


cassette on which the record safety


tab is intact.


2.

TV broadcasts will not be recorded


The VCR has been set to “L-1”,


Select the appropriate channel on the


properly.


“L-2”, “F-1” or “I-1 etc.” input


VCR.


location by mistake.


3.

Tape-to-tape editing will not work.


The components have been


Connect the components correctly


incorrectly connected, or correct


( pg. 64, 66) or check “REAR AUX


video connector (S VIDEO, VIDEO


L-1 (or L-2)” and “FRONT AUX F-1”


or DV) is not selected.


setting ( pg. 56).


The power to one or more of the


Make sure the power to all units is on.


units has not been turned on.


The recording VCR’s input location


Select the appropriate input location


has been set incorrectly.


on the recording VCR.


TIMER RECORDING


SYMPTOM


POSSIBLE CAUSE


CORRECTIVE ACTION


1.

Timer recording will not work.


The clock and/or the timer have


Set the clock and/or timer correctly.


been set incorrectly.


The timer is not engaged.


Press TIMER () and check to make


sure that ‰ appears on the front


display panel.


The VCR has not been set up properly.


Re-perform the set-up procedures.


Make sure you have compensated for


guide channel and VCR or cable box


channel number mismatches


( pg. 36).


2.

Timer programing will not work.


Timer recording is in progress.


Timer programing cannot be performed


when timer recording is in progress.


Wait until it finishes.


3.

“CASS” blinks on the front display


The timer is engaged but there is no


Load a cassette with the record safety


panel.


cassette loaded.


tab intact, or with the hole covered


with adhesive tape.


4. The cassette stops automatically,


The loaded cassette has had its


Remove the cassette and cover its


and ‰, Q and $ on the front


record safety tab removed.


hole with adhesive tape, or replace it


display panel will not stop


with a cassette on which the safety


blinking.


tab is intact.


The tape reaches its end during


The program may not have been


timer recording.


recorded in its entirety. Next time be


sure you have enough time on the


tape to record the entire broadcast.


5.

‰ blinks for 10 seconds and the


TIMER () has been pressed when


Check the programed data and set


timer mode is disengaged.


there are no programs in memory, or


again if necessary, then press TIMER


the timer recording program has not


() again.


been set correctly.


6. Cable channels are not automatically


The Controller is not properly


Connect the Controller correctly


switched during timer recording.


connected to the VCR.


( pg. 15).


The input channel selected on the


After confirming your cable box’s


Cable Set Up screen is incorrect.


input channel number, re-access the


Cable Set Up screen and select the


correct number ( pg. 16).


The cable box is turned off.


Make sure the power is on before


timer recording starts.


CONTINUED ON NEXT PAGE \

HM-DH40000U-EN72-91

73

1/22/3, 5:44 PM

Page 73
Image 73
Marantz MV8300_U1B manual Recording

MV8300_U1B specifications

The Marantz MV8300_U1B is a state-of-the-art component that exemplifies high-fidelity audio reproduction, tailored for music enthusiasts who appreciate both quality and craftsmanship. As part of Marantz's esteemed line of audio products, the MV8300_U1B combines advanced technology with practical usability, making it a standout choice for home theater setups and dedicated audio systems.

One of the most notable features of the MV8300_U1B is its exceptional power output, capable of delivering a robust performance that effortlessly drives demanding speakers. With a substantial total harmonic distortion rating, the amplifier ensures that the audio signal remains clean and undistorted, allowing listeners to experience music as it was intended by the artists. The unit's power rating makes it suitable for various settings, whether for intimate listening experiences or grand home theater presentations.

Incorporating advanced class D amplification, the MV8300_U1B achieves high efficiency without compromising sound quality. This technology allows for a more compact design while still providing significant power reserves, resulting in impressive dynamic range and clarity. The amplifier is engineered to produce an immersive soundstage with detailed imaging, providing listeners with a unique auditory experience.

Connectivity options are plentiful on the MV8300_U1B, including multiple line inputs for versatile integration with various audio sources. The unit also features built-in DAC capabilities, allowing for the conversion of high-resolution digital audio formats, which adds convenience for those who stream music and use digital devices. With Marantz's commitment to quality craftsmanship, the MV8300_U1B is built using premium components, further enhancing its performance and reliability.

The design of the MV8300_U1B reflects Marantz's dedication to aesthetics as well as functionality. Its sleek, modern appearance is characterized by a minimalist front panel, intuitive controls, and LED indicators that provide clear feedback. The robust construction not only contributes to its durability but also helps minimize vibration, ensuring that audio performance remains unaffected.

Additionally, the MV8300_U1B includes advanced thermal management systems that prevent overheating, allowing for continuous operation during long listening sessions. This ensures that the amplifier maintains its performance and longevity, providing owners with a reliable audio solution for years to come.

In conclusion, the Marantz MV8300_U1B is an excellent choice for audiophiles seeking a powerful amplifier that combines cutting-edge technology with superb audio reproduction. Its impressive features, robust build quality, and aesthetic appeal make it an ideal addition to any serious audio setup.