ENGLISH
|
|
|
|
|
|
|
|
|
|
|
|
| Part names and functions | ||
Display |
|
|
|
|
|
| Rear panel | ||||||||
o | i u y | t | r | e |
|
| |||||||||
|
|
|
|
|
|
|
|
|
|
|
|
|
|
|
|
|
|
|
|
|
|
|
|
|
|
|
|
|
|
|
|
|
|
|
|
|
|
|
|
|
|
|
|
|
|
|
|
|
|
|
|
|
|
|
|
|
|
|
|
|
|
|
|
q | w | q | w | e r t | y |
|
|
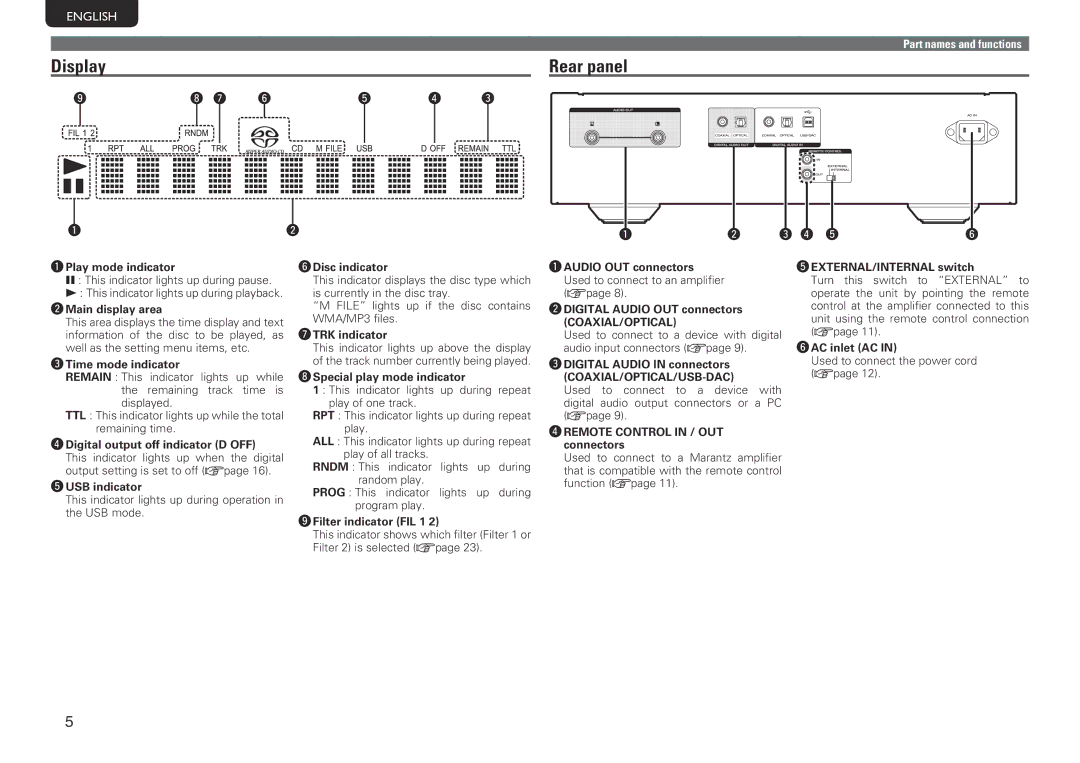
qPlay mode indicator
3 : This indicator lights up during pause.
1: This indicator lights up during playback.
wMain display area
This area displays the time display and text information of the disc to be played, as well as the setting menu items, etc.
eTime mode indicator
REMAIN : This indicator lights up while the remaining track time is displayed.
TTL : This indicator lights up while the total remaining time.
rDigital output off indicator (D OFF) This indicator lights up when the digital output setting is set to off (vpage 16).
tUSB indicator
This indicator lights up during operation in the USB mode.
yDisc indicator
This indicator displays the disc type which is currently in the disc tray.
“M FILE” lights up if the disc contains WMA/MP3 files.
uTRK indicator
This indicator lights up above the display of the track number currently being played.
iSpecial play mode indicator
1 : This indicator lights up during repeat play of one track.
RPT : This indicator lights up during repeat play.
ALL : This indicator lights up during repeat play of all tracks.
RNDM : This indicator lights up during random play.
PROG : This indicator lights up during program play.
oFilter indicator (FIL 1 2)
This indicator shows which filter (Filter 1 or Filter 2) is selected (vpage 23).
qAUDIO OUT connectors Used to connect to an amplifier (vpage 8).
wDIGITAL AUDIO OUT connectors
(COAXIAL/OPTICAL)
Used to connect to a device with digital audio input connectors (vpage 9).
eDIGITAL AUDIO IN connectors
Used to connect to a device with digital audio output connectors or a PC (vpage 9).
rREMOTE CONTROL IN / OUT connectors
Used to connect to a Marantz amplifier that is compatible with the remote control function (vpage 11).
tEXTERNAL/INTERNAL switch
Turn this switch to “EXTERNAL” to operate the unit by pointing the remote control at the amplifier connected to this unit using the remote control connection (vpage 11).
yAC inlet (AC IN)
Used to connect the power cord (vpage 12).
5
