ALL ABOUT IMAGE RECOGNITION & PROCESSING
5. Operation
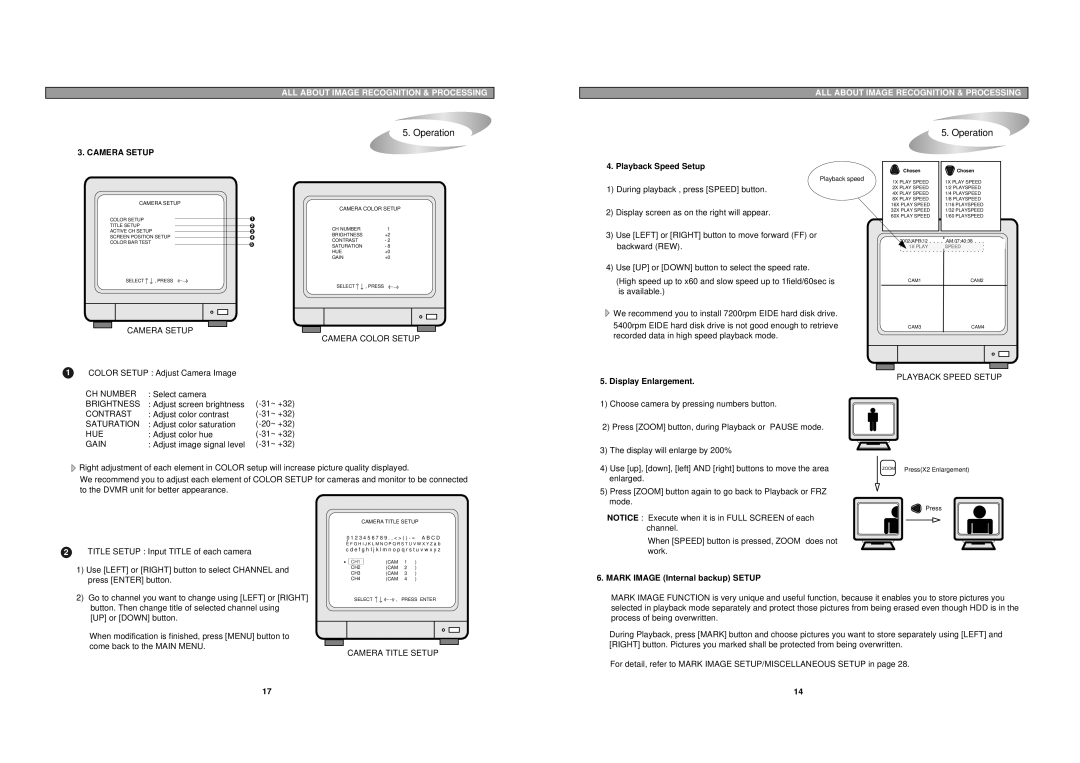
3. CAMERA SETUP
ALL ABOUT IMAGE RECOGNITION & PROCESSING
5. Operation
CAMERA SETUP
CAMERA COLOR SETUP
COLOR SETUP |
|
| 1 |
|
|
|
|
|
| ||
TITLE SETUP |
|
| 2 | CH NUMBER | 1 |
ACTIVE CH SETUP |
|
| 3 | ||
SCREEN POSITION SETUP |
|
| 4 | BRIGHTNESS | +2 |
COLOR BAR TEST |
| 5 | CONTRAST | - 2 | |
| SATURATION | - 8 | |||
|
| ||||
|
|
|
| HUE | +0 |
|
|
|
| GAIN | +0 |
4. Playback Speed Setup
Playback speed
1) During playback , press [SPEED] button. | |
2) | Display screen as on the right will appear. |
3) | Use [LEFT] or [RIGHT] button to move forward (FF) or |
| backward (REW). |
4) | Use [UP] or [DOWN] button to select the speed rate. |
 Chosen
1X PLAY SPEED
2X PLAY SPEED
4X PLAY SPEED
8X PLAY SPEED
16X PLAY SPEED
32X PLAY SPEED
60X PLAY SPEED
2002/APR/12
1X PLAY
![]() Chosen
Chosen
1X PLAY SPEED 1/2 PLAYSPEED 1/4 PLAYSPEED 1/8 PLAYSPEED 1/16 PLAYSPEED 1/32 PLAYSPEED 1/60 PLAYSPEED
AM 07:40:38
SPEED
SELECT | , PRESS |
|
| SELECT | , PRESS |
CAMERA SETUP ![]()
![]()
![]()
![]()
![]() CAMERA COLOR SETUP
CAMERA COLOR SETUP
1COLOR SETUP : Adjust Camera Image
CH NUMBER | : Select camera | |
BRIGHTNESS | : Adjust screen brightness | |
CONTRAST | : Adjust color contrast | |
SATURATION | : Adjust color saturation | |
HUE | : Adjust color hue | |
GAIN | : Adjust image signal level |
![]() Right adjustment of each element in COLOR setup will increase picture quality displayed.
Right adjustment of each element in COLOR setup will increase picture quality displayed.
We recommend you to adjust each element of COLOR SETUP for cameras and monitor to be connected to the DVMR unit for better appearance.
(High speed up to x60 and slow speed up to 1field/60sec is |
is available.) |
![]() We recommend you to install 7200rpm EIDE hard disk drive.
We recommend you to install 7200rpm EIDE hard disk drive.
5400rpm EIDE hard disk drive is not good enough to retrieve recorded data in high speed playback mode.
5. Display Enlargement.
1)Choose camera by pressing numbers button.
2)Press [ZOOM] button, during Playback or PAUSE mode.
3) | The display will enlarge by 200% |
4) | Use [up], [down], [left] AND [right] buttons to move the area |
| enlarged. |
5) | Press [ZOOM] button again to go back to Playback or FRZ |
| mode. |
CAM1CAM2
CAM3CAM4
PLAYBACK SPEED SETUP
ZOOM Press(X2 Enlargement)
2 | TITLE SETUP : Input TITLE of each camera |
CAMERA TITLE SETUP
0 1 2 3 4 5 6 7 8 9 . , < > ( ) - = A B C D
▲
E F G H I J K L M N O P Q R S T U V W X Y Z a b
c d e f g h I j k l m n o p q r s t u v w x y z
NOTICE : Execute when it is in FULL SCREEN of each channel.
When [SPEED] button is pressed, ZOOM does not work.
![]() Press
Press
1) Use [LEFT] or [RIGHT] button to select CHANNEL and |
press [ENTER] button. |
2) Go to channel you want to change using [LEFT] or [RIGHT] |
button. Then change title of selected channel using |
[UP] or [DOWN] button. |
When modification is finished, press [MENU] button to |
come back to the MAIN MENU. |
▶ | CH1 | (CAM | 1 | ) |
| CH2 | (CAM | 2 | ) |
| CH3 | (CAM | 3 | ) |
| CH4 | (CAM | 4 | ) |
SELECT ![]()
![]() , PRESS ENTER
, PRESS ENTER
CAMERA TITLE SETUP
6. MARK IMAGE (Internal backup) SETUP
MARK IMAGE FUNCTION is very unique and useful function, because it enables you to store pictures you selected in playback mode separately and protect those pictures from being erased even though HDD is in the process of being overwritten.
During Playback, press [MARK] button and choose pictures you want to store separately using [LEFT] and [RIGHT] button. Pictures you marked shall be protected from being overwritten.
For detail, refer to MARK IMAGE SETUP/MISCELLANEOUS SETUP in page 28.
17 | 14 |