ALL ABOUT IMAGE RECOGNITION & PROCESSING
ALL ABOUT IMAGE RECOGNITION & PROCESSING
3. Unit Description
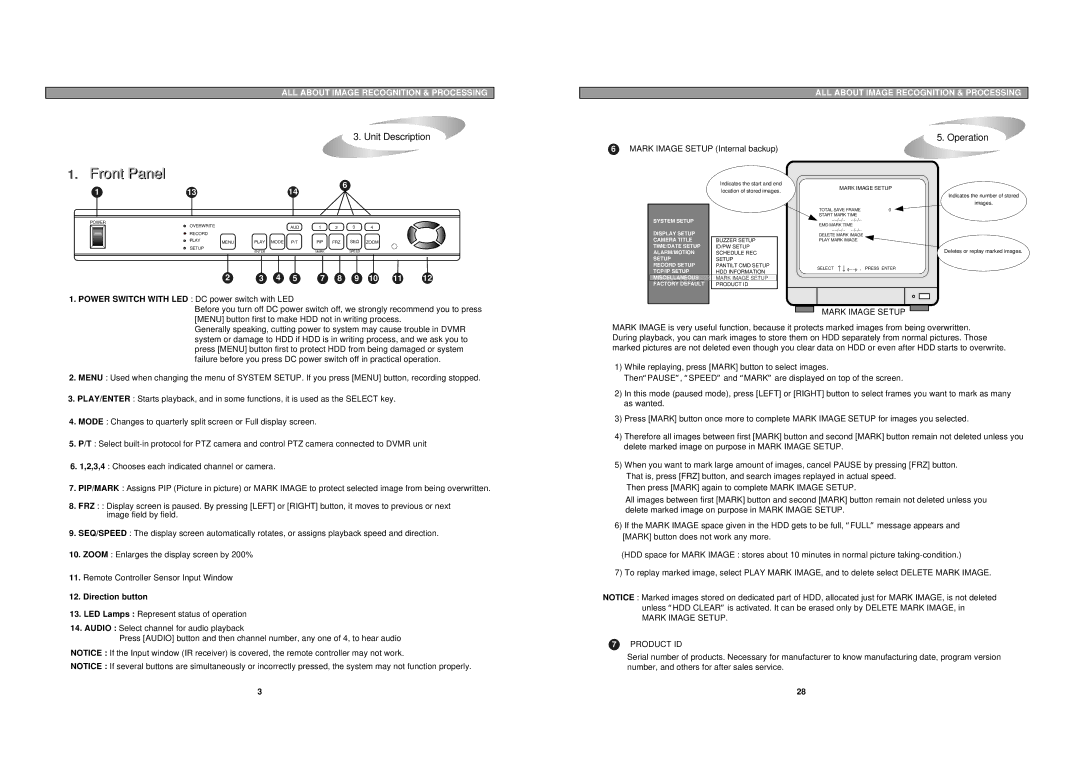
1.Front Panell
1 | 13 |
|
|
| 14 |
|
| 6 |
|
|
|
|
|
|
|
| |||
POWER | OVERWRITE |
|
|
| AUD | 1 | 2 | 3 | 4 |
|
|
|
| ||||||
| RECORD |
|
|
|
|
|
|
|
|
| PLAY | MENU | PLAY | MODE | P/T | PIP | FRZ | SEQ | ZOOM |
| SETUP |
| ENTER |
|
| MARK |
| SPEED |
|
|
|
|
|
|
|
|
2 3 4 5 7 8 9 10 11 12
1.POWER SWITCH WITH LED : DC power switch with LED
6MARK IMAGE SETUP (Internal backup)
|
|
| Indicates the start and end | ||
|
|
| location of stored images. | ||
|
|
|
|
|
|
SYSTEM SETUP |
|
|
|
|
|
DISPLAY SETUP |
|
|
|
|
|
CAMERA TITLE |
| BUZZER SETUP |
| ||
TIME/DATE SETUP |
| ID/PW SETUP |
| ||
ALARM/MOTION |
| SCHEDULE REC |
| ||
SETUP |
| SETUP |
| ||
RECORD SETUP |
| PANTILT CMD SETUP |
| ||
TCP/IP SETUP |
| HDD INFORMATION |
| ||
MISCELLANEOUS |
| MARK IMAGE SETUP |
|
| |
FACTORY DEFAULT |
| PRODUCT ID |
|
| |
|
|
|
|
|
|
5. Operation
MARK IMAGE SETUP
|
|
|
| Indicates the number of stored |
|
|
|
|
| images. |
|
TOTAL SAVE FRAME | 0 |
|
|
| |
START MARK TIME |
|
|
|
|
|
|
|
|
| ||
EMD MARK TIME |
|
|
|
|
|
|
|
|
| ||
DELETE MARK IMAGE |
|
|
|
| |
PLAY MARK IMAGE |
|
|
|
|
|
|
|
|
| ||
|
|
| Deletes or replay marked images. | ||
SELECT | , | PRESS ENTER | |||
Before you turn off DC power switch off, we strongly recommend you to press [MENU] button first to make HDD not in writing process.
Generally speaking, cutting power to system may cause trouble in DVMR system or damage to HDD if HDD is in writing process, and we ask you to press [MENU] button first to protect HDD from being damaged or system failure before you press DC power switch off in practical operation.
2.MENU : Used when changing the menu of SYSTEM SETUP. If you press [MENU] button, recording stopped.
3.PLAY/ENTER : Starts playback, and in some functions, it is used as the SELECT key.
4.MODE : Changes to quarterly split screen or Full display screen.
5.P/T : Select
6.1,2,3,4 : Chooses each indicated channel or camera.
7.PIP/MARK : Assigns PIP (Picture in picture) or MARK IMAGE to protect selected image from being overwritten.
8.FRZ : : Display screen is paused. By pressing [LEFT] or [RIGHT] button, it moves to previous or next
image field by field.
9.SEQ/SPEED : The display screen automatically rotates, or assigns playback speed and direction.
10.ZOOM : Enlarges the display screen by 200%
11.Remote Controller Sensor Input Window
12.Direction button
13.LED Lamps : Represent status of operation
14.AUDIO : Select channel for audio playback
Press [AUDIO] button and then channel number, any one of 4, to hear audio
NOTICE : If the Input window (IR receiver) is covered, the remote controller may not work.
NOTICE : If several buttons are simultaneously or incorrectly pressed, the system may not function properly.
3
MARK IMAGE SETUP
MARK IMAGE is very useful function, because it protects marked images from being overwritten. During playback, you can mark images to store them on HDD separately from normal pictures. Those marked pictures are not deleted even though you clear data on HDD or even after HDD starts to overwrite.
1)While replaying, press [MARK] button to select images.
Then“PAUSE”, “SPEED” and “MARK” are displayed on top of the screen.
2)In this mode (paused mode), press [LEFT] or [RIGHT] button to select frames you want to mark as many as wanted.
3)Press [MARK] button once more to complete MARK IMAGE SETUP for images you selected.
4)Therefore all images between first [MARK] button and second [MARK] button remain not deleted unless you delete marked image on purpose in MARK IMAGE SETUP.
5)When you want to mark large amount of images, cancel PAUSE by pressing [FRZ] button.
That is, press [FRZ] button, and search images replayed in actual speed. Then press [MARK] again to complete MARK IMAGE SETUP.
All images between first [MARK] button and second [MARK] button remain not deleted unless you delete marked image on purpose in MARK IMAGE SETUP.
6)If the MARK IMAGE space given in the HDD gets to be full, “FULL” message appears and [MARK] button does not work any more.
(HDD space for MARK IMAGE : stores about 10 minutes in normal picture
7) To replay marked image, select PLAY MARK IMAGE, and to delete select DELETE MARK IMAGE.
NOTICE : Marked images stored on dedicated part of HDD, allocated just for MARK IMAGE, is not deleted unless “HDD CLEAR” is activated. It can be erased only by DELETE MARK IMAGE, in
MARK IMAGE SETUP.
7PRODUCT ID
Serial number of products. Necessary for manufacturer to know manufacturing date, program version number, and others for after sales service.
28