ALL ABOUT IMAGE RECOGNITION & PROCESSING
ALL ABOUT IMAGE RECOGNITION & PROCESSING
4. Systemt Setup
5. Operation
5. Operation
2. DISPLAY SETUP
1.Basic Operation
1)In SYSTEM SETUP menu, you can set variety of parameters required for operation of DVMR unit to its best performance for your application.
2)To enter into SYSTEM SETUP, first press [MENU] button, and you are requested to enter password (administrator password).
3)Input password and press [MENU] button to enter into
SYSTEM SETUP.
SYSTEM SETUP
DISPLAY SETUP
CAMERA TITLE
TIME/DATE SETUP
ALARM/MOTION SETUP
RECORD SETUP
TCP/IP SETUP
MISCELLANEOUS
FACTORY DEFAULT
SELECT UP/DOWN , ENTER
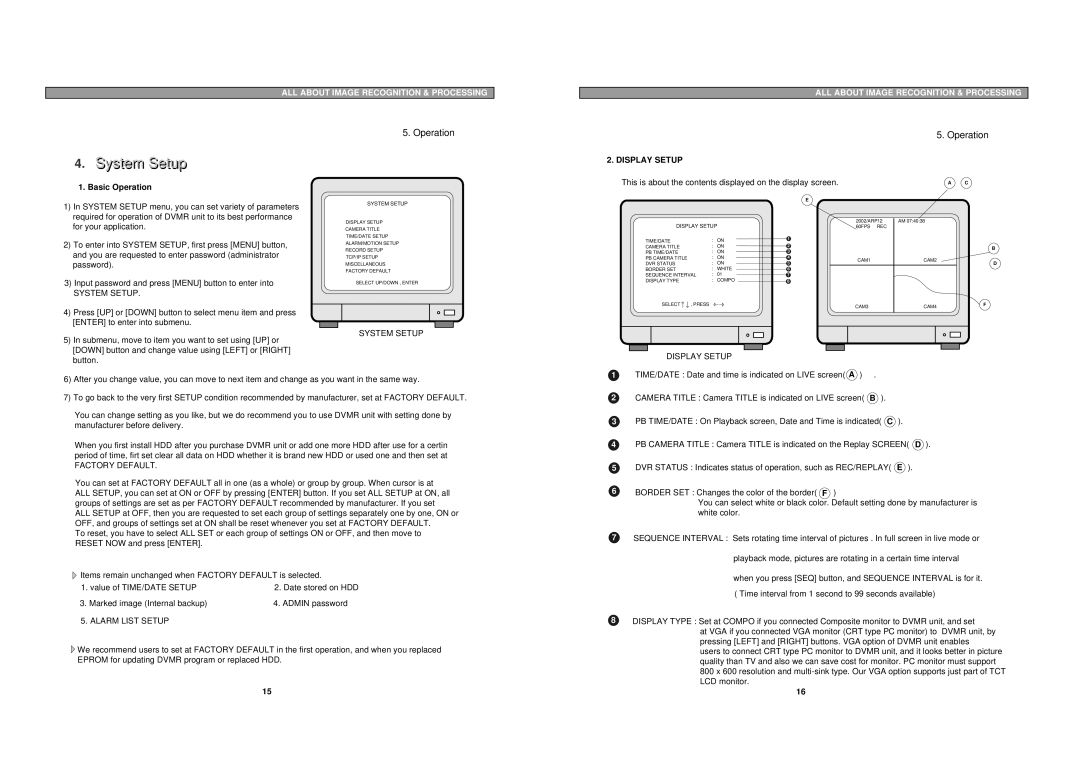
This is about the contents displayed on the display screen.
E
DISPLAY SETUP
TIME/DATE | : | ON | 1 | ||
CAMERA TITLE | : | ON | 2 | ||
PB TIME/DATE | : | ON | 3 | ||
PB CAMERA TITLE | : | ON | 4 | ||
DVR STATUS | : | ON | 5 | ||
BORDER SET | : | WHITE | 6 | ||
SEQUENCE INTERVAL | : | 01 |
|
| 7 |
DISPLAY TYPE | : | COMPO |
| 8 | |
| |||||
| A | C |
2002/ARP12 | AM 07:40:38 |
|
60FPS REC |
|
|
|
| B |
CAM1 | CAM2 | D |
|
|
4) Press [UP] or [DOWN] button to select menu item and press [ENTER] to enter into submenu.
SELECT | , PRESS | CAM3 | CAM4 | F |
|
|
|
5) In submenu, move to item you want to set using [UP] or [DOWN] button and change value using [LEFT] or [RIGHT] button.
SYSTEM SETUP
| DISPLAY SETUP |
1 | TIME/DATE : Date and time is indicated on LIVE screen( A ) . |
6) After you change value, you can move to next item and change as you want in the same way.
7) To go back to the very first SETUP condition recommended by manufacturer, set at FACTORY DEFAULT.
You can change setting as you like, but we do recommend you to use DVMR unit with setting done by manufacturer before delivery.
When you first install HDD after you purchase DVMR unit or add one more HDD after use for a certin period of time, firt set clear all data on HDD whether it is brand new HDD or used one and then set at
FACTORY DEFAULT.
You can set at FACTORY DEFAULT all in one (as a whole) or group by group. When cursor is at ALL SETUP, you can set at ON or OFF by pressing [ENTER] button. If you set ALL SETUP at ON, all groups of settings are set as per FACTORY DEFAULT recommended by manufacturer. If you set ALL SETUP at OFF, then you are requested to set each group of settings separately one by one, ON or OFF, and groups of settings set at ON shall be reset whenever you set at FACTORY DEFAULT.
To reset, you have to select ALL SET or each group of settings ON or OFF, and then move to RESET NOW and press [ENTER].
![]() Items remain unchanged when FACTORY DEFAULT is selected.
Items remain unchanged when FACTORY DEFAULT is selected.
1. value of TIME/DATE SETUP | 2. Date stored on HDD |
3. Marked image (Internal backup) | 4. ADMIN password |
5. ALARM LIST SETUP |
|
![]() We recommend users to set at FACTORY DEFAULT in the first operation, and when you replaced EPROM for updating DVMR program or replaced HDD.
We recommend users to set at FACTORY DEFAULT in the first operation, and when you replaced EPROM for updating DVMR program or replaced HDD.
15
2CAMERA TITLE : Camera TITLE is indicated on LIVE screen( B ).
3PB TIME/DATE : On Playback screen, Date and Time is indicated( C ).
4PB CAMERA TITLE : Camera TITLE is indicated on the Replay SCREEN( D ).
5DVR STATUS : Indicates status of operation, such as REC/REPLAY( E ).
6BORDER SET : Changes the color of the border( F )
You can select white or black color. Default setting done by manufacturer is white color.
7SEQUENCE INTERVAL : Sets rotating time interval of pictures . In full screen in live mode or
playback mode, pictures are rotating in a certain time interval
when you press [SEQ] button, and SEQUENCE INTERVAL is for it.
( Time interval from 1 second to 99 seconds available)
8DISPLAY TYPE : Set at COMPO if you connected Composite monitor to DVMR unit, and set
at VGA if you connected VGA monitor (CRT type PC monitor) to DVMR unit, by pressing [LEFT] and [RIGHT] buttons. VGA option of DVMR unit enables
users to connect CRT type PC monitor to DVMR unit, and it looks better in picture quality than TV and also we can save cost for monitor. PC monitor must support 800 x 600 resolution and
16