ALL ABOUT IMAGE RECOGNITION & PROCESSING
4. Installation
▶Procedure
ALL ABOUT IMAGE RECOGNITION & PROCESSING
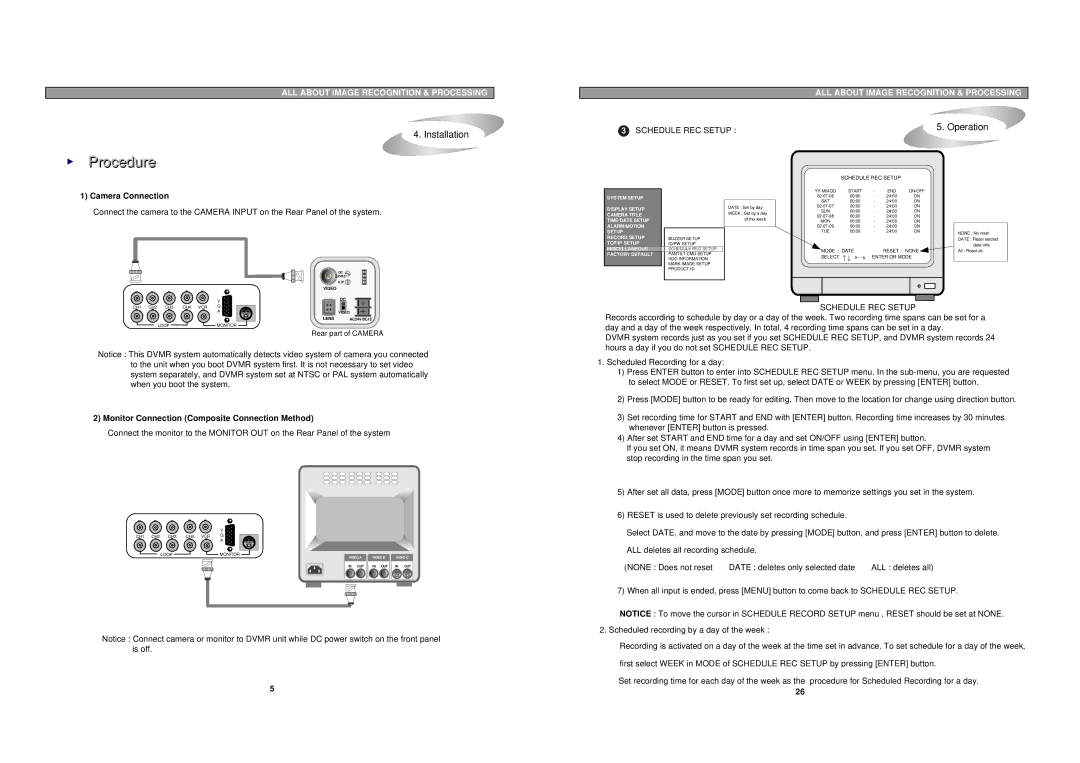
3 SCHEDULE REC SETUP : | 5. Operation |
|
1) Camera Connection
Connect the camera to the CAMERA INPUT on the Rear Panel of the system.
| DC |
| LEVEL |
| V.P |
| VIDEO |
V | DC |
SYSTEM SETUP |
|
|
|
DISPLAY SETUP |
|
| DATE : Set by day |
CAMERA TITLE |
|
| WEEK : Set by a day |
TIME/DATE SETUP |
|
| of the week |
ALARM/MOTION |
|
|
|
SETUP |
|
|
|
RECORD SETUP |
| BUZZER SETUP |
|
TCP/IP SETUP |
| ID/PW SETUP |
|
MISCELLANEOUS |
| SCHEDULE REC SETUP |
|
FACTORY DEFAULT |
| PANTILT CMD SETUP |
|
|
| HDD INFORMATION |
|
|
| MARK IMAGE SETUP |
|
|
| PRODUCT ID |
|
|
|
|
|
SCHEDULE REC SETUP
START | - | END | ON/OFF | |
00:00 | - | 24:00 | ON | |
SAT | 00:00 | - | 24:00 | ON |
00:00 | - | 24:00 | ON | |
SUN | 00:00 | - | 24:00 | ON |
00:00 | - | 24:00 | ON | |
MON | 00:00 | - | 24:00 | ON |
00:00 | - | 24:00 | ON | |
TUE | 00:00 | - | 24:00 | ON |
|
| MODE : DATE | RESET : NONE | |||||
|
| SELECT | , ENTER OR MODE | |||||
|
|
|
|
|
|
|
|
|
|
|
|
|
|
|
|
|
|
|
|
|
|
|
|
|
|
|
|
|
|
|
|
|
|
|
|
|
|
|
|
|
|
|
|
|
|
|
|
|
|
|
|
|
|
NONE : No reset
DATE : Reset selcted date only
All : Reset all.
CH1 CH2 CH3 | CH4 VCR | G |
|
|
| A | VIDEO |
|
| LENS | AC24V/DC12 |
LOOP | MONITOR |
Rear part of CAMERA
Notice : This DVMR system automatically detects video system of camera you connected to the unit when you boot DVMR system first. It is not necessary to set video system separately, and DVMR system set at NTSC or PAL system automatically when you boot the system.
2) Monitor Connection (Composite Connection Method)
Connect the monitor to the MONITOR OUT on the Rear Panel of the system
|
| V |
|
|
CH1 CH2 CH3 | CH4 VCR | G |
|
|
|
| A |
|
|
LOOP |
| MONITOR | VIDEO B | VIDEO C |
|
| VIDEO A | ||
|
| IN OUT | IN OUT | IN OUT |
Notice : Connect camera or monitor to DVMR unit while DC power switch on the front panel is off.
5
SCHEDULE REC SETUP
Records according to schedule by day or a day of the week. Two recording time spans can be set for a day and a day of the week respectively. In total, 4 recording time spans can be set in a day.
DVMR system records just as you set if you set SCHEDULE REC SETUP, and DVMR system records 24 hours a day if you do not set SCHEDULE REC SETUP.
1.Scheduled Recording for a day:
1)Press ENTER button to enter into SCHEDULE REC SETUP menu. In the
2)Press [MODE] button to be ready for editing. Then move to the location for change using direction button.
3)Set recording time for START and END with [ENTER] button. Recording time increases by 30 minutes whenever [ENTER] button is pressed.
4)After set START and END time for a day and set ON/OFF using [ENTER] button.
If you set ON, it means DVMR system records in time span you set. If you set OFF, DVMR system stop recording in the time span you set.
5)After set all data, press [MODE] button once more to memorize settings you set in the system.
6)RESET is used to delete previously set recording schedule.
Select DATE, and move to the date by pressing [MODE] button, and press [ENTER] button to delete.
ALL deletes all recording schedule.
(NONE : Does not reset DATE : deletes only selected date ALL : deletes all)
7) When all input is ended, press [MENU] button to come back to SCHEDULE REC SETUP.
NOTICE : To move the cursor in SCHEDULE RECORD SETUP menu , RESET should be set at NONE.
2. Scheduled recording by a day of the week :
Recording is activated on a day of the week at the time set in advance. To set schedule for a day of the week,
first select WEEK in MODE of SCHEDULE REC SETUP by pressing [ENTER] button.
Set recording time for each day of the week as the procedure for Scheduled Recording for a day.
26