ALL ABOUT IMAGE RECOGNITION & PROCESSING
6. RECORD SETUP | 5. Operation |
RECORD SETUP is one of the most important settings in DVMR system. In this menu, you can select simplex operation or semi- duplex operation with a certain ratio between playback and
ALL ABOUT IMAGE RECOGNITION & PROCESSING
7) HDD connection |
|
| 4. Installation | |||||||||||
|
|
|
|
|
|
|
|
|
|
|
|
|
|
|
|
|
|
|
|
|
|
|
|
|
|
|
|
|
|
|
|
|
|
|
|
|
|
|
|
|
|
|
|
|
recording.
The difference between SIMPLEX and SEMI- DUPLEX (selected with a certain ratio between playback and recording) operation is as follows.
Simplex : recording stopped in playback
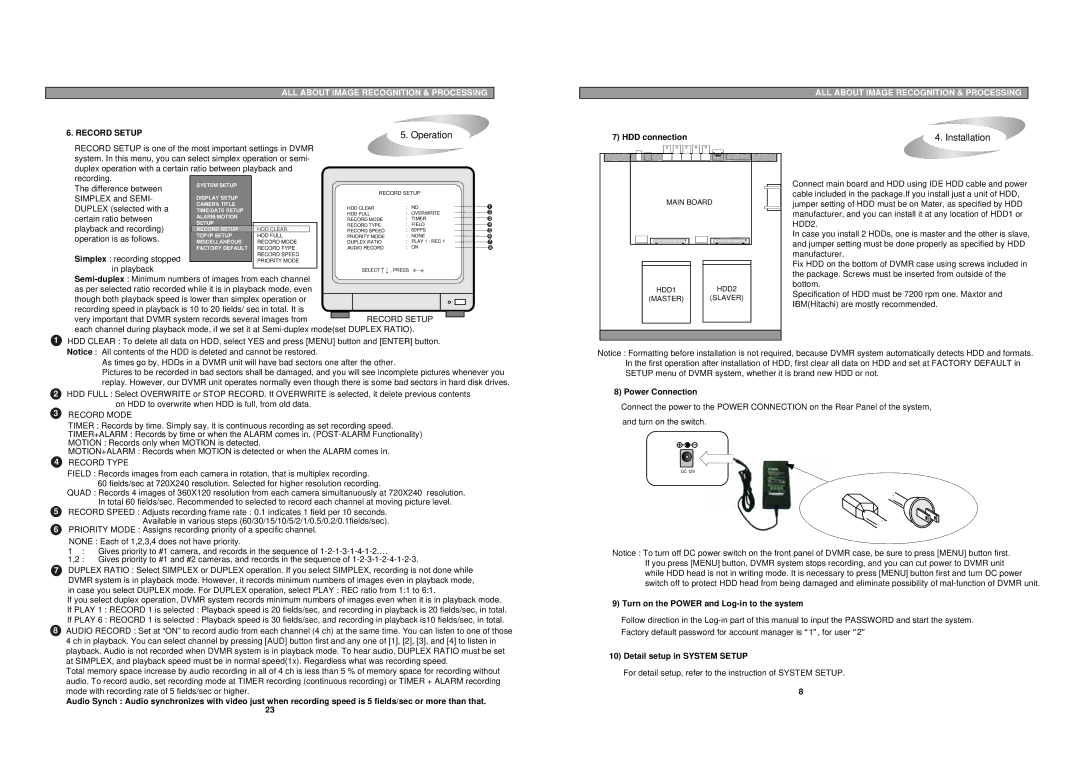
SYSTEM SETUP |
|
|
|
|
DISPLAY SETUP |
| RECORD SETUP |
| |
|
|
|
| |
CAMERA TITLE |
| HDD CLEAR | : NO | 1 |
TIME/DATE SETUP |
| |||
| HDD FULL | : OVERWRITE | 2 | |
ALARM/MOTION |
| RECORD MODE | : TIMER | 3 |
SETUP | HDD CLEAR | RECORD TYPE | : FIELD | 4 |
RECORD SETUP | RECORD SPEED | : 60FPS | 5 | |
TCP/IP SETUP | HDD FULL | PRIORITY MODE | : NONE | 6 |
MISCELLANEOUS | RECORD MODE | DUPLEX RATIO | : PLAY 1 : REC 1 | 7 |
FACTORY DEFAULT | RECORD TYPE | AUDIO RECORD | : ON | 8 |
| RECORD SPEED |
|
|
|
| PRIORITY MODE |
|
|
|
|
| SELECT | , PRESS |
|
MAIN BOARD
Connect main board and HDD using IDE HDD cable and power cable included in the package.If you install just a unit of HDD, jumper setting of HDD must be on Mater, as specified by HDD manufacturer, and you can install it at any location of HDD1 or HDD2.
In case you install 2 HDDs, one is master and the other is slave, and jumper setting must be done properly as specified by HDD manufacturer.
Fix HDD on the bottom of DVMR case using screws included in the package. Screws must be inserted from outside of the
very important that DVMR system records several images from ![]() RECORD SETUP each channel during playback mode, if we set it at
RECORD SETUP each channel during playback mode, if we set it at
HDD1 | HDD2 |
(MASTER) | (SLAVER) |
bottom.
Specification of HDD must be 7200 rpm one. Maxtor and IBM(Hitachi) are mostly recommended.
1HDD CLEAR : To delete all data on HDD, select YES and press [MENU] button and [ENTER] button.
Notice : All contents of the HDD is deleted and cannot be restored.
As times go by, HDDs in a DVMR unit will have bad sectors one after the other.
Pictures to be recorded in bad sectors shall be damaged, and you will see incomplete pictures whenever you replay. However, our DVMR unit operates normally even though there is some bad sectors in hard disk drives.
2HDD FULL : Select OVERWRITE or STOP RECORD. If OVERWRITE is selected, it delete previous contents
on HDD to overwrite when HDD is full, from old data.
3RECORD MODE
TIMER : Records by time. Simply say, it is continuous recording as set recording speed.
TIMER+ALARM : Records by time or when the ALARM comes in.
MOTION : Records only when MOTION is detected.
MOTION+ALARM : Records when MOTION is detected or when the ALARM comes in.
4RECORD TYPE
FIELD : Records images from each camera in rotation, that is multiplex recording. 60 fields/sec at 720X240 resolution. Selected for higher resolution recording.
QUAD : Records 4 images of 360X120 resolution from each camera simultanuously at 720X240 resolution. In total 60 fields/sec. Recommended to selected to record each channel at moving picture level.
5RECORD SPEED : Adjusts recording frame rate : 0.1 indicates 1 field per 10 seconds.
Available in various steps (60/30/15/10/5/2/1/0.5/0.2/0.1fields/sec).
6PRIORITY MODE : Assigns recording priority of a specific channel.
NONE : Each of 1,2,3,4 does not have priority.
1 : Gives priority to #1 camera, and records in the sequence of
1,2 : Gives priority to #1 and #2 cameras, and records in the sequence of
7DUPLEX RATIO : Select SIMPLEX or DUPLEX operation. If you select SIMPLEX, recording is not done while DVMR system is in playback mode. However, it records minimum numbers of images even in playback mode, in case you select DUPLEX mode. For DUPLEX operation, select PLAY : REC ratio from 1:1 to 6:1.
If you select duplex operation, DVMR system records minimum numbers of images even when it is in playback mode. If PLAY 1 : RECORD 1 is selected : Playback speed is 20 fields/sec, and recording in playback is 20 fields/sec, in total. If PLAY 6 : REOCRD 1 is selected : Playback speed is 30 fields/sec, and recording in playback is10 fields/sec, in total.
8AUDIO RECORD : Set at “ON” to record audio from each channel (4 ch) at the same time. You can listen to one of those 4 ch in playback. You can select channel by pressing [AUD] button first and any one of [1], [2], [3], and [4] to listen in playback. Audio is not recorded when DVMR system is in playback mode. To hear audio, DUPLEX RATIO must be set at SIMPLEX, and playback speed must be in normal speed(1x). Regardless what was recording speed.
Total memory space increase by audio recording in all of 4 ch is less than 5 % of memory space for recording without audio. To record audio, set recording mode at TIMER recording (continuous recording) or TIMER + ALARM recording mode with recording rate of 5 fields/sec or higher.
Audio Synch : Audio synchronizes with video just when recording speed is 5 fields/sec or more than that. 23
Notice : Formatting before installation is not required, because DVMR system automatically detects HDD and formats. In the first operation after installation of HDD, first clear all data on HDD and set at FACTORY DEFAULT in SETUP menu of DVMR system, whether it is brand new HDD or not.
8) Power Connection
Connect the power to the POWER CONNECTION on the Rear Panel of the system, and turn on the switch.
DC 12V
Notice : To turn off DC power switch on the front panel of DVMR case, be sure to press [MENU] button first. If you press [MENU] button, DVMR system stops recording, and you can cut power to DVMR unit while HDD head is not in writing mode. It is necessary to press [MENU] button first and turn DC power switch off to protect HDD head from being damaged and eliminate possibility of
9)Turn on the POWER and Log-in to the system
Follow direction in the
10)Detail setup in SYSTEM SETUP
For detail setup, refer to the instruction of SYSTEM SETUP.
8