How to remove odors from refrigerator
➢Remove all food.
➢Disconnect refrigerator.
➢Clean the following items using the appropriate instructions in the How to Clean Your Refrigerator table.
–Walls, floor and ceiling of cabinet interior
–Drawers, shelves and gaskets according to the instructions in this section.
➢Pay special attention to clean all crevices by completing the following steps.
–Dilute mild detergent and brush solution into crevices using a plas- tic bristle brush.
–Let stand for 5 minutes.
–Rinse surfaces with warm water. Dry surfaces with a soft, clean cloth.
➢Wash and dry all bottles, containers and jars. Discard spoiled or expired items.
➢Wrap or store
➢Connect power to refrigerator and return food to refrigerator.
➢After 24 hours, check if odor has been eliminated.
If odor is still present:
➢Remove drawers and place on top shelf of refrigerator.
➢Pack refrigerator and freezer sections
– including doors – with crumpled sheets of black and white newspaper.
➢Place charcoal briquettes randomly on crumpled newspaper in both freezer and refrigerator compartments.
➢Close doors and let stand
Energy saving ideas
➢When placing refrigerator into final position, allow for 1⁄2" clearance around the top and sides of the refrigerator to supply ample ventilation for optimum energy efficiency.
➢Avoid overcrowding refrigerator shelves. This reduces air circulation around food and causes refrigerator to run longer.
➢Avoid adding too much warm food to refrigerator at one time. This over- loads compartments and slows rate of cooling.
➢Do not use aluminum foil, wax paper, or paper toweling as shelf liners. This decreases air flow and causes refrig- erator to run less efficiently.
➢A freezer that is 2⁄3 full runs most effi- ciently.
➢Locate refrigerator in coolest part of room. Avoid areas of direct sunlight, or near heating ducts, registers or other heat producing appliances. If this is not possible, isolate exterior by using a section of cabinet or an added layer of insulation.
➢Refer to Owner's Manual section on
How to Adjust the Temperature Controls (page 11) for recommended control settings.
➢Clean door gaskets every three months according to Owner's Manual cleaning instructions. This will assure that door seals properly and refrigera- tor runs efficiently.
➢Take time to organize items in refriger- ator to reduce time that door is open.
➢Be sure your doors are closing securely by leveling refrigerator as instructed in your Owner's Manual.
➢Clean condenser coils as indicated in the Owner’s Manual every 3 months. This will increase energy efficiency and cooling performance.
How to remove and replace light bulbs
![]() WARNING
WARNING
To avoid electrical shock which can cause severe personal injury or death, disconnect power to refrigerator before replacing light bulb. After replacing light bulb, connect power.
![]() CAUTION
CAUTION
To avoid personal injury or property damage, observe the following:
➢Allow light bulb to cool.
➢Wear gloves when replacing light bulb.
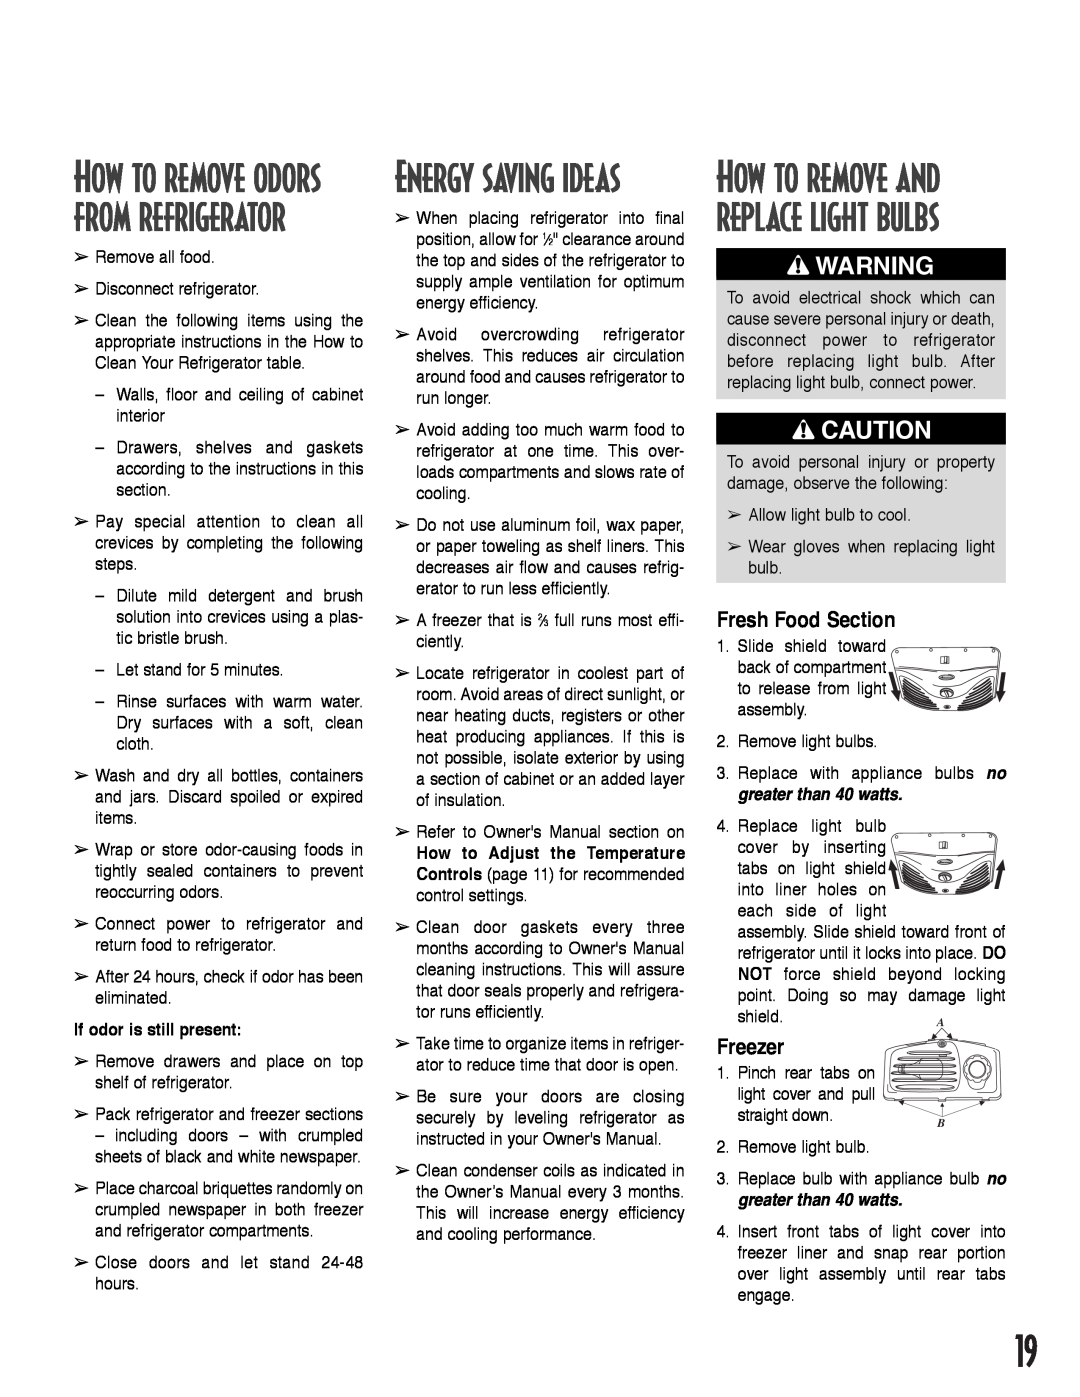
Fresh Food Section
1. Slide shield toward ![]() back of compartment
back of compartment ![]()
to release from light![]()
![]()
![]()
![]()
![]() assembly.
assembly.![]()
![]()
![]()
2.Remove light bulbs.
3.Replace with appliance bulbs no greater than 40 watts.
4.Replace light bulb
cover by inserting
tabs on light shield![]()
![]()
![]()
![]()
![]() into liner holes on
into liner holes on ![]()
![]()
![]() each side of light
each side of light
assembly. Slide shield toward front of refrigerator until it locks into place. DO NOT force shield beyond locking point. Doing so may damage light
shield.A
Freezer
1.Pinch rear tabs on light cover and pull
straight down. | B |
|
2.Remove light bulb.
3.Replace bulb with appliance bulb no greater than 40 watts.
4.Insert front tabs of light cover into freezer liner and snap rear portion over light assembly until rear tabs engage.
19