Installing your refrigerator, cont.

How to install and remove handles

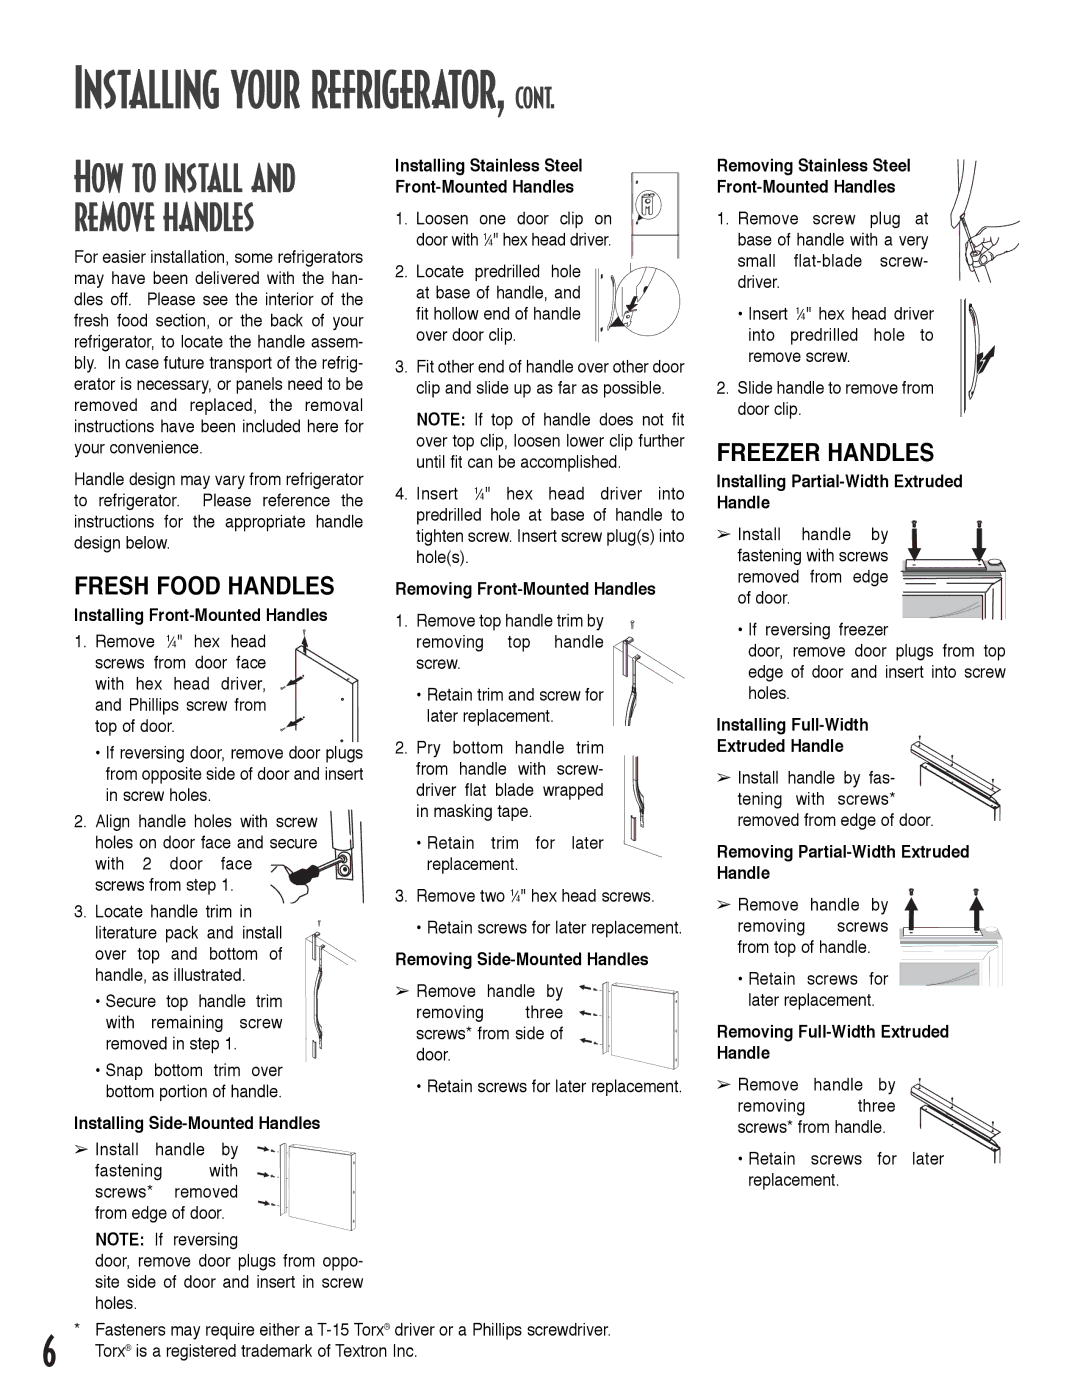
For easier installation, some refrigerators may have been delivered with the han- dles off. Please see the interior of the fresh food section, or the back of your refrigerator, to locate the handle assem- bly. In case future transport of the refrig- erator is necessary, or panels need to be removed and replaced, the removal instructions have been included here for your convenience.

Handle design may vary from refrigerator to refrigerator. Please reference the instructions for the appropriate handle design below.

FRESH FOOD HANDLES

Installing Front-Mounted Handles

1. Remove 14" hex head screws from door face with hex head driver, and Phillips screw from top of door.

If reversing door, remove door plugs from opposite side of door and insert in screw holes.

2.Align handle holes with screw holes on door face and secure

with 2 door face screws from step 1.

3.Locate handle trim in literature pack and install

over top and bottom of handle, as illustrated.

Secure top handle trim with remaining screw

removed in step 1.

Snap bottom trim over bottom portion of handle.

Installing Side-Mounted Handles

Install handle by

fastening with screws* removed from edge of door.

NOTE: If reversing

door, remove door plugs from oppo- site side of door and insert in screw holes.

Installing Stainless Steel

Front-Mounted Handles

1.Loosen one door clip on door with 14" hex head driver.

2.Locate predrilled hole

at base of handle, and fit hollow end of handle over door clip.

3.Fit other end of handle over other door clip and slide up as far as possible.

NOTE: If top of handle does not fit over top clip, loosen lower clip further until fit can be accomplished.

4.Insert 14" hex head driver into predrilled hole at base of handle to tighten screw. Insert screw plug(s) into hole(s).

Removing Front-Mounted Handles

1. Remove top handle trim by removing top handle screw.

• Retain trim and screw for later replacement.

2.Pry bottom handle trim from handle with screw- driver flat blade wrapped

in masking tape.

Retain trim for later replacement.

3.Remove two 14" hex head screws.

Retain screws for later replacement.

Removing Side-Mounted Handles

Remove handle by

removing three screws* from side of door.

• Retain screws for later replacement.

Removing Stainless Steel

Front-Mounted Handles

1. Remove screw plug at base of handle with a very small flat-blade screw- driver.

• Insert 14" hex head driver into predrilled hole to remove screw.

2. Slide handle to remove from door clip.

FREEZER HANDLES

Installing Partial-Width Extruded Handle

Install handle by

fastening with screws removed from edge of door.

If reversing freezer

door, remove door plugs from top edge of door and insert into screw holes.

Installing Full-Width

Extruded Handle

Install handle by fas- tening with screws* removed from edge of door.

Removing Partial-Width Extruded Handle

Remove handle by removing screws from top of handle.

Retain screws for later replacement.

Removing Full-Width Extruded Handle

Remove handle by

removing three

screws* from handle.

• Retain screws for later replacement.

* Fasteners may require either a T-15 Torx® driver or a Phillips screwdriver.

6Torx® is a registered trademark of Textron Inc.

Page 6
Image 6
Maytag ARB2259CC, ARB2557CSL, ARB2257CSR, ARB2557CSR Installing your refrigerator, Fresh Food Handles, Freezer Handles

ARB2257CB, ARB2257CC, AFD2535DEW, ARB2257CSL, ARB2259CW specifications

The Maytag ARB2557CSL, ARB2257CSR, ARB2557CSR, ARB2559CB, and ARB2557CW are a series of innovative refrigerators that combine style, efficiency, and advanced cooling technology to meet the needs of modern kitchens. Each model boasts features designed to enhance usability, maximize storage capacity, and ensure food freshness.

One of the standout features of these Maytag refrigerators is their spacious interiors. With adjustable shelves and humidity-controlled crispers, they provide ample room for storing food items of various sizes. The interior layout is designed to offer flexibility, allowing users to configure the space according to their storage needs.

Furthermore, these models employ the Maytag 10-Year Limited Parts Warranty on the compressor, which underscores the brand’s commitment to durability and reliability. This long-term warranty gives customers peace of mind knowing that their investment is protected for years to come.

Energy efficiency is another hallmark of this series. Many units are Energy Star certified, which means they meet strict energy efficiency guidelines set by the U.S. Environmental Protection Agency. This not only helps reduce energy bills but also minimizes the environmental impact, making these refrigerators a smart choice for eco-conscious consumers.

In terms of cooling technology, the Maytag ARB models incorporate a dual cooling system that maintains consistent temperatures in both the fridge and freezer compartments. This technology helps preserve the natural flavors and nutrients of food, reducing spoilage.

Moreover, these refrigerators feature an innovative ice maker system that produces clear, fast ice, ensuring that you always have ice on hand when entertaining or enjoying a refreshing drink. The ice bin is designed to be easy to access and refill, making everyday use convenient.

Additional features like interior lighting, door bins for quick access to frequently used items, and a sleek, stylish finish elevate the overall aesthetic, enabling these refrigerators to seamlessly blend into the decor of any kitchen.

In summary, the Maytag ARB2557CSL, ARB2257CSR, ARB2557CSR, ARB2559CB, and ARB2557CW models stand out for their robust features, energy efficiency, and reliable performance. They are perfect for families and individuals seeking a refrigerator that combines modern technology with practical functionality.