HD8000
MODEL
HD8000
User Manual
When using the projector in Europe COMPLIANCE NOTICE
SHOCK, DO NOT REMOVE COVER OR BACK NO USER-SERVICEABLE PARTS INSIDE
REFER SERVICING TO QUALIFIED SERVICE PERSONNEL
CAUTION TO REDUCE THE RISK OF ELECTRIC
Contents
Declaration of Conformity
Trademark, Registered trademark
Important safeguards
EN-4
Important safeguards continued
COMPLIANCE NOTICE OF FCC
COMPLIANCE NOTICE OF INDUSTRY CANADA
Preparing your projector
Checking accessories
Inserting the batteries into the remote control
Power supply parts
Control area
Preparating your projector continued
Overview
Terminal board
1 Adjustment feet 2 Air inlet grille/Filter cover 3 Lamp cover
Remote control
Bottom side
Wired remote control jack
Using the wired remote control
Using the remote control
Operational range of the remote control
Reception angle
When the aspect ratio of the screen is
Setting up your projector
Setting up the screen
Screen size and projection distance
When fine streaks are seen on projected images
Setting up your projector continued
Adjusting the projection angle
When projected images are distorted to a trapezoid
Setting up your projector continued
Front projection, ceiling mounting
Rear projection
EN-12
Preparation
A. Connecting the projector to a computer
Viewing computer images
For analog connection
For monitor connection
B. Plugging the power cord
Viewing computer images continued
For audio output connection
EN-15
C. Projecting images
Viewing computer images continued
Preparation
AV mute
When connecting to a notebook computer
To stop projecting
AUTO POSITION button
Viewing video images
A. Connecting the projector to video equipment
Connecting to a video player, etc
When using the BNC connector For VIDEO input
Viewing video images continued
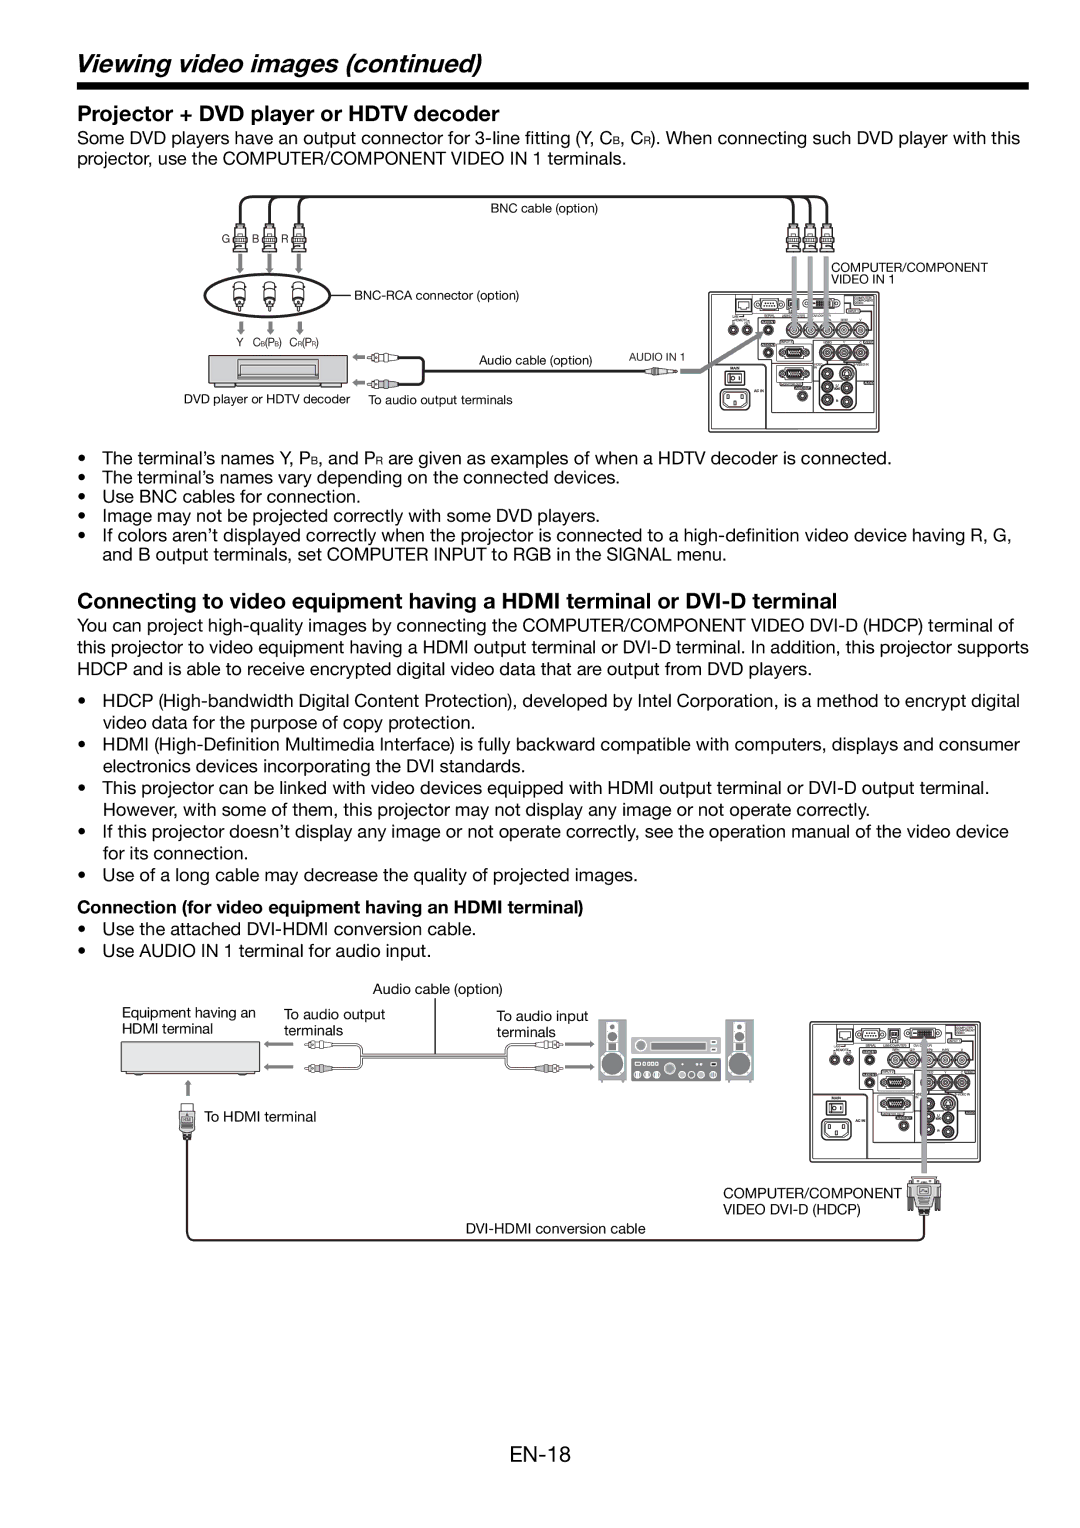
Projector + DVD player or HDTV decoder
Connection for video equipment having an HDMI terminal
EN-19
B. Plugging in the power cord
Viewing video images continued
Connection for video equipment having a DVI-D terminal
EN-20
Viewing video images continued
C. Projecting images
Preparation
How to change the settings With the remote control
Volume from the speaker
Setting the aspect ratio
With the FEATURE menu
2 Not available with certain signals
Menu operation
1 Not available when COLOR ENHANCER is set to sRGB
4 Available only when the input signal is TV60, TV50, 480i, 576i or
How to set the menus
Available settings in the menus
Menu operation continued
2. INSTALLATION menu
Menu operation continued
EN-24
3. FEATURE menu
Menu operation continued
EN-25
SIGNAL - RESOLUTION MEMORIZE menu
4. SIGNAL menu
SIGNAL - USER menu
Menu operation continued
EN-27
5. INFORMATION menu
To adjust the color COLOR and TINT
Adjusting projected images
To adjust the brightness CONTRAST and BRIGHTNESS
To sharpen or soften the projected image SHARPNESS
About color temperature
Adjusting projected images continued
To adjust the tone of white COLOR TEMP
Color Enhancer
How to adjust the computer image
Adjusting projected images continued
EN-30
LPF Progressive filter
How to adjust the image supplied from the computer using the menu
Simple method to adjust the image position
Adjusting projected images continued
Setting of the image displayed during startup or muting
Advanced features
Setting procedure
Set the background color
To cancel the password function
Advanced features continued
Password function
To enable the password function
Advanced features continued
Split
Freeze
To use the split mode
Operation
Mouse remote control
Projector + computer with USB connector
Advanced features continued
ProjectorView
Supervising and controlling by computer
Advanced features continued
PJLink
POWER indicator
Indicators
STATUS indicator
Normal condition
Procedure for changing batteries
Terminal cover with anti-theft alarm device
Procedure for setting the anti-theft alarm device
Installing the terminal cover
Interval of lamp replacement
Replacing the lamp
Replacing the lamp continued
To replace the lamp
Reset of the lamp operation time
Cleaning of the projector and the ventilation slots
Maintenance
Cleaning of the air-filter
Cleaning of the lens
Cleaning the air-filter
Accessory air-filter unit
Attaching the accessory air-filter unit
For the air-filter white
Solution
Troubleshooting
Problem
Power can not be
Solution
Troubleshooting continued
Problem
Problem
Solution
Troubleshooting continued
Problem
Problem
Replacement part option/not included in the box
Specifications
1 Available with the signal for the DVI-D terminal
Specifications continued
Specification of RGB signals in each computer mode of the projector
EN-47
Specifications continued
Connectors
Dimension drawings unit mm
REAL mode
1 Zusho Baba, Nagaokakyo-City, Kyoto Japan
Mitsubishi Projector Warranty, Sales Support and Service Information
MITSUBISHI ELECTRIC CORPORATION
North America