Video Wall setting
Use this feature to configure a (2×2, 3×3, 4×4, 5×5) video wall.
On “OPTION3” menu, select “VIDEO WALL”, then press the MENU/ENTER button.
The “VIDEO WALL” screen appears.
VIDEO WALL
DIVIDER |
| : | OFF |
POSITION |
|
|
|
DISP. MODE | : | SPLIT | |
AUTO ID |
| : | OFF |
IMAGE ADJUST |
|
| |
P. ON DELAY | : | OFF | |
PLE LINK |
| : | OFF |
REPEAT TIMER | : | OFF | |
SEL. | ADJ. |
| EXIT RETURN |
Note: A contingency method of shutting off the electric power should be used in cases of emergency during video wall setup.
DIVIDER
Set the (2⋅ 2) video wall.
Example: Setting “4”
On “DIVIDER” of “VIDEO WALL” menu, select “4”.
VIDEO WALL
DIVIDER |
| : | 4 |
POSITION |
|
|
|
DISP. MODE | : | SPLIT | |
AUTO ID |
| : | OFF |
IMAGE ADJUST |
|
| |
P. ON DELAY | : | OFF | |
PLE LINK |
| : | OFF |
REPEAT TIMER | : | OFF | |
SEL. | ADJ. |
| EXIT RETURN |
Information
⬛DIVIDER settings
OFF, 1: 1 Screen (Matrix display function does not work)
4:4 Screens (2⋅ 2 video wall)
9:9 Screens (3⋅ 3 video wall)
16:16 Screens (4⋅ 4 video wall)
25:25 Screens (5⋅ 5 video wall)
*When selecting a 2⋅ 2, 3⋅ 3, 4⋅ 4, 5⋅ 5 VIDEO WALL POSITION.
VIDEO WALL POSITION
Set the position of each display.
Example: Setting “4”
On “VIDEO WALL” menu, select “POSITION”, then press the MENU/ENTER button.
The “VIDEO WALL POSITION” screen appears. Select “NO. 4” of “POSITION NO.”.
VIDEO WALL POSITION
POSITION NO . ![]() 4
4 ![]()
ADJ. | EXIT RETURN |
Information
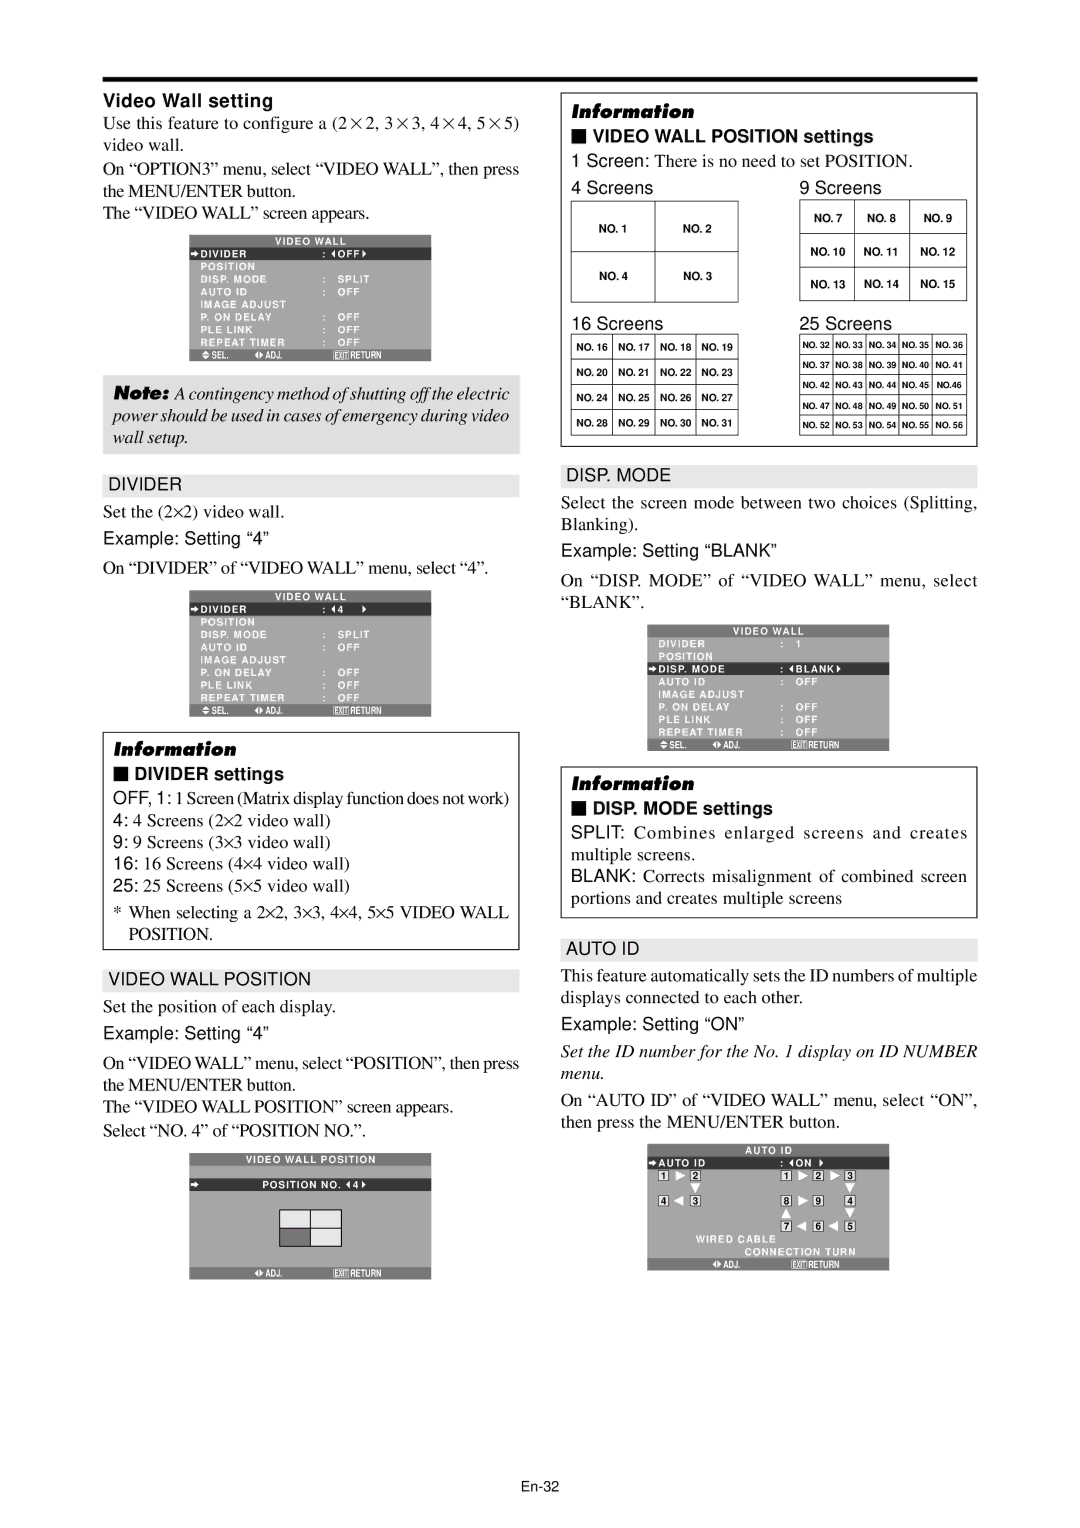
⬛VIDEO WALL POSITION settings
1 | Screen: There is no need to set POSITION. |
| |||||
4 | Screens |
|
| 9 Screens |
| ||
| NO. 1 | NO. 2 |
| NO. 7 | NO. 8 |
| NO. 9 |
|
|
|
|
|
| ||
|
|
|
| NO. 10 | NO. 11 |
| NO. 12 |
| NO. 4 | NO. 3 | |||||
|
|
|
|
|
| ||
|
| NO. 13 | NO. 14 |
| NO. 15 | ||
|
|
|
|
| |||
|
|
|
|
|
|
|
|
16 Screens |
|
| 25 Screens |
|
| |||||
NO. 16 | NO. 17 | NO. 18 | NO. 19 |
| NO. 32 | NO. 33 | NO. 34 | NO. 35 | NO. 36 | |
|
|
|
|
| NO. 37 | NO. 38 | NO. 39 | NO. 40 | NO. 41 | |
NO. 20 | NO. 21 | NO. 22 | NO. 23 |
| ||||||
|
|
|
|
|
| |||||
|
|
|
|
| NO. 42 | NO. 43 | NO. 44 | NO. 45 | NO.46 | |
NO. 24 | NO. 25 | NO. 26 | NO. 27 | |||||||
|
|
|
|
|
| |||||
| NO. 47 | NO. 48 | NO. 49 | NO. 50 | NO. 51 | |||||
|
|
|
|
| ||||||
NO. 28 | NO. 29 | NO. 30 | NO. 31 |
|
|
|
|
|
| |
| NO. 52 | NO. 53 | NO. 54 | NO. 55 | NO. 56 | |||||
|
|
|
|
|
|
|
|
|
| |
DISP. MODE
Select the screen mode between two choices (Splitting, Blanking).
Example: Setting “BLANK”
On “DISP. MODE” of “VIDEO WALL” menu, select “BLANK”.
VIDEO WALL
DIVIDER |
| : | 1 |
POSITION |
|
|
|
DISP. MODE | : | BLANK | |
AUTO ID |
| : | OFF |
IMAGE ADJUST |
|
| |
P. ON DELAY | : | OFF | |
PLE LINK |
| : | OFF |
REPEAT TIMER | : | OFF | |
SEL. | ADJ. |
| EXIT RETURN |
Information
⬛DISP. MODE settings
SPLIT: Combines enlarged screens and creates multiple screens.
BLANK: Corrects misalignment of combined screen portions and creates multiple screens
AUTO ID
This feature automatically sets the ID numbers of multiple displays connected to each other.
Example: Setting “ON”
Set the ID number for the No. 1 display on ID NUMBER menu.
On “AUTO ID” of “VIDEO WALL” menu, select “ON”, then press the MENU/ENTER button.
AUTO ID
AUTO ID | : | ON |
|
|
| |||||||
|
|
|
|
| 1 |
|
|
|
|
| ||
1 | 2 |
| 2 |
| 3 |
| ||||||
|
|
|
|
|
|
|
|
|
|
|
| |
3 |
|
| 9 | |||||||||
4 | 8 | |||||||||||
|
| 4 |
| |||||||||
|
|
|
|
|
|
|
|
|
|
|
| |
|
|
|
|
|
|
| 5 |
| ||||
|
|
|
|
| 7 |
| 6 |
|
| |||
WIRED CABLE
| CONNECTION TURN |
ADJ. | EXIT RETURN |