Multi Control
English
MULTI CONTROL
Navigation terms
MULTI CONTROL
MULTI CONTROL
Edition March
MULTI CONTROL
NAVIGATION functions
MULTI CONTROL
12.2.3
13 Maintenance and fault finding
Specifications
Warranty
MULTI CONTROL
1 Part specification
MULTI CONTROL
Items delivered with the instrument
Registering this product
MULTI CONTROL
Welcome aboard the Nexus Network
MULTI CONTROL
Good luck and happy boating
MULTI CONTROL
2 Installation
The installation includes 6 major steps
MULTI CONTROL
A few ”do nots” you should consider
2.1Installing the instrument
MULTI CONTROL
Note! The two nuts must just be tighten by hand
Note Must be done to avoid corrosion
2.1.1Installing instrument to the Server
Mount the connection back cover with the screw
MULTI CONTROL
MULTI CONTROL
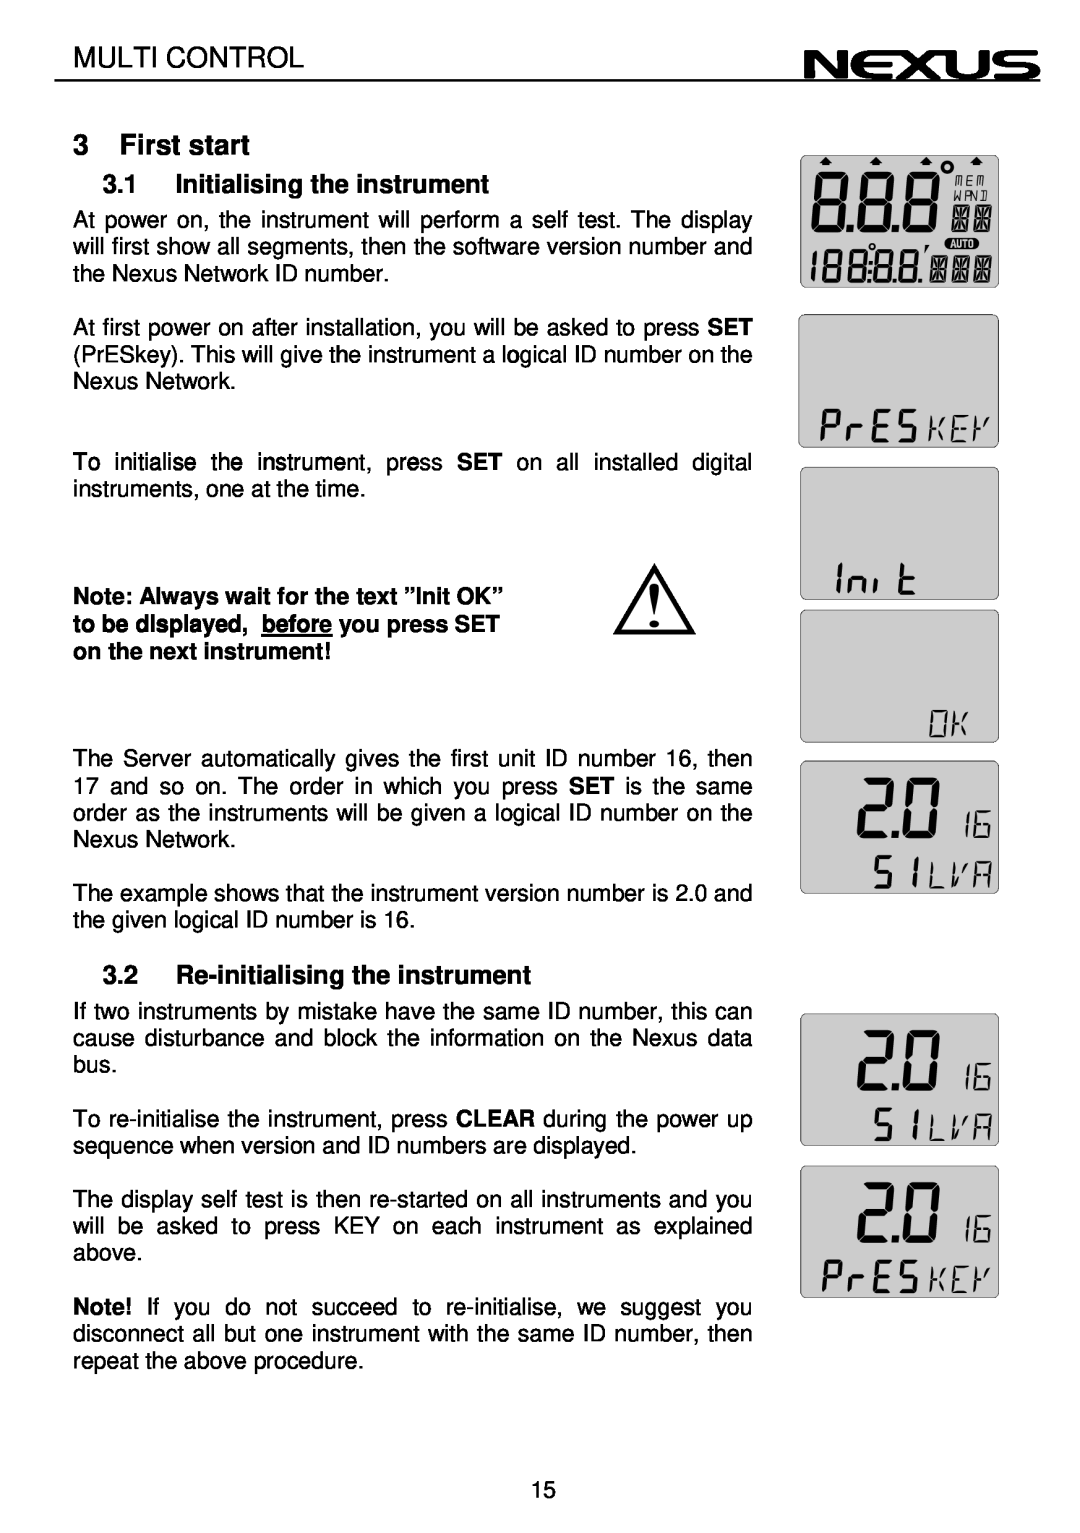
3 First start
3.1Initialising the instrument
3.2Re-initialisingthe instrument
4 Operation
MULTI CONTROL
4.1About this manual
4.2How to use the push-buttons PAGE SIGN
MULTI CONTROL
MAIN FUNCTION
FUNCTION
4.2.5Clear / cancel / reset
MULTI CONTROL
4.2.4SET
4.2.6
MULTI CONTROL
5 Function overview
6.2.4START TIMER STA
6.2.5TIMER
MULTI CONTROL
6.1SPEED main-function
MULTI CONTROL
6.2.8DEPTH unit/DPT
MULTI CONTROL
7.1DEPTH main-function
7.2PLUS sub-functions
General information
7.2.2BATTERY BAT
7.2.3SHALLOW ALARM SHA
7.2.4DEPTH ALARM DEA
7.2.5ANCHOR ALARM
7.3Remote Control REM
MULTI CONTROL
7.5Set and turn on anchor alarm ANC
7.6Clear an alarm value
7.7Silencing an alarm
7.8Turning off / on an alarm
MULTI CONTROL
8.1NAVIGATION main-function
8.2NAVIGATION sub-functions
8.2.1 STEER REFERENCE Pilot OFF
8.2.9CROSS TRACK ERROR XTE
MULTI CONTROL
8.2.6SET and DRIFT
8.2.7CMG and DMG
MULTI CONTROL
8.3Steer reference Pilot
Compass steering MEM
Wind steering AWA
MULTI CONTROL
8.3.1Overview of steer reference Pilot
Steer reference function
Reference
MULTI CONTROL
8.3.3Steer reference BTW
8.3.4Steer reference CTS
MULTI CONTROL
8.3.5Steer reference AWA
MULTI CONTROL
The underlining sign = starboard side. The minus sign - = port side
MULTI CONTROL
9.1 WIND Main-function
9.2WIND Sub-functions
9.2.1 STEER REFERENCE Pilot OFF
MULTI CONTROL
9.2.3APPARENT WIND SPEED AWS
9.2.2 TRUE WIND ANGLE TWA
9.2.4TRUE WIND SPEED TWS
MULTI CONTROL
9.2.7GEOGRAPHIC WIND DIRECTION
MULTI CONTROL
9.3Tactical function
MULTI CONTROL
To activate the MOB function, press the MOB button
MULTI CONTROL
11 Customise your display
11.1 Move and lock a sub-function
11.2 Copy and lock a sub-function
11.3 Select power on function
11.4 Cancel a moved or locked sub-function
MULTI CONTROL
11.5 Temporary locking of alternating functions
MULTI CONTROL
12.1Calibration of speed C10
12.1.1C10 Return RET
12.1.2C11 Unit KTS
MULTI CONTROL
12.2C20, calibration of depth
12.1.4C13 DAMPING SEA
12.2.1C20 RET
MULTI CONTROL
12.3C30, calibration of navigation 12.3.1C30 RET
12.3.2C31 PAGE ATO
12.3.3C32 00 OCA
MULTI CONTROL
12.4Compass calibration
12.3.11 C40 OFF MAG
12.3.12 C41 DAMPING SEA
12.4.2 Automatic compass deviation check Auto CHK
MULTI CONTROL
12.4.4Compass misalignment correction Adj
MULTI CONTROL
12.5C50, calibration of wind
12.5.1C50 RET
12.5.2C51 PAGE ATO
12.5.8C64 WIA
MULTI CONTROL
12.5.9C65 DAMPING SEA
12.5.10 C67 WIND SPEED ALARM WSA
MULTI CONTROL
12.6 C70, calibration of Network and NMEA
12.6.1C70 RET
MULTI CONTROL
12.6.6C75 OFF CMP
12.6.7C76 OFF WND
12.6.8C77 to C92
12.7NMEA
MULTI CONTROL
12.7.1Transmit NMEA sentences OUT from Server
MULTI CONTROL
12.7.2Change NMEA sentences OUT from Server
MULTI CONTROL
12.7.3Receive NMEA sentences IN to Server There are 6 different main types of NMEA sentences
Target boat speed
MULTI CONTROL
Custom fix data
MULTI CONTROL
12.8 Special NMEA sentences
$PSILTBS,X.X,N CR LF
$PSILCD1,X.X,X.X, CR LF
13Maintenance and fault finding
13.1Maintenance
13.2 Fault finding
MULTI CONTROL
13.2.2Fault - action
13.2.3Error messages
ERROR
ERROR
14.1Technical specifications
Dimensions
Power supply
Power
14.3 Optional Accessories
Nexus Remote Control Instrument
MULTI CONTROL
NX2 Completes
MULTI CONTROL
Nexus Multi XL
NX2 GPS
Nexus Autopilot components
MULTI CONTROL
14.4 Abbreviations
Abbreviation
Description
MULTI CONTROL
Geographic Latitude Longitude
MULTI CONTROL
STeeR
WARRANTY GENERAL
LIMITED WARRANTY
CLAIMS PROCEDURE
MULTI CONTROL
WARRANTY CARD
MULTI CONTROL
Dealers stamp
TO BE RETURNED TO YOUR NATIONAL DISTRIBUTOR
MULTI CONTROL
MULTI CONTROL
MULTI CONTROL
MULTI CONTROL
Copyright
Nexus Marine AB
Kuskvägen 4, 191 62 Sollentuna, Sweden