Manuals
/
Night Owl Optics
/
Household Appliance
/
Home Security System
Night Owl Optics
PRO Series 8CH, DVR Security Kit, Elite Series 8CH
manual
DVR Specifications
Models:
Elite Series 8CH
DVR Security Kit
PRO Series 8CH
1
119
124
124
Download
124 pages
45.7 Kb
116
117
118
119
120
121
122
123
Troubleshooting
Specifications
Install
Alarm Menu 15.1.1 Motion Menu
Login
Connecting Cameras to the DVR
Warranty
Maintenance
Windows Network Configuration
Remote Access
Page 119
Image 119
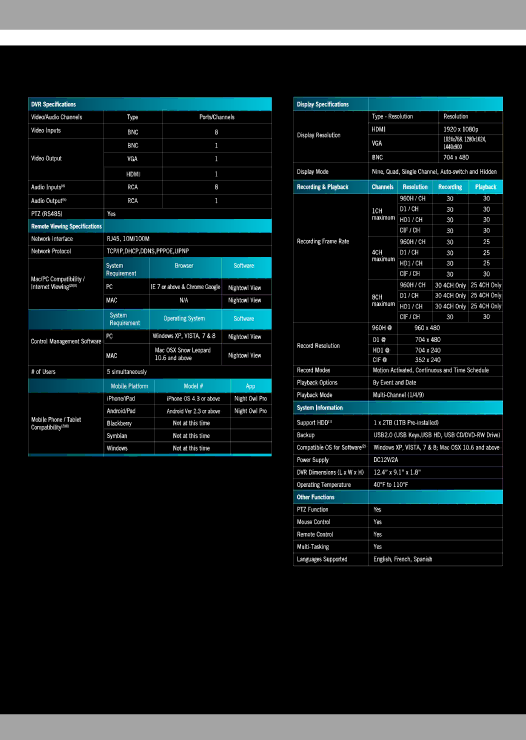
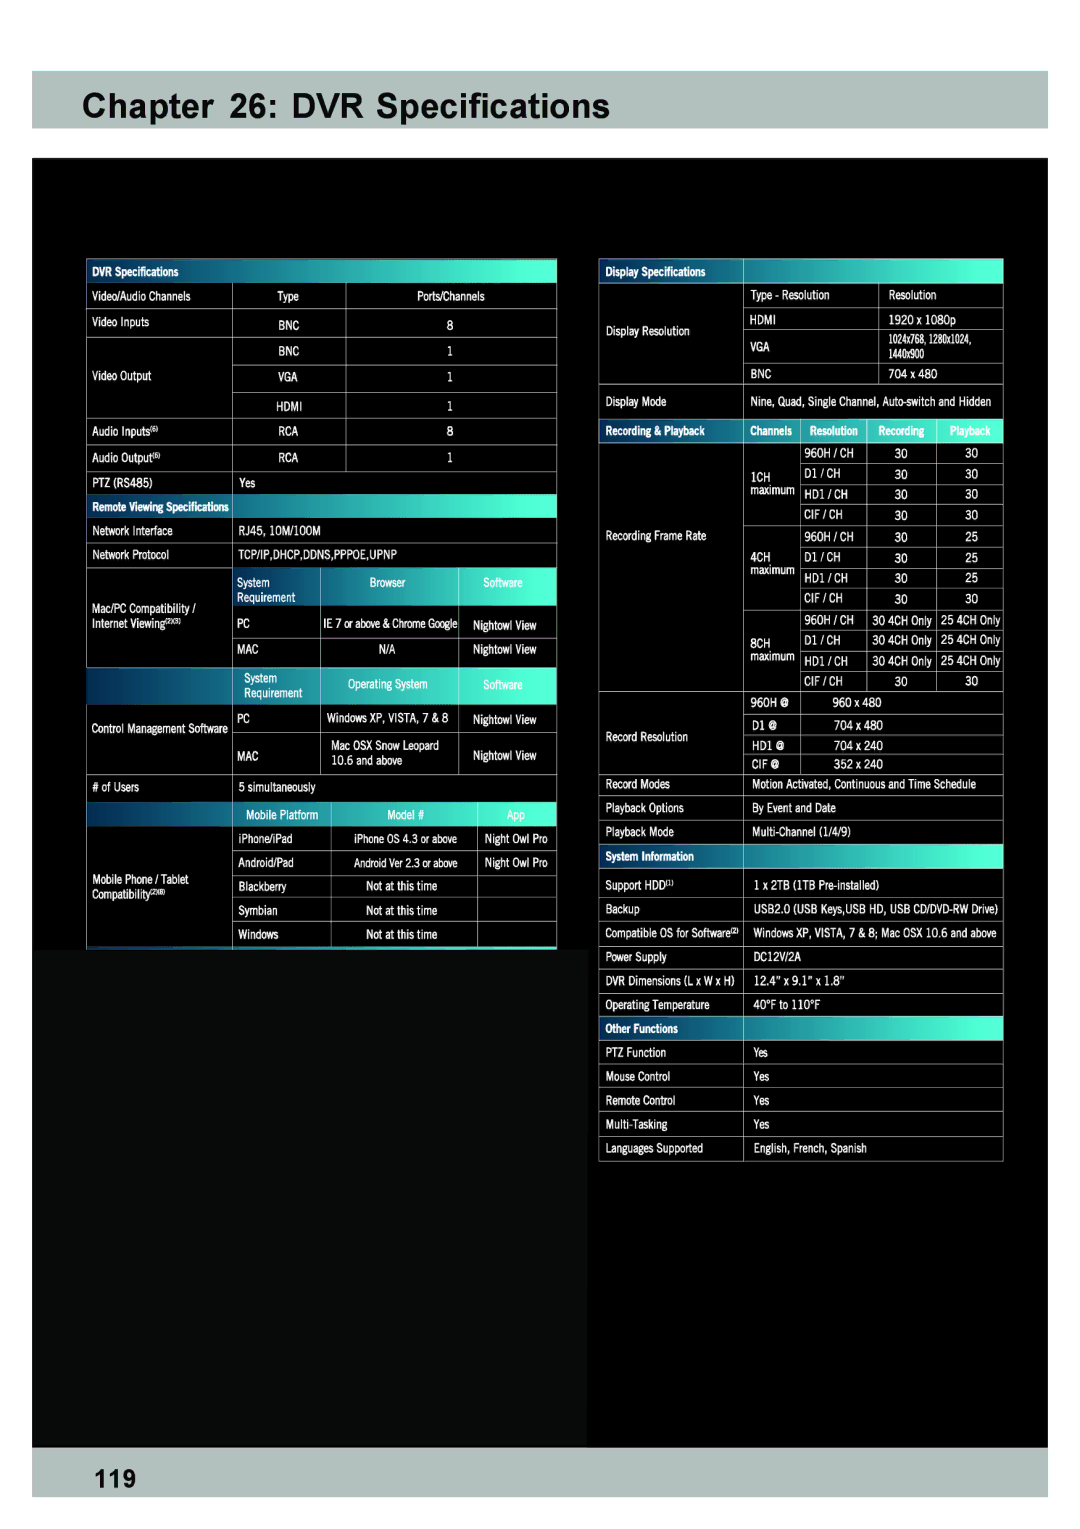
Chapter 26: DVR Specifications
119
Page 118
Page 120
Page 119
Image 119
Page 118
Page 120
Contents
PRO Series 8CH Elite Series 8CH
Contents
Contents
15.4
23.1
FCC Compliance Statement
FCC Radiation Norm
Package Contents
System Requirements
DVR Safety Instructions
Handle the DVR carefully
Do not attempt to remove the top cover
Troubleshooting
Troubleshooting
Back Panel of DVR
DVR Components
Front Panel of DVR
Mouse
Use the remote control to navigate through the DVR’s menus
Remote Control
Connecting the Power Supply
DVR Installation
Connecting the DVR to a TV or Monitor
Connecting Cameras to the DVR
Camera Installation
Mounting the Cameras
System Initialization
DVR Start-up
On-Screen Display
Startup Wizard
Login Screen
Main Menu
Menu Icons
Basic Menu
Basic Menu
System Menu
Date/Time Menu
DST Menu
Display Menu
Mask Screen
Color Screen
Time/Name Screen
Auto SEQ Menu
Basic
Record Menu
Bit Rate Menu
D1 Resolution 704x480 pixels
Resolution
960H Resolution 960x480 pixels
WHD1 Resolution 960x240 pixels
Recording Types
Schedule Menu
User Menu
User Management Menu Basic Tab
User Management Menu Authority Tab
Advanced Menu
Advanced Menu
Alarm Menu 15.1.1 Motion Menu
Area Screen
Schedule Screen
Schedule Screen allows you to choose when to record
Trigger Screen
Alarm output duration This has no function
Video Loss Menu
Others Menu
Advanced Menu
Network Menu 15.2.1 LAN Menu
PPPoE Menu
Port Menu
Quality Set the recording to Good, Better, Best or Normal
Sub-Stream Menu
Sub-Stream
Ddns Menu
Mail Menu
E-Mail Menu allows you to configure email alert settings
UPnP Menu
PTZ Menu
Record Search Menu
Record Search Menu
Calendar
File List
Record Search Menu
Converting Files to AVI
Disk Management Menu
Disk Management Menu
Disk Management Menu
Information Menu
Information Menu
Device Menu
LAN Menu
PPPoE Menu
Online
Online Menu
Record Menu
Maintenance Menu
Maintenance Menu
Basic Menu
Firmware Upgrade
Settings Menu
Remote Access
DVR
Connecting the DVR and Router/Modem
Windows Network Configuration
Remote Access
Changing the Network Settings on the DVR
Apple Mac Network Configuration
Remote Access
Remote Access
PRemotert ForwardingAccess
Checking the Ports After Port Forwarding
Port Forwarding
Registering a Free Domain Name Ddns
Ddns Registration
Ddns Registration
Adding your New Domain Name to your DVR
Scroll down until you see ActiveX controls and plug-ins
Setting ActiveX Controls
Internet Viewing
DVR Login
Menu Bar
Using Nightowl View
Channel Information
Play Control
PTZ Control
Playback
Internet Viewing
Backup
Remote Setting
Using Control Management Software CMS Nightowl View
Starting the CMS
Device List
Device Tab
Channel Group Tab
Patrol Tab
Panel Options
Live View
106
Live View Color Settings
108
System Setting
110
Event
Night Owl Pro Mobile Application
Device
Adding/Editing a Device
115
116
Settings
More
DVR Specifications
Information Log
Exclusions
Warranty
Returns Under this Warranty
Disclaimer
Warranty
Top
Page
Image
Contents