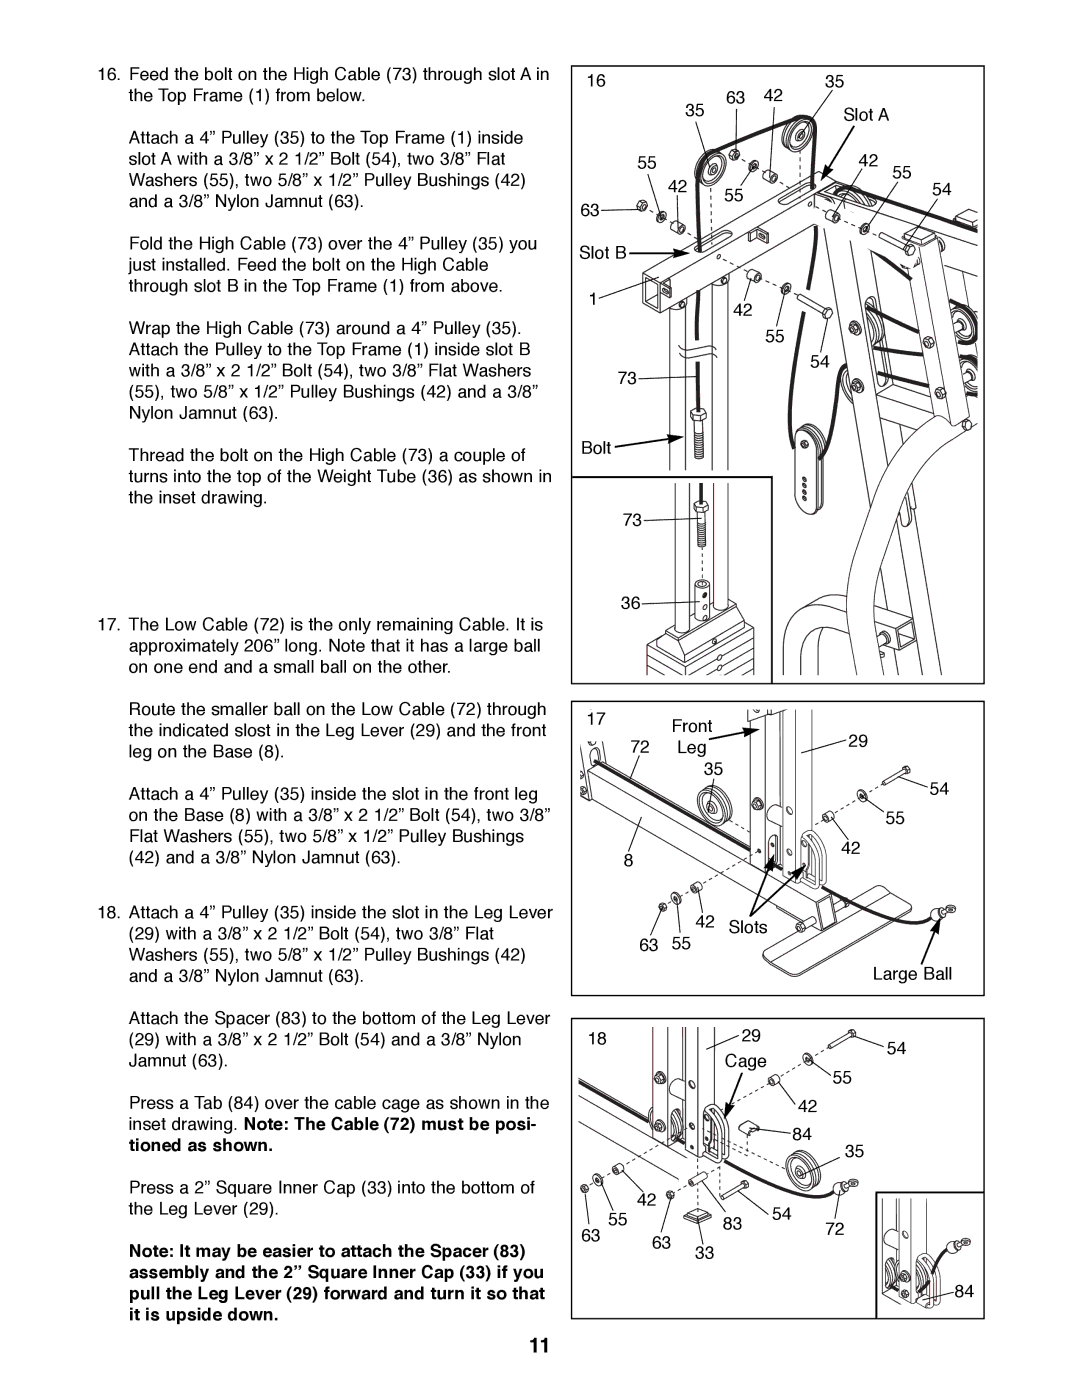
16.Feed the bolt on the High Cable (73) through slot A in the Top Frame (1) from below.
Attach a 4Ó Pulley (35) to the Top Frame (1) inside slot A with a 3/8Ó x 2 1/2Ó Bolt (54), two 3/8Ó Flat Washers (55), two 5/8Ó x 1/2Ó Pulley Bushings (42) and a 3/8Ó Nylon Jamnut (63).
Fold the High Cable (73) over the 4Ó Pulley (35) you just installed. Feed the bolt on the High Cable through slot B in the Top Frame (1) from above.
Wrap the High Cable (73) around a 4Ó Pulley (35). Attach the Pulley to the Top Frame (1) inside slot B with a 3/8Ó x 2 1/2Ó Bolt (54), two 3/8Ó Flat Washers (55), two 5/8Ó x 1/2Ó Pulley Bushings (42) and a 3/8Ó Nylon Jamnut (63).
Thread the bolt on the High Cable (73) a couple of turns into the top of the Weight Tube (36) as shown in the inset drawing.
17.The Low Cable (72) is the only remaining Cable. It is approximately 206Ó long. Note that it has a large ball on one end and a small ball on the other.
Route the smaller ball on the Low Cable (72) through the indicated slost in the Leg Lever (29) and the front leg on the Base (8).
Attach a 4Ó Pulley (35) inside the slot in the front leg on the Base (8) with a 3/8Ó x 2 1/2Ó Bolt (54), two 3/8Ó Flat Washers (55), two 5/8Ó x 1/2Ó Pulley Bushings
(42)and a 3/8Ó Nylon Jamnut (63).
18.Attach a 4Ó Pulley (35) inside the slot in the Leg Lever
(29)with a 3/8Ó x 2 1/2Ó Bolt (54), two 3/8Ó Flat Washers (55), two 5/8Ó x 1/2Ó Pulley Bushings (42) and a 3/8Ó Nylon Jamnut (63).
16 |
| 63 | 35 |
| 35 | 42 | |
|
| Slot A | |
55 |
|
| 42 |
| 42 |
| 55 |
| 55 | 54 | |
63 |
|
| |
|
|
| |
Slot B |
|
|
|
1 |
| 42 |
|
|
|
| |
|
|
| 55 |
73 |
|
| 54 |
|
|
| |
Bolt |
|
|
|
73 |
|
|
|
36 |
|
|
|
17 | Front |
|
|
|
| 29 | |
72 | Leg |
| |
|
| ||
| 35 |
| 54 |
|
|
| |
|
|
| 55 |
8 |
|
| 42 |
|
|
|
![]() 42 Slots 63 55
42 Slots 63 55
Large Ball
Attach the Spacer (83) to the bottom of the Leg Lever
(29)with a 3/8Ó x 2 1/2Ó Bolt (54) and a 3/8Ó Nylon Jamnut (63).
Press a Tab (84) over the cable cage as shown in the inset drawing. Note: The Cable (72) must be posi- tioned as shown.
Press a 2Ó Square Inner Cap (33) into the bottom of the Leg Lever (29).
Note: It may be easier to attach the Spacer (83) assembly and the 2Ó Square Inner Cap (33) if you pull the Leg Lever (29) forward and turn it so that it is upside down.
11
18 |
| 29 | 54 |
|
| Cage | |
|
| 55 | |
|
|
| |
|
|
| 42 |
|
|
| 84 |
|
|
| 35 |
55 | 42 |
| 54 |
| 83 | ||
| 72 | ||
63 | 63 |
| |
33 |
| ||
|
| ||
|
|
| |
|
|
| 84 |
