Adjust Projected Image Height | Adjust the Projected Image |
A a |
A a |
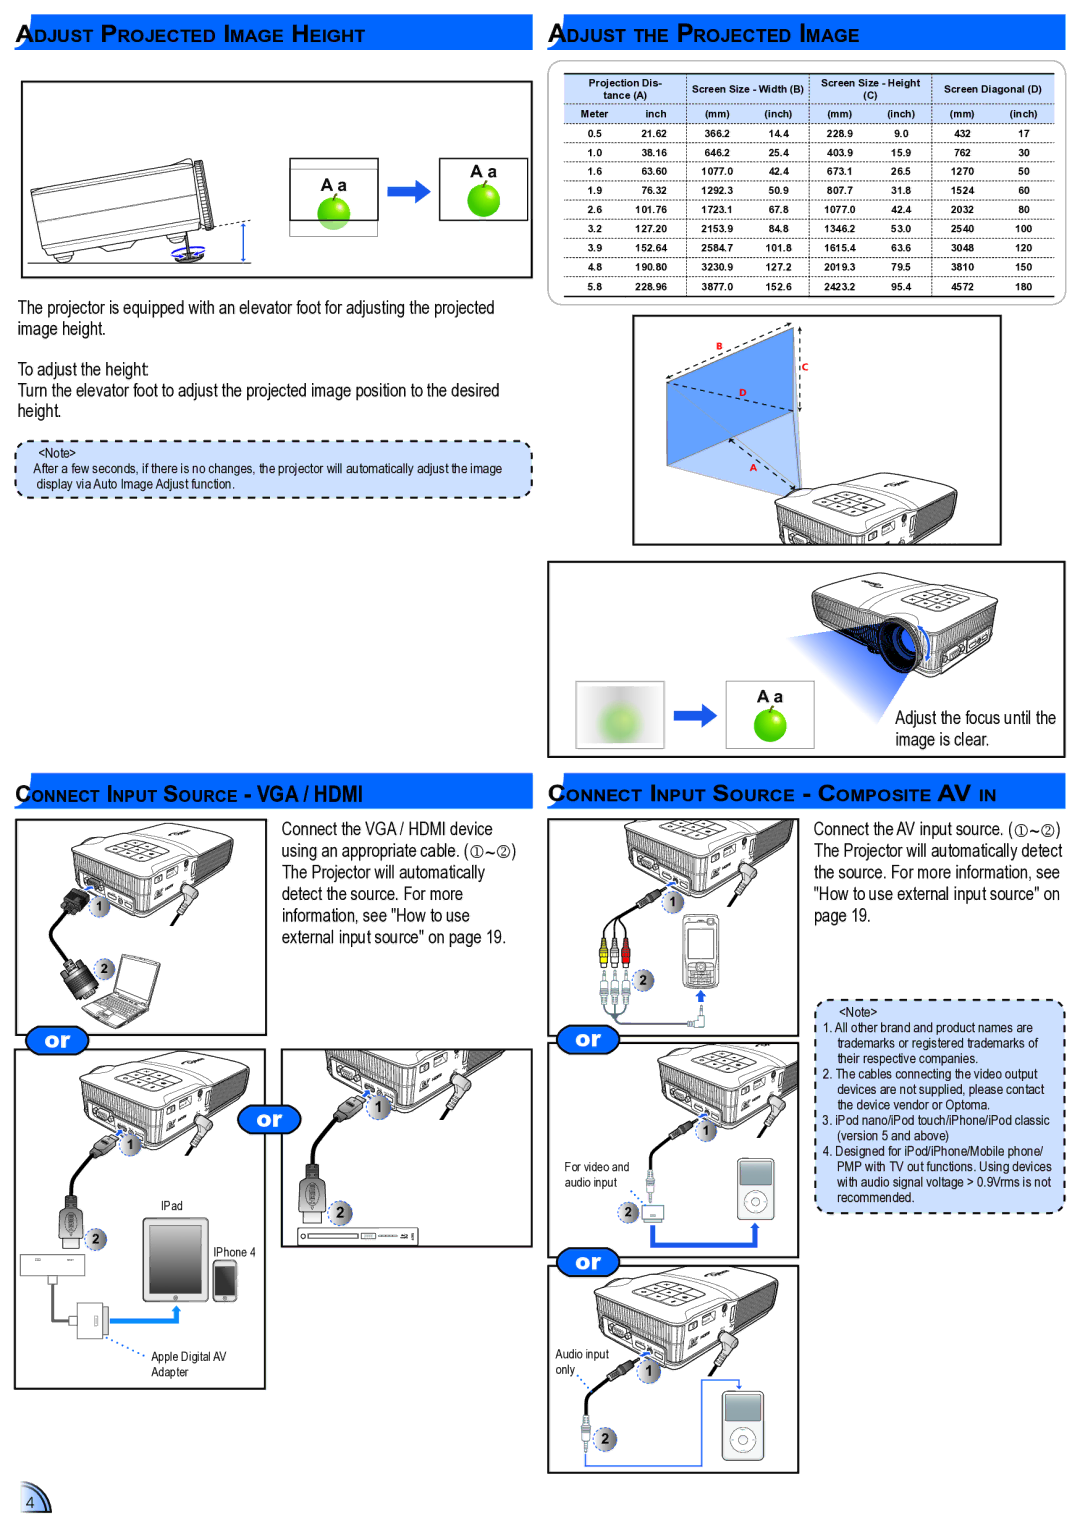
The projector is equipped with an elevator foot for adjusting the projected image height.
To adjust the height:
Turn the elevator foot to adjust the projected image position to the desired height.
<Note>
After a few seconds, if there is no changes, the projector will automatically adjust the image display via Auto Image Adjust function.
Projection Dis- | Screen Size - Width (B) | Screen Size - Height | Screen Diagonal (D) | ||||
tance (A) |
| (C) | |||||
|
|
|
|
| |||
Meter | inch | (mm) | (inch) | (mm) | (inch) | (mm) | (inch) |
0.5 | 21.62 | 366.2 | 14.4 | 228.9 | 9.0 | 432 | 17 |
1.0 | 38.16 | 646.2 | 25.4 | 403.9 | 15.9 | 762 | 30 |
1.6 | 63.60 | 1077.0 | 42.4 | 673.1 | 26.5 | 1270 | 50 |
1.9 | 76.32 | 1292.3 | 50.9 | 807.7 | 31.8 | 1524 | 60 |
2.6 | 101.76 | 1723.1 | 67.8 | 1077.0 | 42.4 | 2032 | 80 |
3.2 | 127.20 | 2153.9 | 84.8 | 1346.2 | 53.0 | 2540 | 100 |
3.9 | 152.64 | 2584.7 | 101.8 | 1615.4 | 63.6 | 3048 | 120 |
4.8 | 190.80 | 3230.9 | 127.2 | 2019.3 | 79.5 | 3810 | 150 |
5.8 | 228.96 | 3877.0 | 152.6 | 2423.2 | 95.4 | 4572 | 180 |
micro | SD |
| DC in |
Connect input source - VGA / HDMI |
A a
Adjust the focus until the image is clear.
Connect input source - Composite AV in
|
|
|
|
|
| Connect the VGA / HDMI device | |||||
|
|
|
|
|
| using an appropriate cable. (~) | |||||
|
|
|
|
|
| The Projector will automatically | |||||
mini HDMI | AV in |
|
|
|
| detect the source. For more | |||||
1 |
| micro USB |
|
| |||||||
|
|
|
|
| information, see "How to use | ||||||
|
|
|
|
|
| ||||||
|
|
|
|
|
| external input source" on page 19. | |||||
2 |
|
|
|
|
|
|
|
|
|
|
|
or |
|
|
|
|
|
|
|
|
|
|
|
|
|
|
|
|
|
|
|
|
| micro | SD |
|
|
|
|
|
|
|
|
|
|
| |
|
|
|
|
|
|
|
|
|
|
| DC in |
|
|
|
|
|
|
| mini | HDMI |
|
|
|
|
|
|
|
|
|
|
|
| AV in | micro USB |
|
|
|
|
|
|
|
|
|
|
|
| |
|
|
|
| micro | SD | or |
|
| 1 |
|
|
|
|
|
|
|
|
|
|
| |||
| mini | HDMI |
|
|
|
|
|
|
|
| |
|
| AV in | micro USB |
|
|
|
|
|
| ||
|
|
| 1 |
|
|
|
|
|
|
|
|
|
|
|
| IPad |
|
| 2 |
|
|
|
|
|
|
|
|
|
|
|
|
|
|
| |
2 |
|
|
|
|
| IPhone 4 |
|
|
|
|
|
|
|
|
|
|
|
|
|
|
|
| |
Apple Digital AV
Adapter
|
|
|
| micro | SD |
mini HDMI | AV in |
|
|
|
|
| micro USB |
|
|
| |
|
|
|
|
| |
1 |
|
|
|
| |
2 |
|
|
|
|
|
or |
|
|
|
|
|
|
| mini HDMI | AV in |
|
|
|
|
| micro USB |
| |
|
|
|
|
| |
|
|
| 1 |
|
|
For video and audio input
| 2 |
|
|
|
or |
|
|
|
|
|
|
| micro | SD |
|
|
|
| DC in |
Audio input | mini HDMI | AV in |
|
|
| micro USB |
| ||
|
|
| ||
|
|
|
| |
only |
| 1 |
|
|
2 |
|
|
|
|
Connect the AV input source. (~) The Projector will automatically detect the source. For more information, see "How to use external input source" on page 19.
<Note>
1.All other brand and product names are trademarks or registered trademarks of their respective companies.
2.The cables connecting the video output devices are not supplied, please contact the device vendor or Optoma.
3.iPod nano/iPod touch/iPhone/iPod classic (version 5 and above)
4.Designed for iPod/iPhone/Mobile phone/ PMP with TV out functions. Using devices with audio signal voltage > 0.9Vrms is not recommended.
4