Palm Treo 700wx Smartphone Quick Reference Guide
Intellectual property notices
Contents
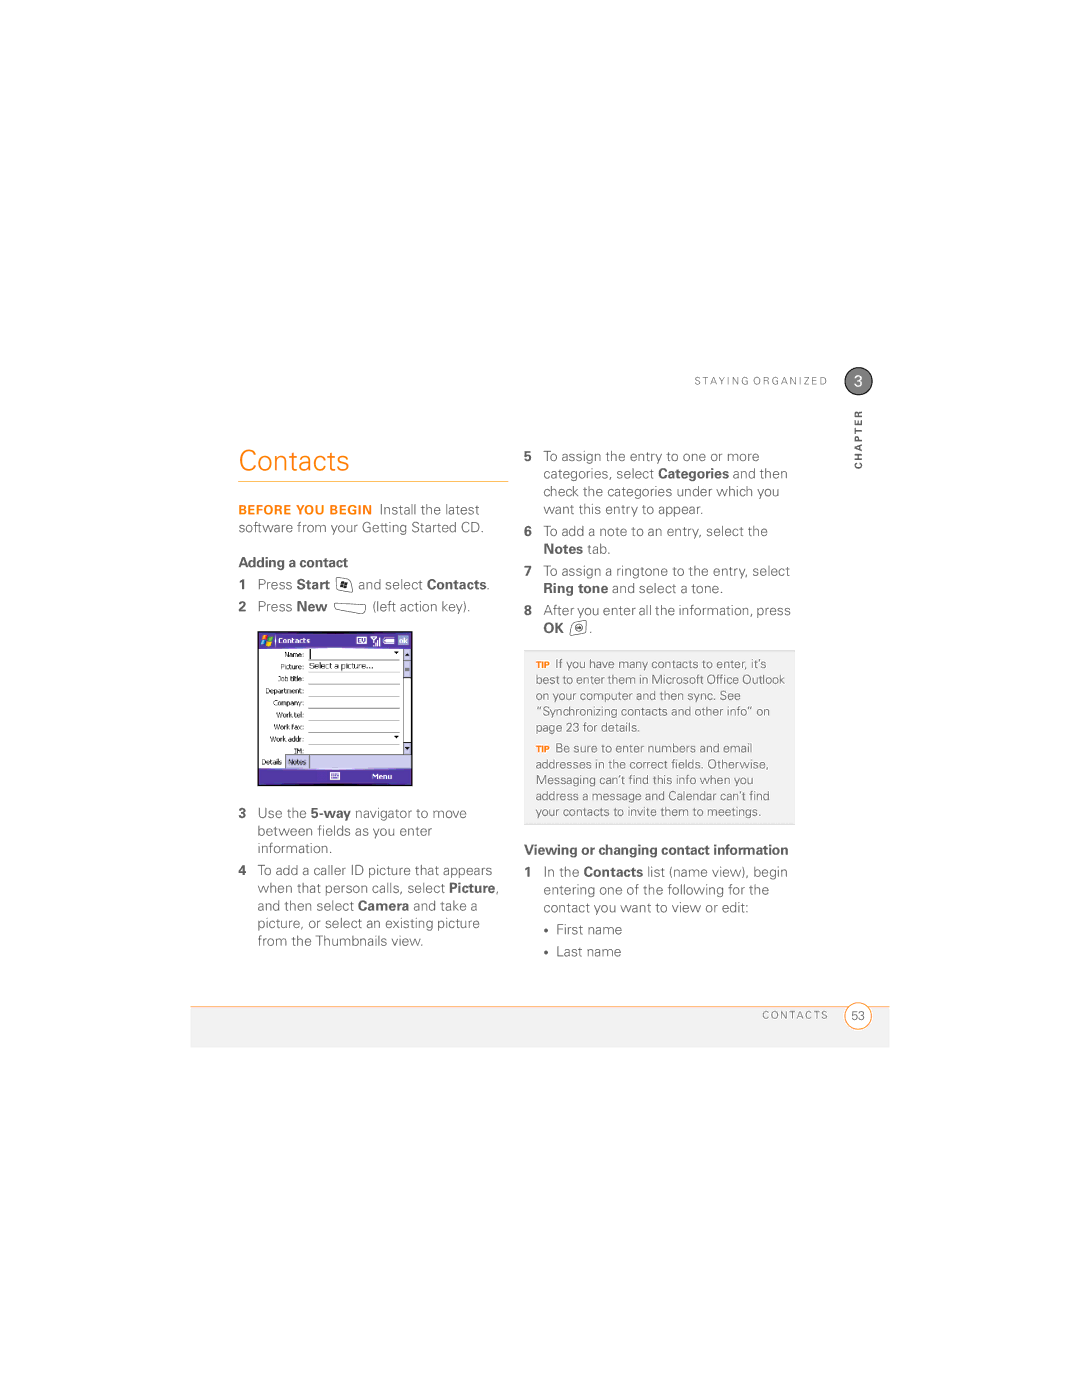
Pictures & Videos Windows Media Player Mobile
Word Mobile PowerPoint Mobile Excel Mobile
Contacts Calendar
Regulatory Information Terms Index
Vi C O N T E N T S
Documentation and software
Welcome
What’s in the box?
Hardware
For a quick introduction
Where to learn more
While using your smartphone
What you need to use your smartphone
If you need more information
About topics you may find nowhere Details
E L C O M E
Moving Around On Your Smartphone
This chapter
Antenna Expansion Stylus Card slot Infrared IR port
Overview
V I N G a R O U N D O N Y O U R S M a R T P H O N E
Turning your phone on and off
Turning your smartphone on/off
Self-portrait mirror
Camera lens Speaker
Waking up the screen and turning it off
Center LeftRight Down
Moving around the screen
Scrolling through screens
Highlighting and selecting items
Closing screens
Left action key activates
Using the action keys
This command Left action key Right action key
Highlighting text
Selecting options in a shortcut menu
Selecting menu items
Selecting options in a list
Using the keyboard
Entering lowercase and uppercase letters
Entering numbers, punctuation, and symbols
Understanding the keyboard backlight
Entering other symbols and accented characters
Symbols and Accented Characters
Closing applications
Opening and closing applications
Opening applications
On the Running Programs tab, do one of the following
Using your Today screen
To access your Today screen, press Phone/Send
Synchronizing contacts and other info
Center to begin the search data services connection required
A P T E R
Viewing the charge status
Maintaining the battery
Maximizing battery life
It overnight each day. The battery in your
A I N T a I N I N G T H E B a T T E R Y
A P T E R
O V I N G a R O U N D O N Y O U R S M a R T P H O N E
Using Your Phone
This chapter
What are all those icons?
Phone overview
H O N E O V E R V I E W
Dialing with the number pad
Making calls
Dialing by contact name
Using the keyboard, begin entering one
Dialing by company name
Dialing with a speed-dial button
To select from your most recently
Select the number you want to dial Press Phone/Send to dial
Dialing from a web page or message
Go to your Today screen, and then press and hold Phone/Send
Press Phone/Send
Dialing using the onscreen Dial Pad
Receiving calls
Press Menu right action key and select Ignore
Using voicemail
Press Power/End
Setting up voicemail
Retrieving voicemail messages
Follow the voice prompts to set up your voicemail
Button with Center or tap it with the stylus
Voicemail notification
Use the built-in speakerphone Press
Press Menu right action key and select Cancel Mute
Managing calls
Press Off Hold left action key
Returning to an active call from another application
Adjusting the call volume
Ending a call
Do one of the following
Press Answer left action key or Phone/Send
Making a second call
Answering a second call call waiting
Place the current call on hold and answer the new call
Put the first call on hold, and then place a second call
Send the new call to voicemail Press
Menu right action key and select Ignore
Making a conference call
Creating speed-dial buttons
Editing a speed-dial button
Extra Digits left action key to dial these digits
Headset button Microphone Speakers
Using a phone headset
Using a hands-free device with Bluetooth wireless technology
Headset specifications
Select Modem Link
Using your smartphone as a wireless modem
Preparing your smartphone for a wireless modem connection
On your smartphone press Start and select Programs
A P T E R
S I N G Y O U R P H O N E
Staying Organized
Contacts Calendar
Viewing or changing contact information
Contacts
Adding a contact
Displaying your calendar
Calendar
Sending a meeting request
Creating an appointment
A P T E R
Using Email and Other Wireless Services
This chapter
Creating and sending a text message
Messaging overview
Enter your message, or press
Using email
Setting up an email account
Creating and sending an email message
A P T E R
Check the Include file attachments box
Receiving attachments
Select ActiveSync
Press Start and select Pocket MSN
Using Pocket MSN
Options Lets you customize your Pocket MSN experience
Signing in to Pocket MSN
Viewing a web
Browsing the web
Select MSN Mobile Home
Screen mode, press right action
Creating a favorite
Downloading files and images from a web
Setting up a Bluetooth connection
New Partnership
Select the Devices tab, and then select
Press Finish right action key
Beaming a record
A M I N G a R E C O R D
A P T E R
Playing Media Files
Pictures & Videos Windows Media Player Mobile
Select Camera
Pictures & Videos
Taking a picture
Press Start and select Pictures & Videos
Recording a video
Optional Set a 5-second timer Press
Resolution. Press Center to start recording
Select the contact to whom you want to assign the ringtone
Viewing a picture or video
Creating a video ringtone
Transferring media files to your smartphone
Windows Media Player Mobile
Press Play left action key
Working with libraries
Shuffle/Repeat Repeat Plays
Smartphone Presentations with you
Staying Productive
Word Mobile PowerPoint Mobile Excel Mobile
Word Mobile PowerPoint Mobile
Select Excel Mobile
Excel Mobile
Creating a workbook
Managing Files Applications
This chapter
Finding information
Hold Center to open the shortcut menu, and then select
Installing applications
Exploring files and folders
Select File Explorer
Installing applications from the Internet
Mobile-Based Device To open Mobile Device folder
Installing applications from your computer
Installing applications onto an expansion card
Click Tools and select Explore Device
Synchronizing with an Exchange Server
Setting synchronization options
Selecting which info to sync
Press OK Press Start and select Programs
Synchronizing using Bluetooth wireless technology
Check the Turn on Bluetooth box
Starting and stopping synchronization
Setting the synchronization schedule
Removing and inserting expansion cards
Using expansion cards
I N G E X P a N S I O N C a R D S
A N a G I N G F I L E S a N D a P P L I C a T I O N S
Customizing Your Smartphone
This chapter
Selecting which items appear on your Today screen
Today screen settings
Select Browse Select the picture you want to use Press OK
Controlling your roaming experience
Feature availability
Setting roaming preferences
N T R O L L I N G Y O U R R O a M I N G E X P E R I E N C E
System sound settings
Slide the Ringer switch to Sound Mode Off
Adjusting volume settings
Setting the ringer switch
Selecting Sounds & Notifications
S T O M I Z I N G Y O U R S M a R T P H O N E
Changing the text size
Display and appearance settings
Application settings
Adjusting the brightness
Start = Start Menu OK = OK/Close
Reassigning buttons
Locking your smartphone and info
Using Keyguard
Using Auto-Keyguard and touchscreen lockout
Using Phone Lock
Press OK to finish
Using the system password lock
Performing a soft reset
Turning wireless services on/off
Resetting your smartphone
Password again. Then tap the onscreen Keyboard icon
Synchronizing with your computer, a soft reset may help
Regulatory Information
Specific Absorption Rates SAR for Wireless Smartphones
E G U L a T O R Y I N F O R M a T I O N
Terms
Phone/Send
My Mobile Devices
Option
Phone Off
Exchange Server 92 options
Add to Favorites command Adding
Index
Icon
Audio
Brightness, adjusting 75, 76
Callback number 60 caller ID pictures 53, 75 camera
Calendar views 54 Call Log Call Log command 37 call waiting
Display message on screen check box
Contacts application managing contact
Box 109 Dismiss button 39 display
With 63 requirements for 1 selecting addresses 13 sending
IM messaging 59, 64 images
111
Listen button 39 listening to
See also battery links
Names 116 naming Speed-dial buttons 44 workbooks
Setting ringtones for
Adding contacts and 53 overview
My Pictures folder
Phone
Personal Settings page 99, 102
Adjusting volume 41, 103 answering 37, 42 customizing
Silencing sounds for 103 voicemail
Remote synchronization
Phone headset Phone lock feature 108, 109 phone numbers
Buttons 44 copying
Customizing presentations
Setting
Command 100 Roaming Preferences screen
Word Mobile
Sending Monitoring status
Taking pictures Themes Off
Features of 1
Text speed-dial buttons Tabs, scrolling through
Searching 23, 67 viewing
Media Player Mobile wireless features 26 Wireless
WMV files Naming Word application Saving Zoom In command
N D E