Model No. HDC-HS100P/PC
Thank you for choosing Panasonic
Refer Servicing to Qualified Service Personnel
Following Applies only in Canada
Following Applies only in the U.S.A
FCC Note
HDC-HS100P
For USA-California only
Battery pack Lithium ion battery pack
Button-type battery Lithium battery
Button-type battery 60 oC 140 Battery pack
Important Safety Instructions
Care
Indemnity concerning recording content
USE & Location
Licenses
Carefully observe copyright laws
Cards that you can use with this unit
For the purposes of these operating instructions
Contents
Others
Backup
Playback
With a PC
CD-ROM
Accessories
High definition images 1920k1080
Features
Very clear high definition pictures
Compatibility with other products
Quick Guide
Charging the battery
Inserting the battery
How to turn on the power
Recording motion pictures
Help mode
To exit the Help mode
Language selection
Still picture playback
Motion picture playback
Preparation
Hard disk drive
Handling of HDD
LCD monitor open LCD monitor l
Parts identification
Handling
PRE-REC button PRE-REC l
Battery holder l
USB terminal 100, 109 Hdmi mini connector Hdmi l 92
Intelligent auto button iA l
Internal microphones 5.1 channel support
Microphone terminal MIC
Grip belt
Remote control
While pressing the stopper A, pull out the battery holder
Install a button-type battery supplied
Remote control usable range
Charging lamp Charge a
Power supply
Charging the battery
About batteries that you can use with this unit
Removing the battery
Inserting/removing the battery
HDD
Charging and recording time
Charging/Recording time
HDD HA/HG/HX
Battery capacity indication
Connecting to the AC outlet
Sdhc
Setup 2 Preparation of SD cards
Cards that you can use with this unit
Card type Capacity Motion picture recording Still picture
Securely close the SD card cover
Card access lamp Access a
Inserting/removing an SD card
Open the LCD monitor
Turning the unit on/off
Selecting a mode
Turning the power on and off with the LCD monitor
To turn on the power To turn off the power
Press the Menu button
Setup 4 Using the menu screen
Menu list
Recording mode
Language selection
Headphone
Offon
Minutes
AV OUT
Edit SCENE*1
Playback mode
Setup
PICT. Setup
Press the cursor button to enter the selection
Setting date and time
¬ Rotate the mode dial to select
Select the menu. l
Select Destination and press the cursor button
≥ When the home is in summer time period
≥ When the destination is in summer time
Select Home and press the cursor button
Viewfinder
Adjusting LCD monitor
LCD/EVF select switch
Adjusting the brightness and the color level
Recording showing the contents to a partner
Adjusting the viewfinder field of view
Recording
Basic camera positioning
Before recording
Auto Ground-Directional Standby AGS
About auto mode
Record Setup # AGS # on
Quick start
Quick power on
Set the LCD/EVF select switch to LCD. l Select the menu. l
Close the LCD monitor while the mode dial is set to
Media Select # HDD or SD Card
Recording motion pictures
Select the media to record from the menu. l
Press the recording start/stop button to start recording
About the compatibility of the recorded motion pictures
Recording time elapsed
Screen indications in the recording mode
When motion picture recording stops suddenly
HDD
Recording modes/approximate recordable time
Advanced # Shooting Guide #
Shooting guide
Press the PRE-REC button
≥ Aim this unit at the subject and position it securely
Focus indication
Recording still pictures
Press the button halfway. For auto focus only
To record still pictures clearly
About the screen indications when the button is pressed
Press the button fully
About the focus indication
About the focusing area
Number of recordable pictures
Zoom lever
Basic # D.ZOOM # desired setting
Zoom in/out function
Digital zoom function
S. Optical Image Stabilizer
Optical image stabilizer
Function
Optical image stabilizer button
Intelligent auto button
Intelligent auto mode
Press the cursor button,
Recording functions
Operation icons
Operation icons
Black
Fade
Backlight
Compensation
Press the Menu button
Self-timer
Intelligent contrast
Control
MagicPix
Soft skin mode
Automatic face
Detection
Headphone volume adjustment
Tele macro
Soft skin mode
MagicPix ≥ Recorded scene is seen as if frames were missed
24p digital cinema
MenusRecording functions
Guide line
Focus MIC
Microphone setup
Surround
Zoom MIC
Select the range of pictures that will be stored
HD hi-speed burst shooting
Press the button
Auto slow shutter
Built-in flash
Red eye reduction
Shutter sound
Digital cinema color
Digital cinema color
Red eye reduction
Auto slow shutter
Recording manually by
Setting the menu
Scene mode
Set the AUTO/MANUAL switch to Manual
Wind noise reduction
Record Setup # Wind CUT # on
Auto
Move the cursor button to adjust the microphone input level
Microphone level
Advanced # Zebra # on
Picture adjustment
Advanced # Picture Adjust # YES
Zebra
Always
On Adjust
Luminance
Histogram
Camera function button
Recording manually using
Set the AUTO/MANUAL switch to MANUAL. l
Multi manual ring
Zoom by rotating the ring
Manual focus adjustment
Adjust the focus by rotating the ring
Zoom operation
To set the white balance manually
White balance
Enter the selection by pressing the camera function button
Manual shutter speed/iris adjustment
Playback
Motion picture playback
Rotate the mode dial to select
Towards s
Speaker/Headphone volume adjustment
Fast forward/rewind playback
Towards r
Frame-by-frame playback
Skip playback To the start of a scene
Slow-motion playback
Motion picture compatibility
Creating still picture from motion picture
Playing back motion pictures by date
Extracting parts recorded clearly to play back
Intelligent scene selection
Resuming the previous playback
Video Setup # Repeat Play # on
Video Setup # Resume Play # on
Repeat playback
Still picture playback
Still picture compatibility
Select the still picture to be played back
Playing back still pictures by date
Deleting scenes/still pictures
To continue deleting other scenes
Edit Scene # Divide # SET
Divide # Cancel ALL
Dividing a scene to delete
Editing
Video Setup or PICT. SETUP# Scene Protect # YES
PicturesProtecting scenes/still
Select the number of prints, then press the cursor button
Editing 4 Dpof setting
What is DPOF?
Tab while the mode dial is set to
Copying
Copying between SD card
HDD
Confirming remaining capacity on the copy destination
Select Start and press the cursor button
Select the item and press the cursor button
Select the date to be copied and press the cursor button
To copy 600 still pictures approx 600 MB
Approximate time for copying
To copy a 4 GB SD card with full motion pictures to a HDD
Formatting SD cards
Setup # Format Card # YES
Setup # Format HDD # YES
Editing 6 FormattingHDD SD cards
With a TV
Watching Video/Pictures on
Your TV
Connect this unit to a TV
Cables Reference items
Set the mode dial to to play back
To display the on-screen information on the TV
To watch images with a 169 aspect ratio on a regular TV
480p
Connecting with a Hdmi mini cable
What is HDMI?
Setup # Hdmi Resolution # desired setting
Setup # AV Jack # AV OUT
Connecting with the component cable
Connecting with the AV cable
Setup # Component OUT # desired setting 480i
Hdavi Control
Playback using Viera Link
Playback operation with the remote control for the TV
¬Set the mode dial to
Other linked operations
Turning the power off
Automatic input switching
Backup
100
Connecting a DVD burner to
Copy to/play back a disc
Preparing for copying/playing back
101
Insert the disc in the DVD burner
Select Burn Disc and press the cursor button
Select Play Disc and press the cursor button
102
Copying to discs
103
Press the Disc Copy button
Select START, then press the cursor button
Select Next and press the cursor button
Disc type Copy time
Important Notice
About the approximate time it takes for copying to a disc
104
105
106
Playing back the copied disc
Use the cursor button to select disc playback tab
Copy to the disc. l
Formatting discs
Displaying disc information
Auto protect
Is connected to
Dubbing images onto other
Video device
Change the video input on
109
With a printer PictBridge
Connect this unit to a printer
Press the Menu button to display the PictBridge menus
Select the date print setting on Date Print
Select the paper size setting on Paper Size
Select the desired layout setting on page Layout
111
With a PC
112
What you can do with a PC
Software required Available function Data type
To use the HD Writer 2.6E
113
114
End User License Agreement
CPU
Operating environment
Operating environment for HD Writer 2.6E for HDC
115
Interface
116
Necessary software
Sound
117
Setup 1 Installation
Insert the CD-ROM into the PC
118
Check the contents, then close Window
Uninstalling HD Writer 2.6E
Click Finish
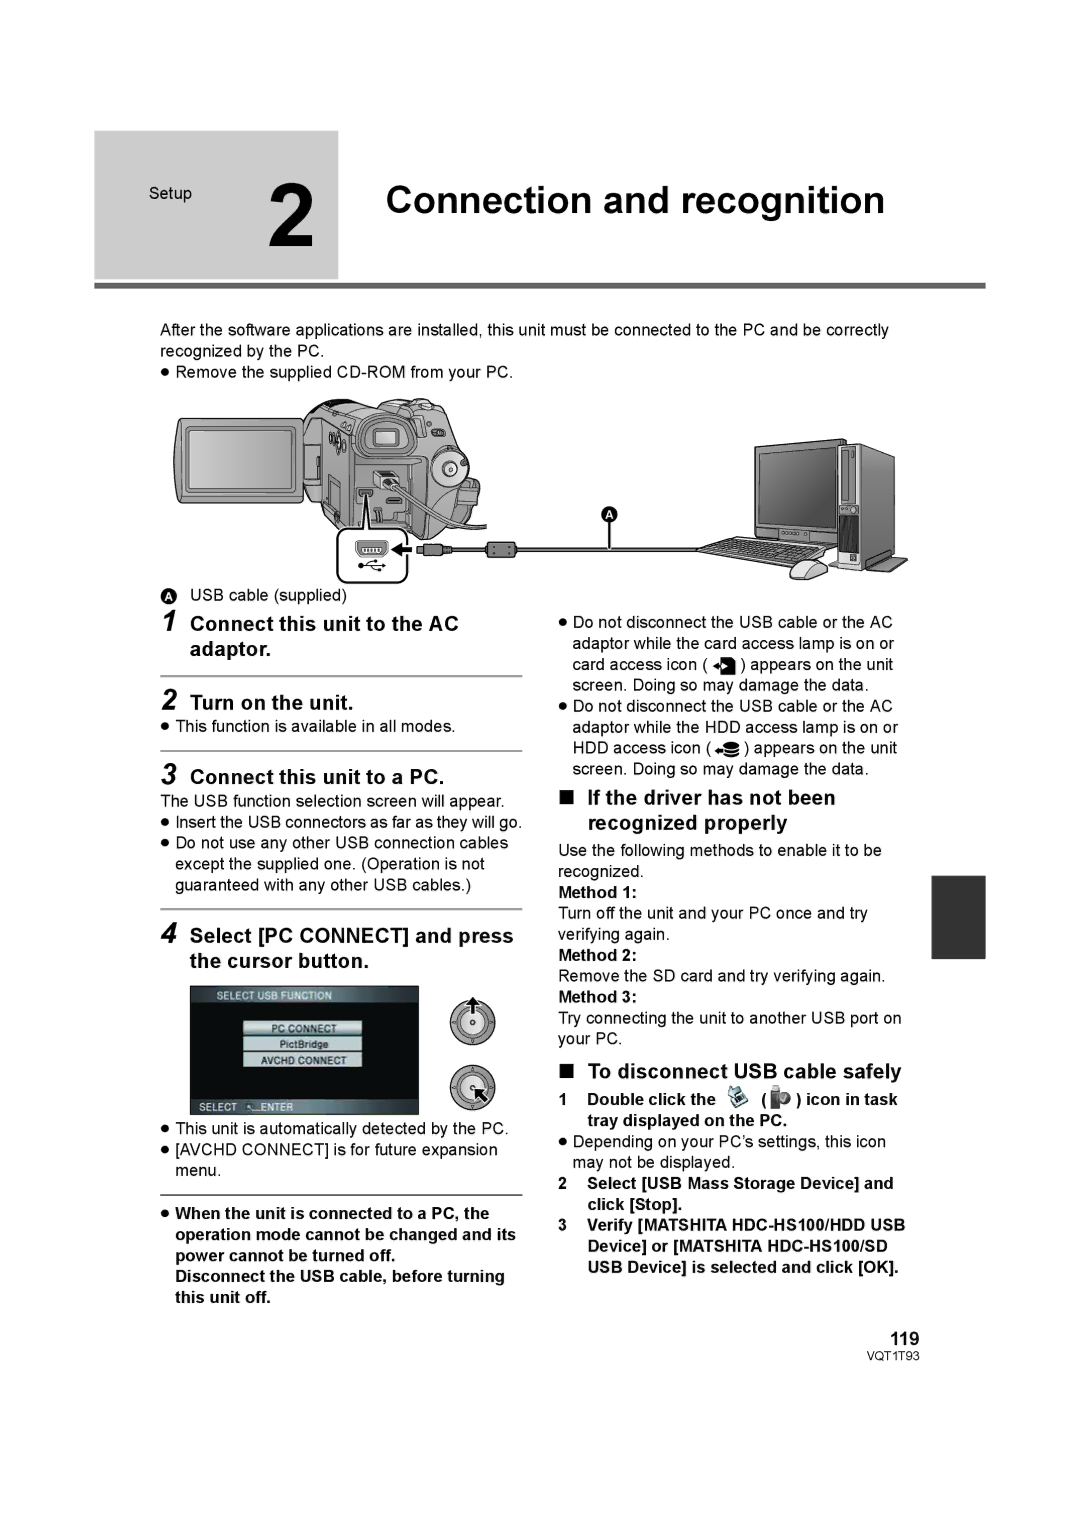
Connection and recognition
120
About the PC display
Copying your still pictures to your PC
121
Starting HD Writer 2.6E
122
If using Macintosh
123
Others
Open
Recording indications
0h00m00s
124
Playback indications
126
Confirmatory indications when a DVD burner is connected
PC connection indications
Confirmatory indications
127
Please Check External Drive or Disc
This Battery Cannot be Used
Error OCCURRED. Please Turn Unit OFF, then Turn on Again
128
129
About recovery
PRE-REC
Functions that cannot be
Used simultaneously
130
131
132
Troubleshooting
Auto focus function does not work
133
This unit cannot be operated though it is turned on
134
135
136
137
When the scenes were recorded on different dates
When more than 99 scenes were recorded on the same date
When scenes lasting under 3 seconds have been recorded
138
When PRE-REC was used for recording
When the setting of the 24p digital cinema is turned on/off
139
When deleting scenes
About this unit
When carrying the unit, do not drop or bump it
Cleaning
When you are not going to use the unit for an extended time
141
About the battery
About the AC adaptor
142
LCD monitor/viewfinder
About condensation
Causes of condensation
Auto focus
White balance adjustment
Explanation of terms
Automatic white balance
Recording a subject with little contrast
144
Recording a subject behind dirty or dusty window
145
Specifications
USB
146
DC output
147
Still pictures Recording media SD Memory Card
VW-VH04 RP-CDHM15 RP-CDHM30
Optional accessories
148
VW-AD21PP-K*1
149
Visa
Accessory Order Form For USA Customers
150
151
Request for Service Notice USA Only
152
Limited Warranty For USA Customers
Limited Warranty
Panasonic Video Products
153
Customer Services Directory
Centralized Factory Service Center
For hearing or speech impaired TTY users, TTY
154
Warranty For Canadian Customers
155
Index
Numerics
156
Cómo encender la unidad
Spanish Quick Use Guide/Guía española para el uso rápido
Carga de la batería
Inserción de la batería
Para salir del modo de ayuda
Selección del idioma
Modo de ayuda
Grabación de películas
159
Reproducción de películas
Reproducción de fotografías
Panasonic Canada Inc
Panasonic Puerto Rico, Inc