Operating Instructions
Safety Precautions
Things You Should Know
Thank you for choosing Panasonic
FCC Note
Following Applies only in the U.S.A
AC adaptor
Batteries
Important Safety Instructions
Indemnity concerning recording content
Precautions
Carefully observe copyright laws
Cards that you can use with this unit
Contents
Installation
Before using with a computer
Using HD Writer 2.0E for SX/SD
If using Macintosh
Accessories
Quick Guide
Inserting/removing an SD card
Securely close the SD card/battery cover
Recording motion pictures
Recording still pictures Jpeg images
Still picture Jpeg images playback
Motion picture playback
Select the scene to be played back
Press the cursor button Move the cursor button to operate
What is the AVCHD?
Features of the High Definition Video Camera
Very clear high definition pictures
High definition images
Watching high definition images
When connecting to a TV that does not have a Hdmi terminal
About the Sdhc Memory Card
About the compatibility of the recorded motion pictures
What is the EZ Sync?
Using the remote control for the TV for playback
Turning the power off
Automatic input switching
Important Notice
Saving data to a disc
Saving data to a computer
What you can do with HD Writer
SD Media Storage USA only
Parts identification and handling
About the cooling fan
Using grip belt
Flip the belt
Put your hand through the grip
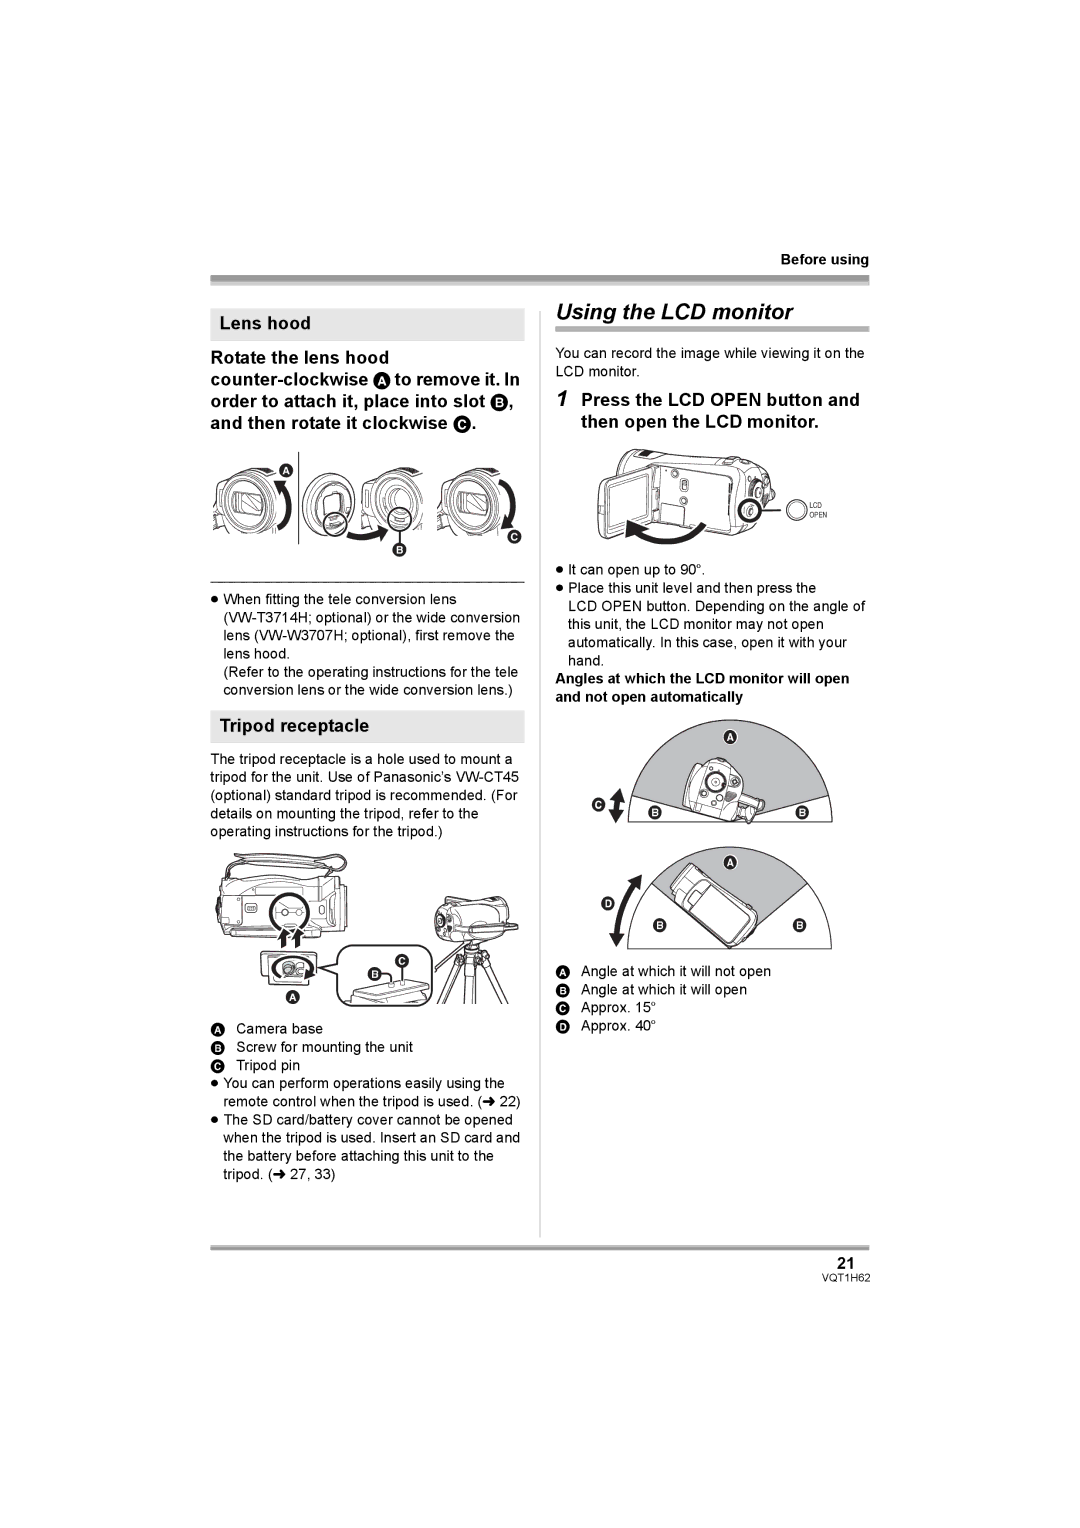
Using the LCD monitor
Tripod receptacle
Press the LCD Open button and then open the LCD monitor
Adjust the angle of the LCD monitor as desired
Using the remote control
Install a button-type battery
Remote control usable range
Concerning the button-type battery
Cards that you can use with this unit
Handling precautions
Card type
Sdhc Memory
256 MB
Card type Pro High Speed Super High Sdhc Memory
512 MB
Do not format it on a PC etc
Charging the battery
Connect the AC cable to the AC Adaptor and the AC outlet
Charging lamp
Close the SD card/battery cover
Inserting/removing the battery
About batteries that you can use for this unit
Charging and recording time
Charging time
Recordable time
About the remaining battery capacity indication
Connecting to the AC outlet
About the battery pack holder kit VW-VH04 optional
Attach the DC cable
How to turn off the power Set the mode dial to OFF
Selecting a mode Turning the unit on/off
Turning the power on and off with the LCD monitor
To turn on the power
To cancel Quick start
Quick start
Open the LCD monitor
Card access lamp Access
Securely close the SD card Battery cover
Inserting/removing an SD card
About the SD card
¬Rotate the mode dial to select
How to use the cursor button
¬ Rotate the mode dial to select
Basic operations
Operation icons displayed in each mode Recording mode
Set the AUTO/MANUAL/FOCUS switch to Manual
Set the AUTO/MANUAL/FOCUS switch to Focus
Playback mode Still picture playback
Playback mode In motion picture playback
Help mode
Using the menu screen
To exit the help mode
Language selection
Move the cursor button right or press the cursor button
Remote Control Operation
Press the Menu button
Select a menu item
Press the Menu button to exit the menu screen
Setting date and time
Press the cursor button to enter Selection
Changing the date and time display style
Color
Adjusting LCD monitor
Before recording
Basic camera positioning
Recording
About auto mode
Auto Ground-Directional Standby AGS
Turning the AGS function on/off
Screen indications in the recording mode
Rotate the mode dial to select
Recording motion pictures
To end the recording
PRE-REC function
Open the LCD monitor Press the PRE-REC button
To end PRE-REC
HG *1 HN *2 HE *3
≥ Recordable time using the battery l
Focus indication
Recording still pictures Jpeg images
Press the Photo Shot button fully to take the picture
To record still pictures clearly
Switching the shutter sound on/ off
Concerning the focusing area
About the focus indication
Card indication l Mega optical image stabilizer l
Picture size 1M 1920t1080
Picture quality
Recording Functions
About using the zoom microphone function
Zoom in/out function
Move the zoom lever
Recording Yourself
To cancel Intelligent contrast control
Intelligent contrast control
Rotate the LCD monitor towards the lens side
Fade in/fade out function
To cancel fading
Press the recording start/stop button
To select the color for fade in/out
To cancel the MagicPix function
Soft skin mode
To cancel the soft skin mode
MagicPix function
To stop the timer midway through
Self-timer recording
Backlight compensation function
Press the Photo Shot button
Built-in flash
When the flash is not used
To cancel the tele macro function
To cancel the red eye reduction function
Tele macro function
Red eye reduction function
To cancel the image stabilizer function
Image stabilizer function
Guide line function
To cancel the wind noise reduction function
To cancel the guide line function
Wind noise reduction function
Microphone level
To cancel the zebra display
To return to automatic setting
To cancel the color bar
Zebra display
Scene mode
Auto slow shutter mode
Set the AUTO/MANUAL/FOCUS switch to Manual
Manual recording functions
Move the switch down and set it to Focus position
Manual focus adjustment
Outdoor mode
To restore to the automatic adjustment
Manual adjustment mode
White balance
White balance sensor
Black balance adjustment
To restore to automatic adjustment
Manual shutter speed/aperture adjustment
Manual shutter speed adjustment
Manual iris/gain adjustment
Select the scene to be played back
Motion picture playback
Press the cursor button
Move the cursor button to operate
Operating with the remote control
Press the or 9 button on the remote control during playback
Skip playback to the start of a scene
Move the volume lever to change the volume level
To adjust the speaker volume during playback
Playing back motion pictures by date
Frame-by-frame playback
To cancel the resume playback function
To cancel the repeat playback function
Repeat playback
Resuming the previous playback
Still picture Jpeg images playback
Select the file to be played back
About still picture compatibility
Playback
Deleting scenes
Editing scenes
Deleting scenes one at a time
To continue deleting other scenes
Dividing a scene to delete
To continue dividing other scenes
To delete all the divided points
Editing still pictures
To complete the settings
Protecting scenes
Deleting still pictures
Protecting still pictures
Select the file to be deleted, then press the cursor button
To continue deleting other files
Dpof setting
What is DPOF?
To cancel all Dpof settings
Formatting
¬ Rotate the mode dial to select or
Formatting SD cards
Card management
Watching Video/Pictures on your TV
Press the EXT Display button on the remote control
To display the on-screen information on the TV
With other products
What is HDMI?
Connecting with a Hdmi cable optional
Connect this unit to a TV with the Hdmi cable optional
Start playback on this unit
Hdmi output resolution
About the settings when connecting with Hdmi
EZ Sync must be activated on the connected TV
Playback using EZ Sync Hdavi Control
To cancel EZ Sync Hdavi Control
Operate with the remote control for the TV
Audio Component Video
About the setting when connecting the component terminals
TV Aspect setting 169
Connecting with the AV cable supplied
Connect this unit to a TV with the AV cable supplied
To watch images with a 169 aspect ratio on a regular TV
With a DVD burner
Connecting a DVD burner to copy to a disc
About the time it takes to copy
Connect this unit to the AC adaptor
Insert the disc in the DVD burner
Copying all the scenes to discs
Selecting the scenes to copy to Disc
¬ Select the motion picture playback tab
With other products
Insert the copied disc in the DVD burner
Playing back a disc inserted in the DVD burner
Managing a disc inserted in the DVD burner
Dubbing images onto another video device
With a DVD recorder or video device
Connect this unit to a video device
To stop dubbing
With a printer PictBridge
Select the paper size setting on Paper Size
Connect this unit to a printer
Select PictBridge and press Cursor button
When you stop printing halfway
Select the layout setting on page Layout
What you can do with a computer
Before using with a computer
With a computer
Data type Available function Software used
Contents on provided CD-ROM
End User License Agreement
Operating environment for HD Writer 2.0E for SX/SD
Operating environment
Other requirements
With a computer Interface
Installing HD Writer 2.0E for SX/SD
Installation
Continue to follow the on-screen messages to install it
Insert the CD-ROM into the computer
Uninstalling software application
Computer must be rebooted for the application to work
Click Finish
Camera-Computer connection
Connection and recognition
About the computer display
Select PC Connect and press Cursor button
Copying your still pictures to your computer
To disconnect USB cable safely
Connect this unit to the computer Then select PC Connect
Double click the icon in task tray displayed on Computer
If the driver has not been recognized properly
Verifying the unit is correctly recognized by the computer
101
Method
Select PC Connect and then Press the cursor button
Using HD Writer 2.0E for SX
Click the Copy to PC button Click the Start copying button
102
Playing back the high definition images on the computer
Writing back to an SD card
103
≥ Start HD Writer 2.0E for SX/SD
104
Formatting a disc
Creating a DVD-Video disc
105
≥ The images are in conventional standard quality
106
If using Macintosh
Menu list
Menus and Indications
Language l Playback menus Still picture playback Play Setup
Playback menus Motion picture playback Play Setup
Language l Playback menus disc playback Disc Setup
Edit Scene
Power Save
Menus related to Setup Display
Demo Mode
Menus related to Advanced REC Lamp
Indications
Recording indications
110
Playback indications
Confirmatory indications when a DVD burner is connected
PC connection indications
Confirmatory indications
112
Messages
113
About recovery
114
Functions that cannot be used simultaneously
Troubleshooting
Unit operations
115
116
117
118
When connected to another device
With a computer
119
When more than 99 scenes were recorded on the same date
When the scenes were recorded on different dates
When scenes lasting under 3 seconds have been recorded
120
When PRE-REC was used for recording
When deleting scenes
121
122
123
When carrying the unit, do not drop or bump it
About this unit
124
About the battery
About the AC adaptor
125
LCD monitor
About the miniSD Card
About condensation
Causes of condensation
Explanation of terms
Automatic white balance
127
White balance
Auto focus
128
129
Specifications
130
131
132
Optional accessories
133
Accessory Order Form For USA Customers
134
Request for Service Notice USA Only
135
Limited Warranty For USA Customers
136
Customer Services Directory
Panasonic Canada Inc
Warranty For Canadian Customers
137
Camcorder Product One 1 year, parts and labour
138
Index
139
Spanish Quick Use Guide/ Guía española para el uso rápido
Grabación de películas
Insertar/extraer una tarjeta SD
141
Cierre firmemente la tapa de la tarjeta SD/ batería
Reproducción de películas
Grabación de fotografías Imágenes Jpeg
142
Seleccione la escena que desea reproducir
Reproducción de fotografías Imágenes Jpeg
143
Seleccione el archivo que desea reproducir
Panasonic Puerto Rico, Inc

 B B