VQT2M51
Model No. HDC-SD60P/PC HDC-TM55P/PC HDC-TM60P/PC HDC-HS60P/PC
Operating Instructions
High Definition Video Camera
≥ USE ONLY THE RECOMMENDED ACCESSORIES
Date of Purchase Dealer Purchased From Dealer Address Dealer Phone No
Model No Serial No
TO REDUCE THE RISK OF FIRE, ELECTRIC SHOCK OR PRODUCT DAMAGE
THE FOLLOWING APPLIES ONLY IN THE U.S.A FCC Note
THE FOLLOWING APPLIES ONLY IN CANADA
Battery pack Lithium ion battery pack
AC adaptor
U.S.A./CANADA CONSUMERS ATTENTION
For USA-California only
IMPORTANT SAFETY INSTRUCTIONS
Precautions
Information on Disposal in other Countries outside the European Union
≥ DO NOT EXPOSE YOUR CAMERA TO EXTENDED HIGH TEMPERATURE
If you see this symbol
∫ Indemnity about recorded content
∫ Handling of built-in memory HDC-TM55/HDC-TM60
∫ Handling of HDD HDC-HS60
Back up data periodically
∫ Cards that you can use with this unit
∫ For the purposes of these operating instructions
Operation may stop in hot or cold environments
Do not use the unit in low atmospheric pressures
Contents
Before using
Setup
Preparation
Before using
Setup
Using with a PC
Copy/Dubbing
Accessories
Battery pack
AC adaptor
AC cable
∫ Inserting the battery
∫ Charging the battery
∫ To turn on the power
∫ To turn off the power
∫ How to use the touch screen
∫ Selecting a mode
∫ Language selection
∫ Recording motion pictures
∫ Motion picture/Still picture playback
Motion picture playback 1/ Playback/Pause 6 Rewind playback
5 Fast forward playback ∫ Stops the playback and shows the thumbnails
1 Displays the direct playback bar. l Still picture playback
Parts identification and
handling
1 2 3 4
HDC-SD60/HDC-TM55/HDC-TM60
1819 20 21
21 Adjust zoom buttons l 22 Menu button MENU l
18 LCD monitor Touch screen l
19 Recording start/stop button l 20 Sub recording start/stop button l
27 28
27 Status indicator l 28 Photoshot button l
Thumbnail display switch / / Volume lever sVOLr In Playback Mode l
30 DC input terminal l
HDC-HS60
1 Power button l 2 Speaker
4 Optical image stabilizer button O.I.S. l 5 Mode switch l
6 Battery holder l 7 HDMI mini connector HDMI l 94
21 Adjust zoom buttons l 22 Menu button MENU l
2526 Battery release lever BATTERY l
1819 20 21
18 LCD monitor Touch screen l
27 28 29
27 Status indicator l 28 Photoshot button l
Thumbnail display switch / / Volume lever sVOLr In Playback Mode l
30 HDD access lamp ACCESS HDD 31 DC input terminal l
1 Power supply
∫ About batteries that you can use with this unit
The battery that can be used with this unit is VW-VBK180/VW-VBK360
Preparation
Removing the battery
Inserting/removing the battery
≥ Press the power button to turn off the power. l
Charging the battery
∫ Connecting to the AC outlet
1 Connect the AC adaptor to the DC input terminal
≥ The battery will not be charged if the power is turned on
Charging and recording time
∫ Charging/Recording time
Battery capacity indication
2 Recording to a card
Cards that you can use with this unit
Preparation
Still
Access lamp ACCESS A
Inserting/removing an SD card
Check that the access lamp has gone off
3 Securely close the SD card cover
Turning the power on and off with the power button
Turning the power on and off with the LCD monitor
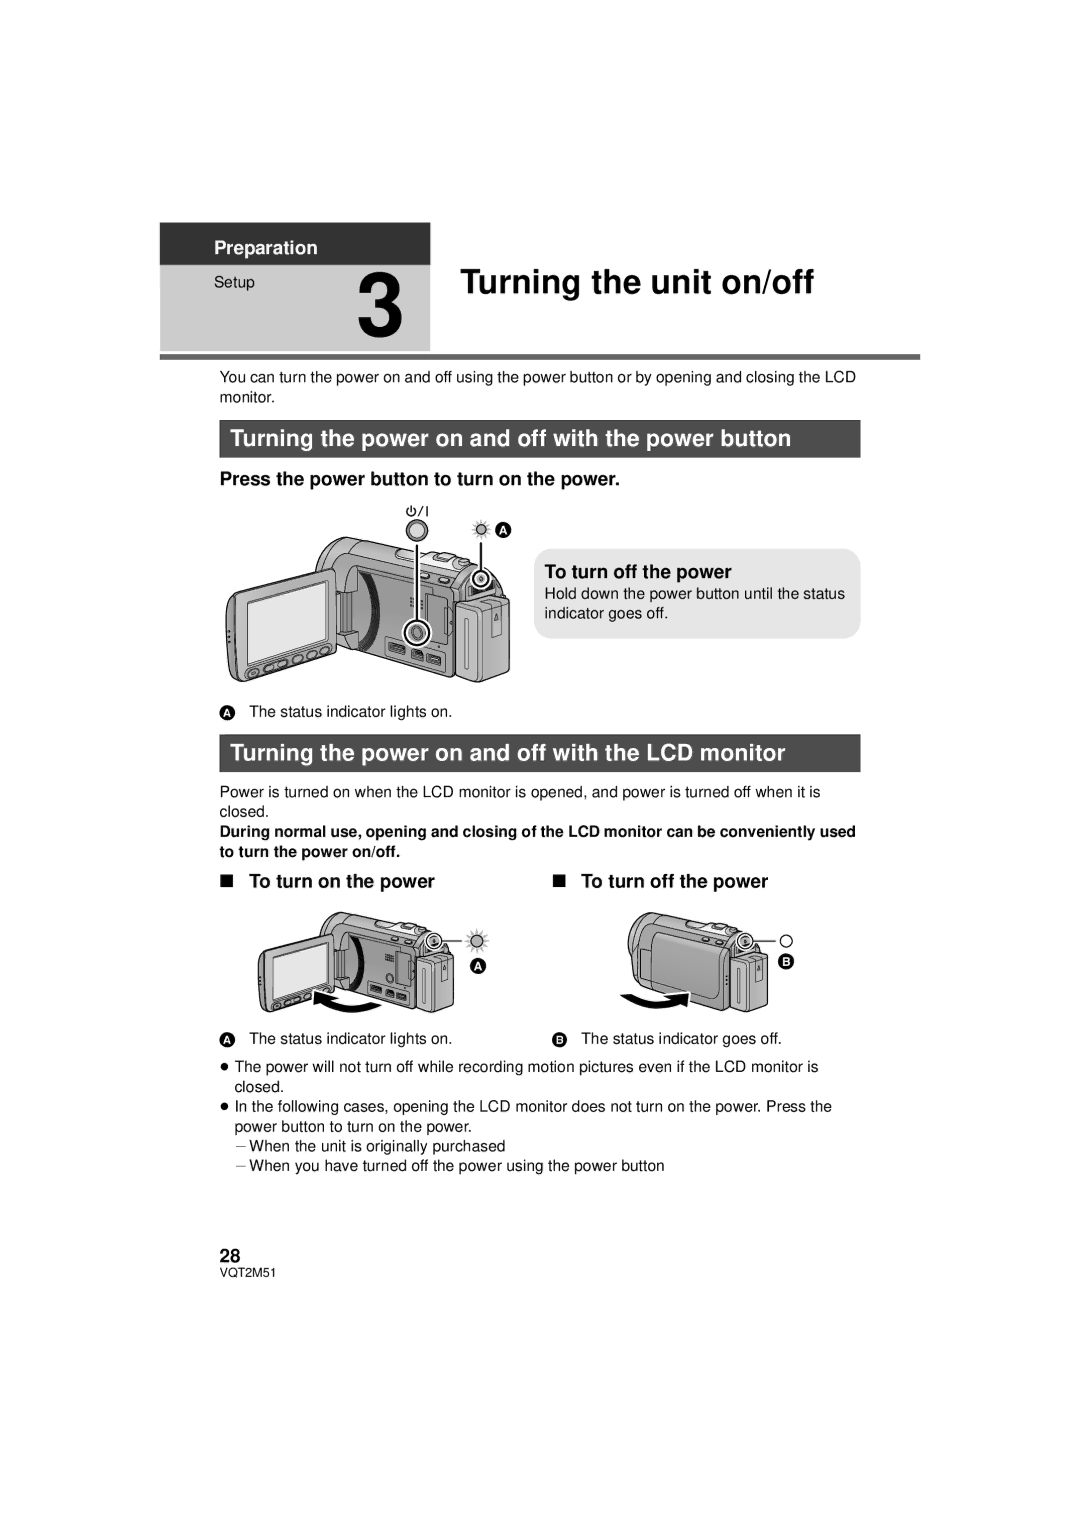
Press the power button to turn on the power
To turn off the power
Operate the mode switch to change the mode to , or
4 Selecting a mode
Preparation
Motion Picture Recording Mode l Still Picture Recording Mode l
5 Adjusting LCD monitor
How to use the touch screen
Recording Yourself
∫ Touch
6 Setting date and time
2 Touch the date or time to be set, then set the desired value using
1 Select the menu
3 Touch ENTER
Before recording
Basic
∫ Basic camera positioning
∫ Basic motion picture recording
HDC-TM55/HDC-TM60/HDC-HS60
1 Change the mode to or . 2 Select the menu
3 Touch the media to record motion pictures or still pictures
4 Touch ENTER
Recording motion
pictures
1 Change the mode to 2 Open the LCD monitor
3 Press the recording start/stop button to start recording
∫ Screen indications in the Motion Picture Recording Mode
About the compatibility of the recorded motion pictures
A Recording mode
C Recording time elapsed
Recording still pictures
3 Press the button halfway. For Auto focus only
4 Press the button fully Focus indication
Basic
∫ About the focusing area
Recording still pictures in Motion Picture Recording Mode
∫ About the screen indications in Still Picture Recording
∫ About the focus indication
Intelligent Auto Mode
Intelligent auto/Manual button
Press this button to switch Intelligent Auto Mode/Manual Mode
When the object is a
Automatic white balance
∫ Intelligent Auto Mode
Auto focus
Motion picture/Still
picture playback
Change the mode to
Touch the play mode select icon A
4 Touch the scene or the still picture to be played back
5 Select the playback operation by touching the operation icon
Motion picture playback
Still picture playback
∫ Speaker volume adjustment
∫ Change the thumbnail display
Motion picture compatibility
Still picture compatibility
1 Using the menu screen
4 Touch the desired item to enter the setting
5 Touch EXIT or press the MENU button to exit the menu setting
1 Press the MENU button. MENU 2 Touch the top menu A
2 Using the Setup Menu
Select the menu
DISPLAY
EXT. DISPLAY
To return the display to the home setting
DATE FORMAT
ECONOMY
Touch DESTINATION
QUICK POWER ON
QUICK START
3 Open the LCD monitor
OFF/ON
POWER LCD
HDMI RESOLUTION
3 Touch / to adjust settings 4 Touch ENTER
ALERT SOUND
TV ASPECT
INITIAL SET
FORMAT CARD
FORMAT MEDIA
CARD STATUS
MEDIA STATUS
CALIBRATION
1 Touch CALIBRATION
DEMO MODE
O.I.S. DEMO
OFF/ON
LANGUAGEEnglish/Français/Español
Zoom lever/Adjust zoom buttons
Zoom in/out function
Extra Optical Zoom
Advanced
Optical Image Stabilizer
Function
Optical image stabilizer button
Pressing the button changes the Optical image stabilizer setting
AF/AE tracking
3 Start recording
1 Touch
∫ About target frame
Recording with the video
light
Video light button
Advanced
Recording functions of
operation icons
Operation icons
1 Touch F to display the
Fade
Intelligent contrast control
∫ To select the color for Fade in/out
When you start recording, the image/audio gradually appears. Fade in
∫ To adjust the brightness of the flash
Smile Shot
Built-in flash
MENU PICTURE # FLASH LEVEL # desired setting ßj Less bright
Self-timer
To stop the timer midway through
Red-Eye Reduction
Intelligent exposure
Tele macro
Guideline
∫ Selecting the type of Guideline
∫ Displaying Guidelines at playback
menus
SCENE MODE
MENU RECORD SETUP # SCENE MODE # desired setting
Recording functions of
ZOOM MODE
REC MODE
≥ Change the mode to MENU RECORD SETUP # ZOOM MODE # desired setting
RELAY REC
FACE RECOG
≥ Change the mode to MENU RECORD SETUP # RELAY REC # ON
MENU RECORD SETUP # FACE RECOG. # desired setting
∫ Registering a face for face recognition
1 Align the person’s face with the guide
2 Touch REC or press the button fully
3 Entering the person’s name
∫ Canceling a registered person
2 Touch the desired item to enter the setting
Touch the person to cancel
∫ Changing the information of a registered person
NAME DISPLAY
FACE FRAMING
∫ Prioritized face framing
MENU RECORD SETUP # NAME DISPLAY # desired number OFF/1/2/3
AUTO SLOW SHTR
Digital Cinema Color
≥ Change the mode to MENU RECORD SETUP # AGS # ON
≥ Change the mode to ≥ Switch to Manual Mode. l
WIND NOISE CANCELER
SHOOTING GUIDE
ZOOM MIC
≥ Change the mode to MENU RECORD SETUP # SHOOTING GUIDE # ON
2 Touch / to adjust the microphone input level
MIC LEVEL
≥ Change the mode to ≥ Switch to Manual Mode. l 74 1 Select the menu
MENU RECORD SETUP # MIC LEVEL # desired setting
PICTURE ADJUST
2 Touch the desired setting items
3 Touch / to adjust settings 4 Touch ENTER
≥ Change the mode to or ≥ Switch to Manual Mode. l
PICTURE SIZE
∫ Picture size and Maximum zoom ratio
∫ Picture size in Motion Picture Recording Mode
≥ Change the mode to MENU PICTURE # PICTURE SIZE # desired setting
QUALITY
ASPECT RATIO
≥ Change the mode to or MENU PICTURE # QUALITY # desired setting
≥ Change the mode to MENU PICTURE # ASPECT RATIO # desired setting
HI-SPEED BURST
2 Press the button
3 Touch Record or Delete
Touch REC ALL or SELECT
AF ASSIST LAMP
SHTR SOUND
≥ Change the mode to ≥ Switch to Manual Mode. l
MENU PICTURE # AF ASSIST LAMP # AUTO
Press the iA/MANUAL button to switch to Manual Mode
Perform the setting by touching the desired item to be set
Manual recording
Advanced
White balance
1 Touch WB 2 Touch / to select White balance mode
∫ To set the white balance manually
≥ Press the iA/MANUAL button to switch to Manual Mode. l
Manual shutter speed/iris adjustment
1 Touch SHTR or IRIS 2 Touch / to adjust settings
≥ Press the iA/MANUAL button to switch to Manual Mode. l
Manual shutter speed adjustment
Manual focus adjustment
≥ Press the iA/MANUAL button to switch to Manual Mode. l
MENU RECORD SETUP # MF ASSIST # ON
Select the menu
Motion picture playback using operation icon
Playback Operations
Advanced
Touch 5 during playback to fast
Creating still picture from motion picture
2 Press the button fully
During Playback
Direct playback
Highlight&Time frame index
Repeat playback
1 Touch selected search condition
2 Touch the desired search condition
Resuming the previous playback
Zooming in on a still picture during playback Playback zoom
1 Touch the part you wish to zoom in on during still picture playback
2 Move your position on the zoomed still picture by touching 3/4/2/1
Various playback
functions
Playing back motion pictures/still pictures by date
1 Touch the date select icon 2 Touch the playback date
Touch Touch the desired playback mode
3 Touch the desired item
4 Touch START
5 Select the playback operation. l 40
∫ Scene setting
∫ Priority setting
1 Touch SELECT SCENES or SELECT DATE
Touch the scenes to be played back
∫ Playback time setting
∫ Date setting
∫ Music setting
Touch the playback time to set
Changing the playback setting and playing back the slide show
Touch START and start the audio testing
Touch Touch the desired item
Touch the playback date
When you stop deleting halfway
Deleting scenes/still
To delete by confirming images being played back
∫ Deleting multiple scenes/still pictures from the thumbnail display
Dividing a scene to partially delete
2 Touch the scene to be divided 3 Touch to set the dividing point
4 Press the MENU button to complete dividing
To complete editing
Deleting personal information
2 Touch the desired scenes with personal information to be deleted
3 Touch Delete
To delete all the divided points
Protecting scenes/still pictures
2 Touch the scene/still picture to be protected
MENU VIDEO SETUP or PICT. SETUP # SCENE PROTECT
1 Select the menu
2 DPOF setting
∫ What is DPOF?
To cancel all DPOF settings
2 Touch the still picture to be set
3 When the confirmation message appears, touch YES
Relay scene combining
HDC-TM55/HDC-TM60
1 Insert the SD card that was used for Relay recording
To cancel relay information
EDIT SCENE # RELAY INFO CANCEL
Watching Video/Pictures
on your TV
1 Connect this unit to a TV
Advanced
2 Select the video input on the TV
3 Change the mode to to play back
the screen
∫ To display the on-screen information on the TV
Connecting with a HDMI mini cable
Connecting with the AV multi cable
Changing the component output setting
MENU SETUP # HDMI RESOLUTION # AUTO/1080i/480p
Playback using VIERA Link
HDAVI Control
What is the VIERA Link?
MENU SETUP # VIERA Link # ON
3 Operate with the remote control for the TV
∫ Other linked operations
Turning the power off
Automatic input switching
Copying
Copy/Dubbing
Copying between SD card and Built-in Memory
HDD HDC-TM55/HDC-TM60/HDC-HS60
4 Touch EXIT when the copy complete message is displayed
When you stop copying halfway
3 Touch desired items following the screen display
Approximate time for copying
Connecting a DVD burner to
We recommend using Panasonic DVD burner VW-BN1/VW-BN2
copy to/play back a disc
Preparing for copying/playing back
1 Connect the AC adaptor supplied with DVD burner to the DVD burner
2 Connect this unit to the AC adaptor and change the mode to
4 Insert the disc in the DVD burner
5 Touch the desired item
∫ About recording formats when copying motion pictures
Copying to discs
1 Connect this unit to the DVD burner to prepare for copying. l
2 Touch the desired items following the instructions on the screen
Important Notice
Approximate time for copying to a disc
Disc type
Copy time
High Definition
Playing back the copied disc
1 Connect this unit to the DVD burner to prepare for playback. l
Managing the copied disc
∫ Formatting discs
∫ Auto protect
2 Copy to the disc. l
Dubbing images onto
other video devices
1 Connect this unit to a video device and then change the mode to
2 Start playback on this unit
What you can do with a
With a PC
HD Writer AE
∫ Smart wizard
∫ About Conversion Assist Function
Important Notice
Available function
Data type
End User License Agreement
∫ Operating environment for HD Writer AE
Operating environment
With a PC
∫ To use the HD Writer AE
Display
Free hard disk
drive space
Interface
∫ Operating environment for the card reader function mass storage
Other requirements
Installation
4 Select the country or region where you live, then click Next
1 Insert the CD-ROM into the PC
2 Click Next
5 Select where the application is to be installed, then click Next
Check the contents, then close the window
∫ Uninstalling HD Writer AE
1 Select Start # Control Panel # Uninstall a Program
2 Connecting to a PC
1 Connect this unit to the AC adaptor
2 Turn on the unit
3 Connect this unit to a PC
Charging the battery by connecting it to different devices
∫ To disconnect USB cable safely
1 Double click the icon in task tray displayed on the PC
2 Select USB Mass Storage Device and click Stop
About the PC display
∫ Copying your still pictures to your PC
4 The DPOF setting files 5 The motion picture thumbnails
Example folder structure of an SD card
Using with a PC 1 Starting HD Writer AE
Reading the operating instructions of the software applications
Select Start # All Programs # Panasonic # HD Writer AE 2.0 #
Operating Instructions 120
∫ Operating environment
∫ Copying still pictures on PC
1 Connect this unit to a PC via the supplied USB cable
2 Touch PC 3 Double-click CAMSD displayed on the desktop
Others
∫ Recording indications
HG 1920 R 1h20m
1h30m
1/100
Shutter Speed l
OPEN/F2.0
Iris Value l
∫ Confirmatory indications when a DVD burner is connected
∫ Playback indications
∫ Indication of connection to other devices
∫ Confirmatory indications
HDD BACKUP RECOMMENDED.*2
HDD ERROR OCCURRED. PLEASE TURN UNIT OFF, THEN TURN ON AGAIN.*2
CANNOT OPERATE DUE TO LOW TEMPERATURE.*2
THIS BATTERY CANNOT BE USED
PLEASE CHECK EXTERNAL DRIVE OR DISC
About recovery
scenes with will be deleted
Troubleshooting
Battery runs down
A clicking sound is heard when the unit is shaken
Remaining battery indication is not displayed properly
This unit cannot be operated though it is turned on
This unit does not operate normally
Item other than the touched one is selected
The unit arbitrarily stops recording
Any scenes/still pictures cannot be played back
The images are squeezed horizontally Scenes cannot be deleted
If the SD card is inserted in this unit, it is not recognized
If the SD card is inserted in another device, it is not recognized
The LCD monitor flickers indoors Object seems to be warped
White round spots like soap bubbles appear on the recorded picture
When connected by the USB cable, this unit is not detected by the PC
The power of the DVD burner cannot be turned on
VIERA Link does not work
Cannot see the PDF operating instructions for HD Writer AE
∫ If scenes do not change smoothly when played back on another device
≥ When the scenes were recorded on different dates
≥ When scenes lasting under 3 seconds have been recorded
≥ When PRE-REC was used for recording ≥ When deleting scenes
Cautions for use
About this unit
When carrying the unit, do not drop or bump it
Cleaning
When disposing of or giving away this unit, note that
When you are not going to use the unit for an extended time
Do not use the unit for surveillance purposes or other business uses
About the battery
Be sure to detach the battery after use
Prepare spare batteries when going out for recording
Do not throw an old battery into fire
About charging errors
About the AC adaptor
2 seconds
LCD monitor
About the SD card
When disposing of or giving away the SD card, note that
About personal information
About condensation
Causes of condensation
Indemnity
About copyright
∫ Carefully observe copyright laws
∫ Licenses
Others
Recording modes/approximate recordable time
Others
4 GB
8 GB
Number of recordable pictures
Others
Built-in memory
Built-in memory
Built-in memory
Built-in memory
110000
174000
Specifications
Power consumption
Signal system
Others
adjustment
AV multi connector
HDMI mini connector
AV multi connector
Mass Weight in
Operating temperature
Battery operation time
operation
Motion pictures
Recording SD card
media
Built-in
Power source
Power consumption
Dimensions
Mass Weight
Optional accessories
Accessory No
Others
Description
Class 10 64 GB SDXC Memory Card
Class 10 48 GB SDXC Memory Card
32 GB SDHC Memory Card
16 GB SDHC Memory Card
Accessory Order Form For USA and Puerto Rico Customers
Limited Warranty ONLY FOR U.S.A. AND PUERTO RICO
Panasonic Camcorder Products Limited Warranty
Limited Warranty Coverage For USA and Puerto Rico Only
Carry-In or Mail-In Service
Customer Services Directory United States and Puerto Rico
Accessory Purchases United States and Puerto Rico
As of November
For hearing or speech impaired TTY users, TTY
Warranty For Canadian Customers
PANASONIC PRODUCT - LIMITED WARRANTY
Camcorder Products - One 1 year, parts and labour
Panasonic Canada Inc
Index
Page
Spanish Quick Use Guide Guía española para el uso rápido
∫ Insertar la batería
∫ Insertar/extraer una tarjeta SD
∫ Carga de la batería
∫ Encender/apagar la unidad
∫ Selección del modo
∫ Cómo usar la pantalla táctil
∫ Selección del idioma
∫ Selección de un medio para grabar HDC-TM55/HDC-TM60/HDC-HS60
∫ Grabación de películas
MENU SELEC MEDIO
∫ Reproducción de película/ fotografía
Reproducción de películas 1/ Reproducción/Pausa 6 Rebobinado
durante la reproducción 5 Avance rápido durante la reproducción
∫ Detener la reproducción y visualizar las miniaturas
Panasonic Consumer Electronics Company
Division of Panasonic Corporation of North America
Panasonic Canada Inc
One Panasonic Way, Secaucus, NJ