Getting Started
Setting up
Screen size and throw distance
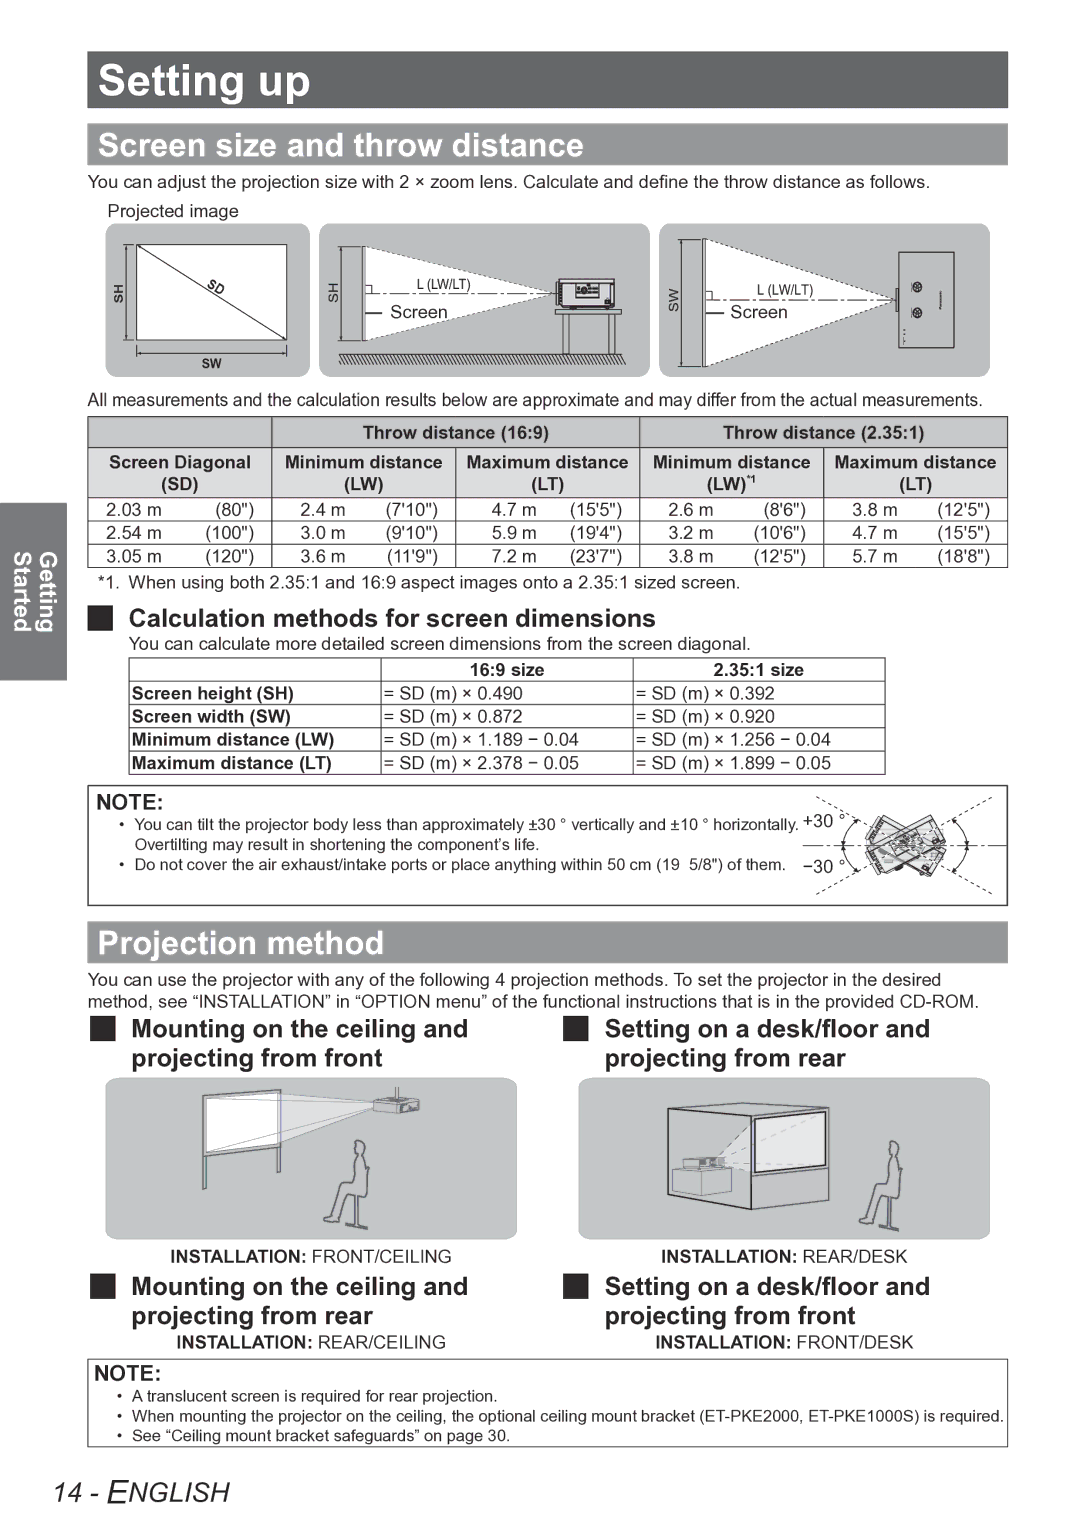
You can adjust the projection size with 2 × zoom lens. Calculate and define the throw distance as follows. Projected image
Getting Started
SH | Screen | Screen |
|
SW
All measurements and the calculation results below are approximate and may differ from the actual measurements.
|
|
| Throw distance (16:9) |
|
| Throw distance (2.35:1) |
| ||
Screen Diagonal | Minimum distance | Maximum distance | Minimum distance | Maximum distance | |||||
(SD) |
| (LW) | (LT) |
| (LW)*1 | (LT) |
| ||
2.03 m | (80") | 2.4 m | (7'10") | 4.7 m | (15'5") | 2.6 m | (8'6") | 3.8 m | (12'5") |
2.54 m | (100") | 3.0 m | (9'10") | 5.9 m | (19'4") | 3.2 m | (10'6") | 4.7 m | (15'5") |
3.05 m | (120") | 3.6 m | (11'9") | 7.2 m | (23'7") | 3.8 m | (12'5") | 5.7 m | (18'8") |
**** When using both 2.35:1 and 16:9 aspect images onto a 2.35:1 sized screen.
JJ Calculation methods for screen dimensions
You can calculate more detailed screen dimensions from the screen diagonal.
Screen height (SH) | 16:9 size | 2.35:1 size |
= SD (m) × 0.490 | = SD (m) × 0.392 | |
Screen width (SW) | = SD (m) × 0.872 | = SD (m) × 0.920 |
Minimum distance (LW) | = SD (m) × 1.189 − 0.04 | = SD (m) × 1.256 − 0.04 |
Maximum distance (LT) | = SD (m) × 2.378 − 0.05 | = SD (m) × 1.899 − 0.05 |
NOTE:
•• You can tilt the projector body less than approximately ±30 ° vertically and ±10 ° horizontally. +30 ° ![]()
![]()
![]()
![]()
![]() Overtilting may result in shortening the component’s life.
Overtilting may result in shortening the component’s life.![]()
•• Do not cover the air exhaust/intake ports or place anything within 50 cm (19 5/8") of them.
Projection method
You can use the projector with any of the following 4 projection methods. To set the projector in the desired method, see “INSTALLATION” in “OPTION menu” of the functional instructions that is in the provided
JJ Mounting on the ceiling and projecting from front
JJ Setting on a desk/floor and projecting from rear
INSTALLATION: FRONT/CEILING
JJ Mounting on the ceiling and projecting from rear
INSTALLATION: REAR/CEILING
INSTALLATION: REAR/DESK
JJ Setting on a desk/floor and projecting from front
INSTALLATION: FRONT/DESK
NOTE:
•• A translucent screen is required for rear projection.
•• When mounting the projector on the ceiling, the optional ceiling mount bracket
•• See “Ceiling mount bracket safeguards” on page 30.