NOTE:
BThe projected image will be paused when the cursor is displayed. Press the MENU button to cancel the still image. (If the adjustment menu is displayed, press the MENU button twice.)
BWhen there are same or similar colours in the projected image, these colours will also be changed.
BThe colours white, gray and black cannot be adjusted.
BIf the same colours are adjusted separately, these colours may not be adjusted to suit your preference.
BYou can adjust a maximum of 8 colours
(“USER1/2/3”). The cursor will not be displayed when 8 colours have already been adjusted.
PROFILE SAVE
PROFILE SAVE USER 1
USER 2
USER 3
![]() SELECT
SELECT ![]() ENTER
ENTER ![]() ESC
ESC
PROFILE SAVE
OK CANCEL
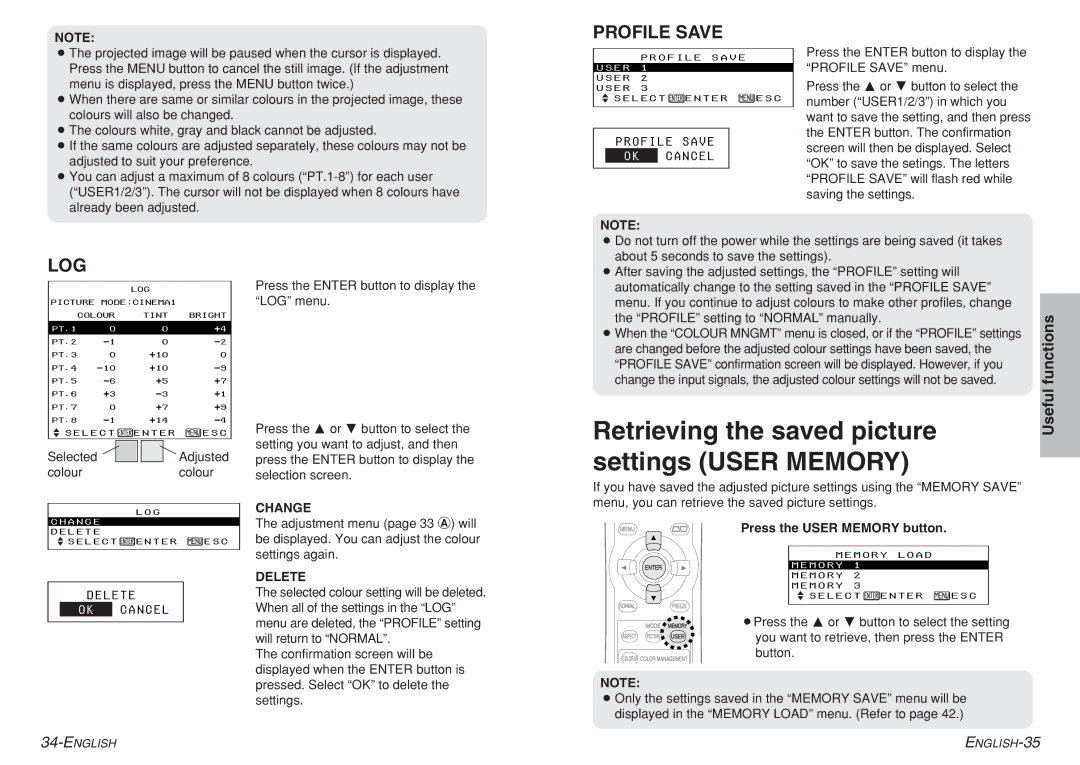
Press the ENTER button to display the “PROFILE SAVE” menu.
Press the F or G button to select the number (“USER1/2/3”) in which you want to save the setting, and then press the ENTER button. The confirmation screen will then be displayed. Select “OK” to save the setings. The letters “PROFILE SAVE” will flash red while saving the settings.
NOTE:
LOG
|
| LOG |
|
PICTURE MODE:CINEMA1 |
| ||
| COLOUR | TINT | BRIGHT |
|
|
|
|
PT.1 | 0 | 0 | +4 |
PT.2 | 0 | ||
PT.3 | 0 | +10 | 0 |
PT.4 | +10 | ||
PT.5 | +5 | +7 | |
PT.6 | +3 | +1 | |
PT.7 | 0 | +7 | +9 |
PT.8 | +14 | ||
SELECT | ENTER | ESC | |
Selected |
|
|
|
| Adjusted | |
colour |
|
|
| colour | ||
|
|
| LOG |
| ||
|
|
|
|
|
| |
| CHANGE |
|
|
|
| |
|
|
|
|
|
|
|
| DELETE |
|
|
|
| |
| SELECT | ENTER | ESC | |||
DELETE
OK CANCEL
Press the ENTER button to display the “LOG” menu.
Press the F or G button to select the setting you want to adjust, and then press the ENTER button to display the selection screen.
CHANGE
The adjustment menu (page 33 A) will be displayed. You can adjust the colour settings again.
DELETE
The selected colour setting will be deleted. When all of the settings in the “LOG” menu are deleted, the “PROFILE” setting will return to “NORMAL”.
The confirmation screen will be displayed when the ENTER button is pressed. Select “OK” to delete the settings.
BDo not turn off the power while the settings are being saved (it takes about 5 seconds to save the settings).
BAfter saving the adjusted settings, the “PROFILE” setting will automatically change to the setting saved in the “PROFILE SAVE” menu. If you continue to adjust colours to make other profiles, change the “PROFILE” setting to “NORMAL” manually.
BWhen the “COLOUR MNGMT” menu is closed, or if the “PROFILE” settings are changed before the adjusted colour settings have been saved, the “PROFILE SAVE” confirmation screen will be displayed. However, if you change the input signals, the adjusted colour settings will not be saved.
Retrieving the saved picture settings (USER MEMORY)
If you have saved the adjusted picture settings using the “MEMORY SAVE” menu, you can retrieve the saved picture settings.
Press the USER MEMORY button.
MEMORY LOAD
MEMORY 1
MEMORY 2
MEMORY 3
![]() SELECT
SELECT ![]() ENTER
ENTER ![]() ESC
ESC
BPress the F or G button to select the setting you want to retrieve, then press the ENTER button.
NOTE:
BOnly the settings saved in the “MEMORY SAVE” menu will be displayed in the “MEMORY LOAD” menu. (Refer to page 42.)
Useful functions
