Specifications
Power
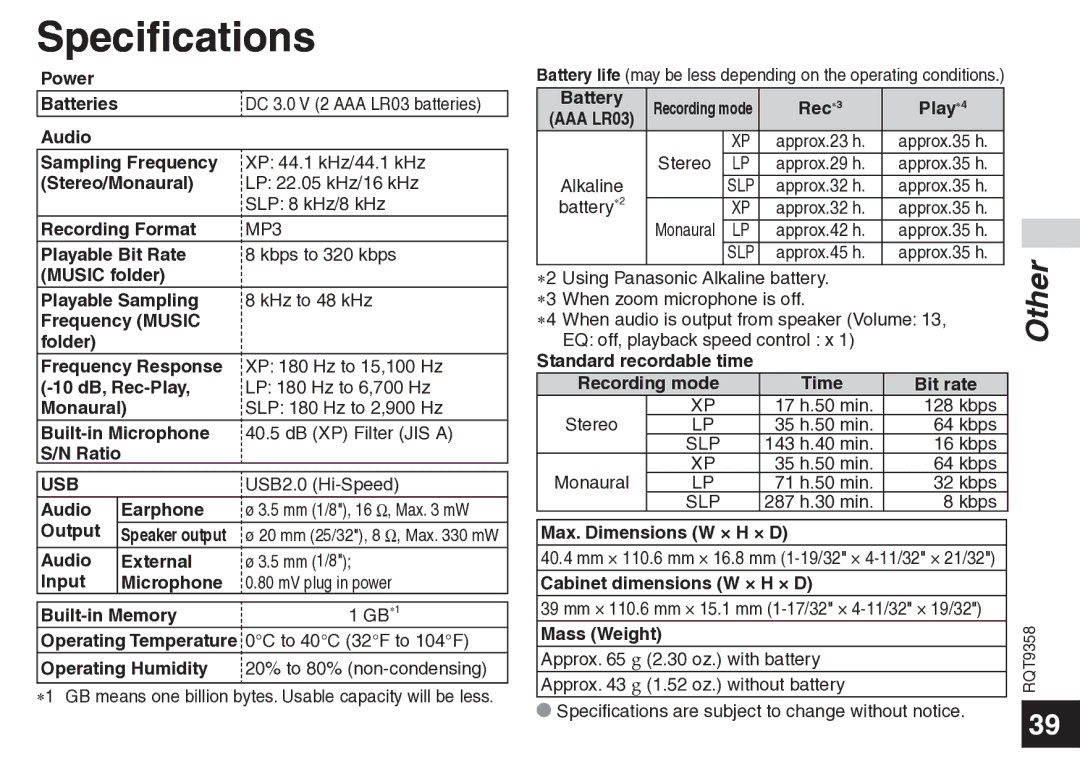
Batteries |
| DC 3.0 V (2 AAA LR03 batteries) |
Audio |
|
|
Sampling Frequency | XP: 44.1 kHz/44.1 kHz | |
(Stereo/Monaural) | LP: 22.05 kHz/16 kHz | |
|
| SLP: 8 kHz/8 kHz |
Recording Format | MP3 | |
Playable Bit Rate | 8 kbps to 320 kbps | |
(MUSIC folder) |
| |
Playable Sampling | 8 kHz to 48 kHz | |
Frequency (MUSIC |
| |
folder) |
|
|
Frequency Response | XP: 180 Hz to 15,100 Hz | |
LP: 180 Hz to 6,700 Hz | ||
Monaural) | SLP: 180 Hz to 2,900 Hz | |
40.5 dB (XP) Filter (JIS A) | ||
S/N Ratio |
|
|
|
|
|
USB |
| USB2.0 |
Audio | Earphone | ø 3.5 mm (1/8"), 16 Ω, Max. 3 mW |
Output | Speaker output | ø 20 mm (25/32"), 8 Ω, Max. 330 mW |
Audio | External | ø 3.5 mm (1/8"); |
Input | Microphone | 0.80 mV plug in power |
|
| |
1 GB∗1 | ||
Operating Temperature ![]() 0°C to 40°C (32°F to 104°F)
0°C to 40°C (32°F to 104°F)
Operating Humidity ![]() 20% to 80%
20% to 80%
∗1 GB means one billion bytes. Usable capacity will be less.
|
|
|
|
|
Alkaline |
|
|
|
|
|
|
|
| |
| SLP | approx.32 h. | approx.35 h. | |
battery∗2 |
| XP | approx.32 h. | approx.35 h. |
| Monaural | LP | approx.42 h. | approx.35 h. |
|
| SLP | approx.45 h. | approx.35 h. |
∗2 | Using Panasonic Alkaline battery. |
| ||
∗3 | When zoom microphone is off. |
| ||
∗4 | When audio is output from speaker (Volume: 13, | |||
| EQ: off, playback speed control : x 1) |
| ||
Standard recordable time |
|
| ||
| Recording mode | Time | Bit rate | |
| Stereo | XP | 17 h.50 min. | 128 kbps |
| LP | 35 h.50 min. | 64 kbps | |
|
| SLP | 143 h.40 min. | 16 kbps |
Monaural | XP | 35 h.50 min. | 64 kbps | |
LP | 71 h.50 min. | 32 kbps | ||
|
| SLP | 287 h.30 min. | 8 kbps |
Max. Dimensions (W × H × D)
40.4mm × 110.6 mm × 16.8 mm
Cabinet dimensions (W × H × D)
39 mm × 110.6 mm × 15.1 mm
Mass (Weight)
Approx. 65 g (2.30 oz.) with battery Approx. 43 g (1.52 oz.) without battery
*Specifications are subject to change without notice.
Other
RQT9358
39