Attached Installation Guide
Thank you for purchasing a Panasonic product
Introduction
Important Information
Preparation
Doorphone
Accessory information
Product names used in these Operating Instructions
Included items
VL-SW250BX
Additional/replacement accessories
Accessory items Order number
When using with a lobby station
Compatible Panasonic PBXs
For your safety
Power connection
Installation
Operating safeguards
Installation and relocation
Important safety instructions
Battery
For best performance
Before using
Environment
Other information
Tapping
Privacy and rights of portrait
Others
Location of controls
Door station
Main monitor station
Press Volume d
Monitor display Main monitor station
Display during operation
Operation guidance
Sub monitor station
Battery cover
Rear view Speaker Charge contacts Metallic parts Charger
Charge contacts
Charger stand
Monitor display Sub monitor station
OFF
Back Next
LImages on the monitor display
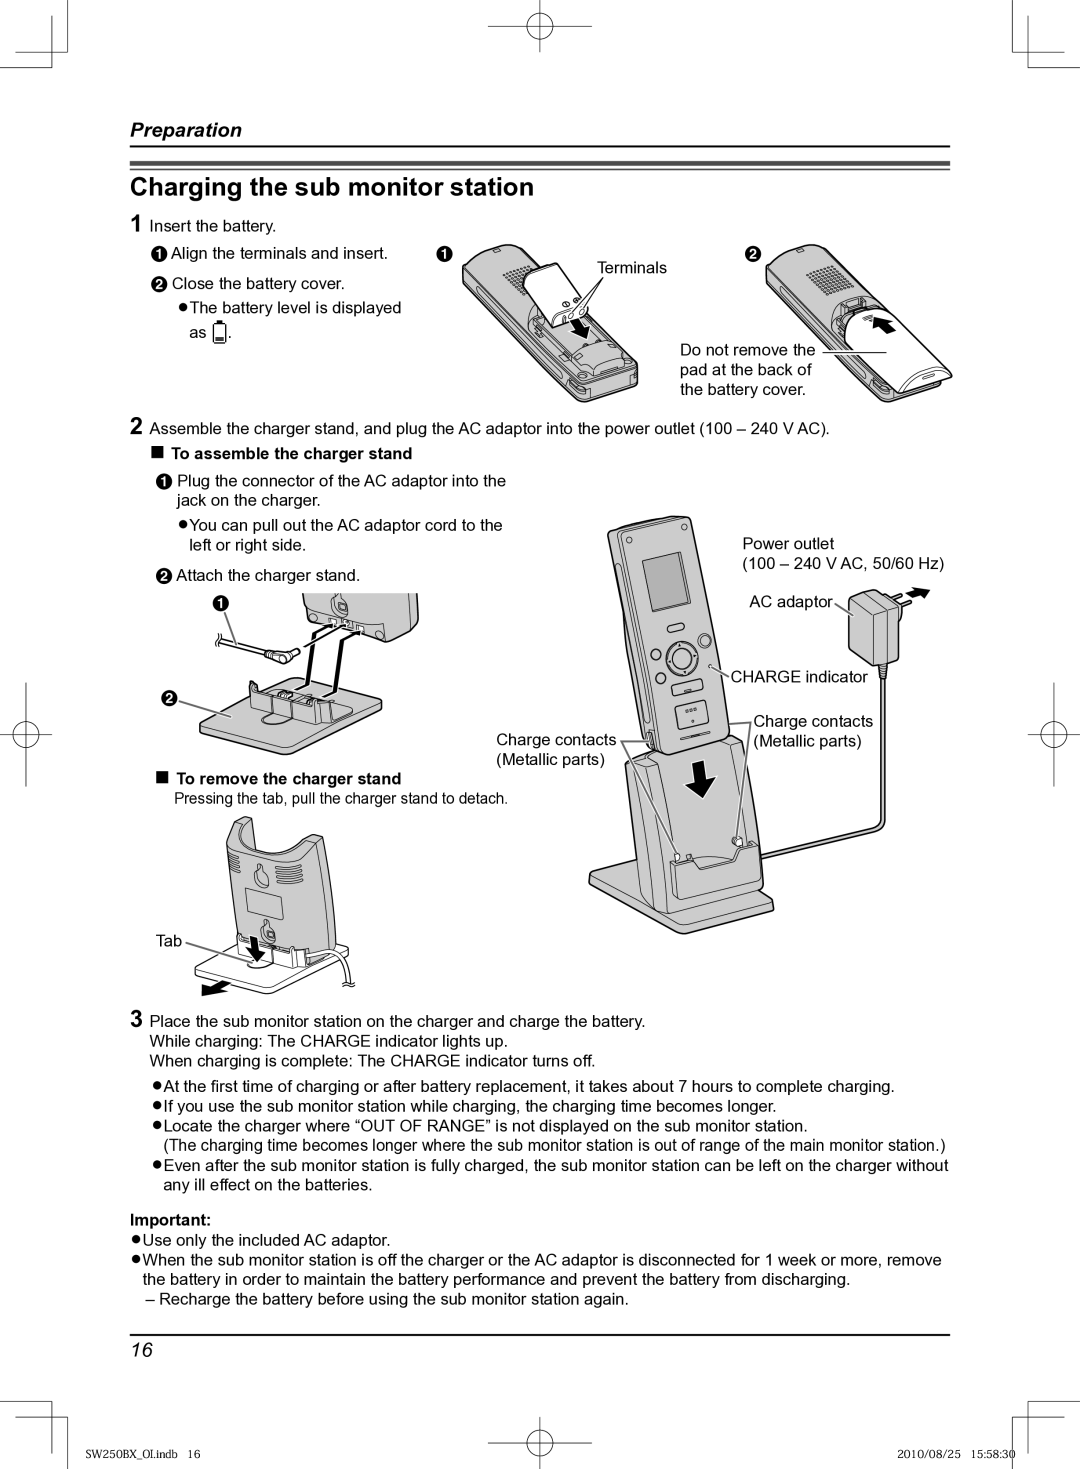
Charging the sub monitor station
Pad at the back
To assemble the charger stand
To remove the charger stand
Volume Voice Changer
Setting the date and time
Voice Changer Next
Answering a call by voice sensor Voice answer mode
When using an additional door station
Answering a call
Microphone
Features during a call or while monitoring
Adjusting the display brightness Main monitor station
Adjusting the speaker volume Main monitor station
Main monitor station only
Using Door KEY button
To speak to the visitor
Speak while pressing and holding Talk
To hear the visitor
Volume
Transferring a call
To transfer a call
To receive a transferred call
When answering a call
Monitor Talk OFF
Monitor OFF Talk
NTo speak to the other party
When installing 2 door stations
Press Volume or page , then
Monitoring the outside Door station monitor
Monitor
NAuto image update
Recording an image
Auto recording
PLAY/REC
Press PLAY/REC
Manual recording
Press D REC
Voice Changer Menu Volume OFF
Viewing recorded images using the main monitor station
NTo view the next image
Voice Changer Back
Menu Pause
Menu Play
Menu Menu
Viewing recorded images using the sub monitor station
NTo view a series of 8 continuous images
Image status
Button and guidance Operation Back
Volume Menu
Protecting the recorded images
Select
To release protection
Press Volume YES
Erasing an image
You can erase unnecessary images
Menu OFF
Caller Receiver
Volume Menu OFF
OFF Talk
Adjusting the ringer volume
Changing the ringer tone
Main monitor station Sub monitor station
Ringer tone patterns
Sound Sound 1 REPEAT*1 Sound 2 REPEAT*1 Sound 3 REPEAT*1
Setting Door KEY button
Press Menu OK, then select Door KEY by pressing Volume or
Volume or
Press Menu OK, then select the desired item by pressing
How to change the function settings
Item function Setting
Function list of the main monitor station
Time and Date
NORMAL, LOW
PICTURES, 1 Picture
Lobby
Terminal 2 SIGNALS, 2 Terminals 1 Signal
External Device
REGISTRATION/CANCELLATION Registration Cancellation
Demo Mode
Function list of the sub monitor station
Ring Volume Door HIGH, MEDIUM, LOW, OFF
Station
Init Settings YES, no
Voice Answer ON, OFF
Disp REC Date ALWAYS, 3 SEC
Contrast
Expanding your system with optional units
Sub monitor station*1 Door station*1 Main monitor station
Units required to be installed Adding a door station
Using with Panasonic PBX
Operating the door opener
Please use only a Panasonic PBX
Using the main monitor station
Using the sub monitor station
To register a canceled sub monitor station page 46 again
Adding a sub monitor station Registration
Setting a repeater Registration
To power outlet 100 240 V AC
Status indicator
Program
Canceling registration of the sub monitor station/repeater
Cancellation
Monitor display Problem Cause & Solution
Troubleshooting
Away from those appliances. Try again
Conversation Doorphone/Intercom Problem Cause & Solution
Problem Cause & Solution
Ringer tone Problem Cause & Solution
Others Problem Cause & Solution
Sub monitor station/Battery Problem Cause & Solution
Remove the battery and insert it again
Help
Error messages
Sub monitor station only Problem Cause & Solution
Cleaning
Battery replacement
Specifications
Main monitor station VL-MW250BX
Sub monitor station VL-W605BX
Door station VL-V566BX
Function Settings
Lring Volume Lring Tone
Lvoice Answer Lvoice Changer Lplay Lamp Flashing
Lcontrast Lregistration
Loutgoing VOL
For your future reference
Attach your sales receipt here