Operating Manual
Regarding trademarks
Regarding copyrights
About the Camera
For Using Your Camera Safely
To users of this camera
About the Battery Charger and AC Adapter
Precautions for D-LI109 Battery Usage
About the Rechargeable Lithium-ion Battery
About the Usage of AA Batteries
Care to be Taken During Handling
Before Using Your Camera
Storing Your Camera
About the Battery and Charger
Precautions on Carrying and Using Your Camera
Cleaning Your Camera
About SD Memory Cards
Write-protect switch
About Eye-Fi Cards
Regarding User Registration
Memo
Before Using Your Camera
Contents
Getting Started
Shooting Functions
Basic Operations
Shooting Settings
Playback Functions and Image Editing
Connecting to a Computer
Changing Additional Settings
Appendix
Using the Flash
Composition of the Operating Manual
Indicates precautions to take when operating the camera
Symbols used in this Operating Manual are explained below
Indicates useful information
How to Change Function Settings
Before Using Your Camera
Checking the Contents of the Package
Names and Functions of the Working Parts
DGreen button
Capture Mode
Main switch
EV Compensation Button
Lens unlock button
Mode dial
Focus mode switch
Front e-dial R
Four-way controller
Playback Mode
3button
I Delete button
Shooting Info Display Selection screen
Capture Mode
Monitor Display
Control panel
Status screen
Settings for shooting with the viewfinder are displayed
Camera
Button guide AE Metering p.97 AE Lock p.96
Live View
Your
AF frame
Before Using Your Camera
Mode
Still picture capture mode
Before Using Your
Control panel
Display Off Nothing is displayed on the monitor
Shooting Info Display
Red
Return to the status screen
Display Indicators are displayed Detailed Information
Playback Mode
Single image display Standard Information Display
Detailed Information Display
Use the four-way controller 23 to switch between pages
Still picture
Focus mode p.101/AF point p.104/Contrast AF p.106
Histogram before and after shooting
Using the Histogram
Histogram Display/RGB Histogram Display
Histogram shows the brightness
Guide Indicators
Viewfinder
Changing AF point p.105
Before Using Your Camera 10 ISO/ISO Auto p.87
Sensitivity/Remaining image storage capacity
AE Lock p.96
Electronic Level Display
Press the 4button
How to Change Function Settings
Using the Direct Keys
Press the four-way controller Standby mode
Control panel appears
Using the Control Panel
Press the Mbutton Standby mode
Setup screen of the selected item appears
Halfway
Using the Menus
Press the 3button in standby mode
Press the 3button or the shutter release button
Press the four-way controller
Use the four-way controller 23 to select a setting
Press the four-way controller 5 twice
Use the four-way controller 23 to select an item
Press the 3button
Turning the Camera On and Off Initial Settings
Attaching the Strap Inserting the Battery
Attaching a Lens
Attaching the Strap
Battery charger
Inserting the Battery
Using the Lithium-ion Battery
Charging the Battery
GettingStarted
Inserting/Removing the Battery
Available Batteries Characteristics AA lithium batteries
Using the AA Batteries
Close the battery cover
Battery cover is locked
Battery Level Indicator
Open the battery cover
Using the AC Adapter
GettingStarted
Inserting/Removing an SD Memory Card
Push the SD Memory Card in once to remove
Close the card cover 3, Then slide it in the direction Arrow
Attaching a Lens
To remove the lens
Remove the front lens cap by
Pushing the indicated portions
Inward
Getting Started
Adjusting the Viewfinder Diopter
Always turn the camera off when not in use
Turn the main switch to on
Turning the Camera On and Off
W Hometown screen appears
Initial Settings
Setting the Display Language
Initial Setting screen appears in the selected language
Press the four-way controller 3 to select DST, and use
Initial Setting screen reappears
Use the four-way controller
To select a city
Choose mm/dd/yy, dd/mm/yy or yy/mm/dd
Setting the Date and Time
Use the four-way controller 23 to set the month
Set the current date and time and the display style
TimeTime 10001000
Memo
Basic Operations
Taking Pictures Using the Viewfinder Set the mode dial to n
Letting the Camera Choose the Optimal Settings
Basic Shooting Operation
Look through the viewfinder to View the subject
Set the focus mode switch to l
Flash
Is available. p.72
Press the shutter release button fully
Review the captured image on the monitor
Available operations
Live View image is displayed on the monitor
Setting the Flash Mode
Using the Built-in Flash
Capture Mode Selectable Flash Mode E/F/r G/H/I/r A/p K/r
Press the four-way controller 4 in standby mode
Operations
Compensating Flash Output
Press the four-way controller 3 in on p.69
Turn the rear e-dial S
Press the Ebutton
Using the Built-in Flash
Take a picture
You can play back captured images with the camera
Reviewing Images
Playing Back Images
Press the Q button
Image is deleted
Deleting a Single Image
You can delete images one by one
Delete confirmation screen appears
Memo
Taking Pictures Continuously
Setting the Exposure Focusing
Checking the Depth of Field Preview
Camera Shake
Direct Keys Setting Items
How to Operate the Shooting Functions
Rec. Mode Menu Items
GPS
Sets the microphone sensitivity Movie SR *1
Movie Menu Items
Framerate *1 Sets the number of frames shot per Second 130
Quality Level *1 Sets the quality level of the movie
Custom Setting Menu Items
215
Save Menu Location
Dial indicator
Selecting the Appropriate Capture Mode
Capture Mode Characteristics NAuto Picture mode
Mode for the subject
Auto Picture Modes
HDR
Scene Modes
Press the Mbutton
Selecting a Scene Mode Set the mode dial to H
Camera switches to the Hmode status screen
Scene Mode selection screen appears
Automatic Exposure Aperture value Manual Exposure
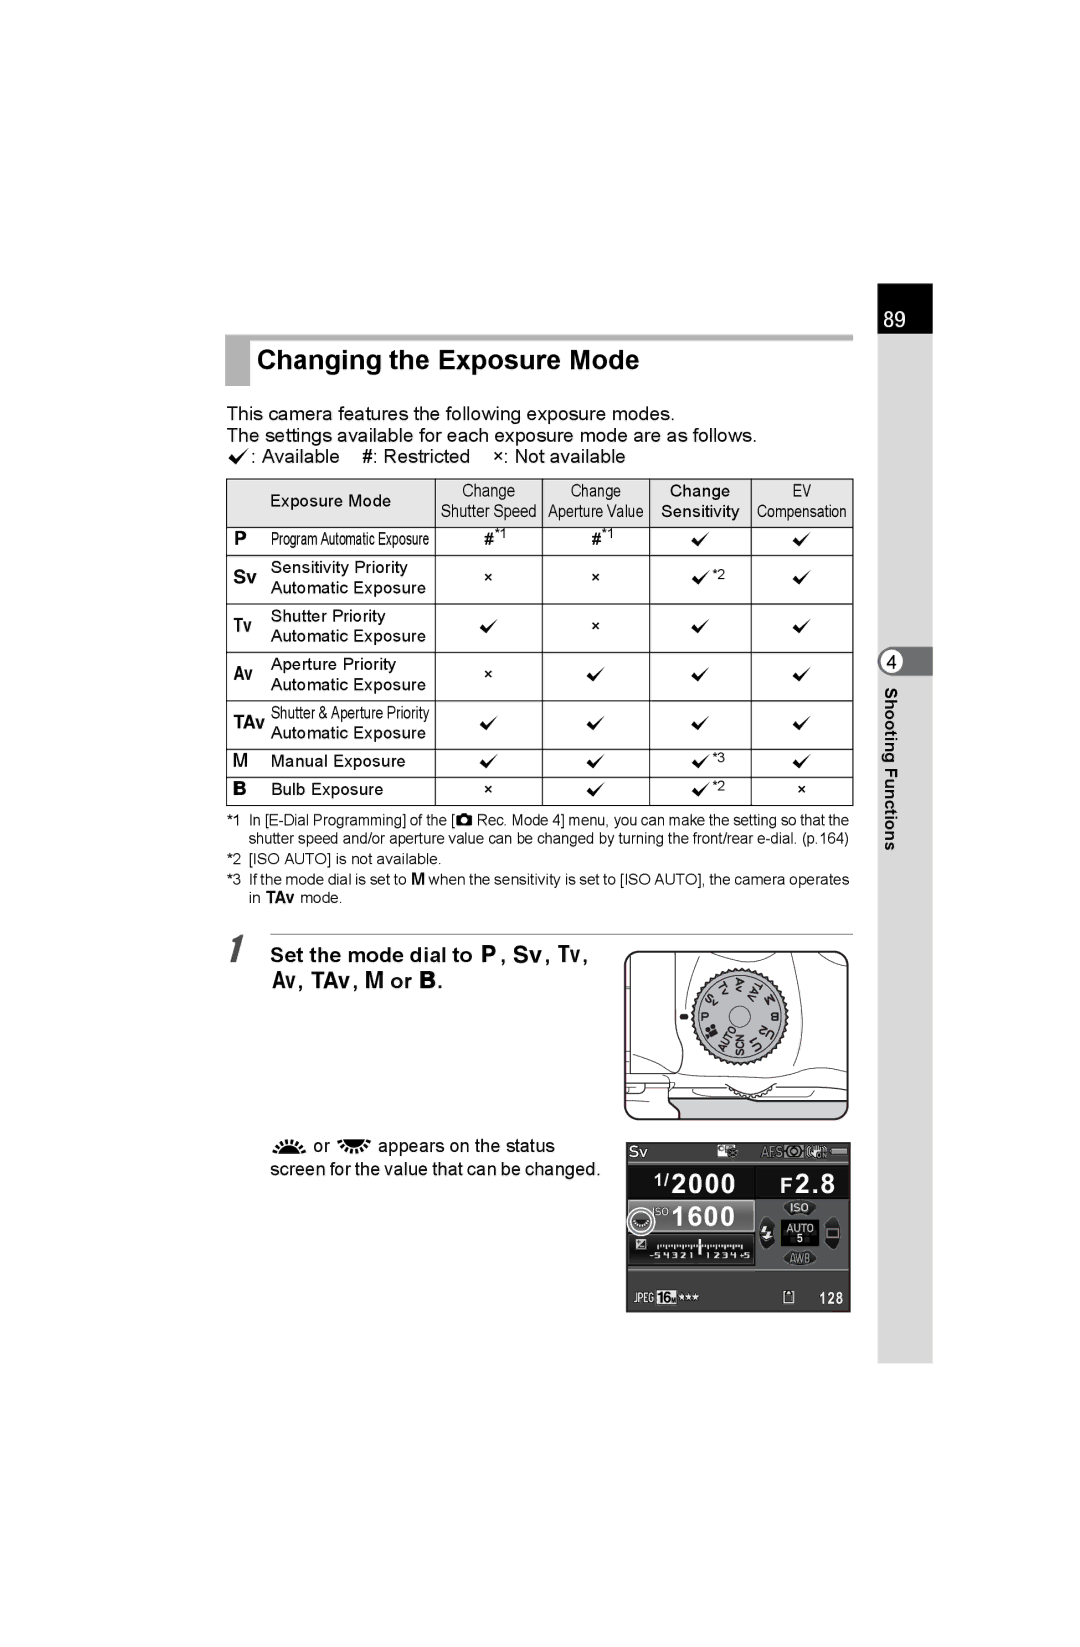
Exposure Modes
Functions
Priority
Use the four-way controller 23 to select ISO Auto or ISO
Setting the Exposure
Setting the Sensitivity
Press the four-way controller 2 in standby mode
ShootingFunctions
Set the mode dial to e, K, b, c, L, a or p
Changing the Exposure Mode
Available # Restricted × Not available
Turn the front e-dial R
Shutter speed can be changed in b, L, or a mode
Take your finger off the shutter release button
Bulb Shooting
Exposure ends
Exposure is adjusted
Adjusting the Exposure
Press the m button 1, and then turn the rear e-dial S
Standard exposure Underexposure Overexposure
+ Standard Underexposed Overexposed default setting
Set the bracket value
Press the four-way controller 5 in standby mode
Press the shutter release button halfway
Press the shutter release button fully
Set the exposure, and press the =/Lbutton
Refer to Setting the =/LButton Operation p.169 for details
Locking the Exposure Before Shooting AE Lock
Assign AE Lock to the =/Lbutton
Camera returns to the control panel
Press the Mbutton in standby mode
Selecting the Metering Method
AE Metering screen appears
High-ISO NR screen appears
Reduces noise at high ISO sensitivity settings
Reducing the Image Noise Noise Reduction
High-ISO NR
Sensitivity value
To select a sensitivity value,
To set the level of noise reduction
Which is applied to the selected
Shooting Functions
100
Slow Shutter Speed NR
Reduces noise during long exposures
101
Focusing
Setting the Focus Mode
TTL phase-matching autofocus
102
Autofocus Modes when Shooting with the Viewfinder
FPS
103
104
Selecting the Focusing Point AF Point
AF Active Area screen appears
Select the desired AF point
105
106
Setting the Contrast AF during Live View
Contrast AF screen appears
107
Select the AF area
Selecting the Desired Focusing Area
108
Select G in on p.106, and press the 4button
Autofocus system operates
Checking the Focus
109
Turn the rear e-dial S to change the magnification
Focusing Using the Viewfinder
Adjusting the Focus Manually Manual Focus
110
Press the 4button or the shutter release button halfway
111
Image on the monitor is magnified
112
AF Fine Adjustment
Press the four-way controller 5, and adjust the value
21. AF Fine Adjustment screen appears
Press the 3button three times
Adjustment value is saved
How to Take Pictures
113
Preview Method Description Optical Preview
Checking the Depth of Field Preview
Displaying the Optical Preview
Take your finger off the V/Ybutton
Focus on the subject, and press the V/Ybutton
Displaying the Digital Preview
115
Assign Digital Preview to the V/Ybutton
Taking Pictures Using the Shake Reduction Function
Using the Shake Reduction Function to Prevent Camera Shake
Shake Reduction screen appears
You can also change the setting from the a Rec. Mode 3 menu
Self-timer shooting
117
Correcting the Tilt of the Images
118
Use the four-way controller 45 to select P Off or O On
119
Shooting with the Self-timer
Camera is ready to take a picture
120
121
Shooting with a Remote Control Unit Optional
122
Continuous Shooting
Taking Pictures Continuously
123
124
Interval Shooting screen appears
Press the 4button to complete the setting
Interval Shooting
125
If you selected Now, proceed to Step
126
Camera is ready to take a series of interval pictures
127
Select from 2 to 9 shots
Multi-exposure
128
Multi-exposure screen appears
Exposure Bracketing and Lens Correction are not available
129
Take the picture
Multi-exposure is ended
Compensation value. default setting
Changing the Settings for Movie Recording
Set the mode dial to C, and press the 3button
Movie Capture Settings screen appears
Set Quality Level to C, D, or E Press the 3button
131
Select Recorded Pixels
Select Framerate
Press the shutter release button again
Set the mode dial to C
Recording Movies
132
Flash is not available
133
134
Interval Movie
Interval Movie screen appears
135
Movie playback starts
Playing Back Movies
136
First frame of the movie is displayed on the monitor
Save confirmation screen appears
137
Capturing a Still Picture from a Movie
Press the m button
Editing Movies
Select a point where you want to divide the movie
138
139
140
Correcting Images
Setting a File Format
Setting the White Balance
Setting the Image Finishing Tone
Image Capture Settings screen appears
Setting a File Format
Settings
You can set the format of image files
File Format
Jpeg Recorded Pixels
143
You can select a color space to use
Jpeg Quality
Color Space
144
145
Setting the White Balance
Fine-tune the white balance
Press the four-way controller 3 in standby mode
146
Use the four-way controller 45 to select the white balance
Use the four-way controller 45 to select K1 to K3
Adjusting the White Balance Manually
147
Select K in on p.146, and press the four-way controller
148
Saving the White Balance Settings of a Captured Image
Turn the front e-dial R to select an image
149
Adjusting the White Balance with Color Temperature
Highlight Correction or Shadow Correction screen appears
Brightness Adjustment
Use the four-way controller 45 to change the settings
Correcting Images
HDR Capture screen appears
This section explains how to set HDR Capture
High Dynamic Range Image Capture
151
152
Select from ±1 EV, ±2 EV default setting or ±3 EV
Lateral chromatic aberration
Lens Correction
153
Distortion
Use the four-way controller 45 to select Off or On
154
Composition Adjust. screen appears
Composition Adjustment
Select Start adjustment, and press the 4button
Adjust the composition
156
Custom Image
Setting the Image Finishing Tone
157
158
Screen to adjust the parameters appears
159
You can check the saturation and hue with the radar chart
160
Saving the Cross Processing Settings of a Captured Image
Turn the front e-dial R to select a cross processed image
161
Digital Filter
162
Shooting Settings
Use the four-way controller 2345 to select a filter
163
Customizing the Button/E-dial Functions
Setting the E-dials Operation
Use the four-way controller 23 to select an exposure mode
Screen for the selected exposure mode appears
Auto
Following settings can be selected for each exposure mode
165
ESHIFT ELINE
BSHIFT CSHIFT
Depends on the Exposure Setting p.130 of the C Movie 1 menu
166
Press the 4button Press the 3button
Button Customization screen appears
Setting the V/YButton Operation
167
Select , and press the four- way controller
Use the four-way controller 23 to choose a file format
Setting the One Push File Format
Is taken. default setting
168
169
Setting the =/LButton Operation
Off the =/Lbutton to return to normal autofocus operation
A mode cannot be set when the mode dial is set to n, Hor C
Saving Frequently Used Settings
Saving the Settings
Save User Mode screen appears
Text-entry screen appears
Editing a Setting Name
Rename User Mode screen appears
171
Cursor
172
Four-way controller Moves the text selection cursor
Cursor at the position of the text input cursor
173
Checking the Saved User Settings
Using Saved User Settings
Set the mode dial to Bor C
Reset User Mode screen appears
Resetting to Default Settings
Change the settings as necessary
Resets the settings saved as a mode to the default settings
Deleting Multiple Images
Connecting the Camera to an AV Device
Functions
Selecting the Playback Functions
Function Image Rotation *1
How to Operate the Playback/Edit Functions
Playback Mode Palette Items
Playback Functions and Image Editing
177
Playback Menu Items
Rotation Info in the ACustom Setting 3 menu is
Setting the Playback Display Method
Select from ×16, ×8, ×4, ×2 or Off default setting
Based on the rotation information when 18. Save
179
Images can be magnified up to 16 times in playback mode
Selecting the Playback Functions
Magnifying Images
Turn the rear e-dial S to the right toward y
Displaying Multiple Images
180
Select the images to display
Use the four-way controller To select the display style
181
Changing the Multiple Image Display Style
Press the Mbutton in on p.180
182
Playing Back Images Continuously
Setting the Slideshow Display
183
Start screen is displayed and the slideshow starts
184
185
Rotating Images
Image rotation information is saved
You can delete multiple images at once
Deleting Multiple Images
Deleting Selected Images
Select images to delete
Folder display screen appears
Deleting a Folder
187
Selected images are deleted
188
Deleting All Images
Confirmation screen for deleting all images is displayed
Screen to select the recorded pixels appears
Processing Images
Changing the Number of Recorded Pixels Resize
189
Four-way controller Moves the cropping frame Rear e-dial S
Cutting Out Part of the Image Cropping
190
Cropped image is saved as a new image
White Magenta/Blue/Cyan/Green/Yellow
Processing Images with Digital Filters
191
Extracted Color 2 OFF/Red
192
Screen to select a filter appears
Four-way controller 45 to Adjust the value
193
To select a parameter
Image Editing
194
Recreating Filter Effects
Filter effects used for the selected image appear
Filter-processed image is saved as a new image
195
To check the parameter details, press the Mbutton
Image selection screen appears
Press the four-way controller 3 in the single image display
Index setting screen appears
Joining Multiple Images Index
196
Index image is created and a confirmation screen appears
Processing may take a while when creating an index image
197
You can select a white or black background
Developing One RAW Image
Developing RAW Images
Screen to select a development method is displayed
RAW image is developed and saved as a new Jpeg image
199
Use the four-way controller 45 to change the value
Following parameters can be changed
Select the RAW images to be developed
You can develop multiple RAW images with the same settings
Developing Multiple RAW Images
200
Use the four-way controller To set Jpeg Recorded
201
Pixels and Jpeg Quality
Connecting the Camera to a Video Input Terminal
Connecting the Camera to an AV Device
Interface Options screen appears
Setting the Video Output Format
203
Turn the AV device and camera on
204
Camera Settings
How to Operate the Set-up Menu
File Management Settings
USB
How to Operate the Set-up Menu
Changing Additional Settings
Set-up Menu Items
Menu Function Create New
207
224 Folder File Name
Sound Effects 1 screen appears
Camera Settings
Setting the Sound Effects
Use the four-way controller 45 to adjust the volume
209
Setting the World Time
Use the four-way controller 45 to select a destination city
210
List of World Time Cities
211
Region City
212
Setting the Monitor and the Menu Displays
Setting the Electronic Level Display
Setting the LCD Display
LCD Display Settings screen appears
Adjusting the Brightness and the Color of the Monitor
Use the four-way controller 45 to adjust the value
Adjusts the brightness and the color of the monitor
214
Setting the Display for Instant Review
Instant Review screen appears
19. Save Menu Location screen appears
Setting the Initial Menu Tab to be Displayed
ARec. Mode 1 menu C Movie 1 menu
215
AA Battery Type screen appears
Battery Settings
Minimizing Battery Consumption
Setting the Battery Type
Memory 1 screen appears
Selecting Settings to Save in the Camera Memory
Function Default
217
Turned off
Settings are saved even when the camera is turned off
218
Turn the rear e-dial S to display the Memory 2 screen
219
Resetting the Camera Settings
Resetting the Rec. Mode/Movie/Playback/Set-up Menus
Resetting the Custom Menu
Changing
Additional Settings
Checking the Camera Version Information
220
Format screen appears
File Management Settings
Formatting an SD Memory Card
221
222
Protecting Images from Deletion Protect
To select Protect, and press Button
223
Setting the Naming System of the Folder
If you selected Date, proceed to Step
Create New Folder screen appears
Creating New Folders
224
Folder name is changed
File Name screen appears
Setting the File Name
225
Folder with a new number is created
Change the text
Setting the Photographer Information
Selecting the File Number Setting
226
Enter the text
227
228
Using an Eye-Fi Card
Eye-Fi screen appears
Folder selection screen appears
229
Transferring Selected Images
Screen to select the unit of transfer appears
Images to be transferred are specified
Transferring process cannot be canceled once started
230
Select the images to transfer
You can set up to 99 copies
Setting the Dpof Settings
231
Press the Mbutton to select P or O for printing the date
232
Computer
Using the Provided Software
Saving Images on a Computer
Computer
Manipulating Captured Images on a Computer
Windows
Macintosh
Unless otherwise specified, select MSC
Setting the USB Connection Mode
Saving Images on a Computer
235
Save the captured images to the computer
Connecting the Camera and a Computer
236
Turn the camera on
Turn the computer on
Using the Provided Software
Installing the Software
237
238
Connecting to a Computer
Click Silkypix Developer Studio 3.0 LE
Regarding User Registration
239
240
Using the Flash
Using the Flash in cMode
Flash Characteristics in Each Exposure Mode
Using the Slow-speed Sync Flash
Using the Flash in bMode
Built-in flash pops up
Set the flash mode to Gor H
Using the Flash
243
ISO Sensitivity Built-in Flash Guide Number Approx
244
Calculating Shooting Distance from Aperture Value
Calculating Aperture Value from Shooting Distance
Flash Built-in
Using an External Flash Optional
Slave flash High-speed sync Wireless flash
245
246
Using the P-TTL Auto Flash
247
Using the High-speed Sync Flash
First, set the channel for the external flash unit
Using Flash in Wireless Mode
Setting the Channel for the External Flash
248
Off Discharges the built-in flash as a control flash
249
Control
Connecting an External Flash with an Extension Cord
250
Master
251
Multiple Flash Shooting Using Extension Cords
When combining with the built-in flash
When combining two external flashes
Refer to p.250 for details
Using the Contrast Control Sync Flash
252
Connect the external flash to the camera indirectly
Error Messages
Default Settings
Cleaning the Cmos Sensor
Using the GPS Unit
Appendix
Default Settings
Rec. Mode Menu
Direct Keys
AF.A
255
Astro
256
Tracer GPS
Dpof
Playback Mode Palette
257
Movie Menu
Playback Menu
258
Set-up Menu
259
ACustom Setting Menu
260
DA L
Functions Available with Various Lens Combinations
261
FA J
262
Lenses and accessories that cannot be used with this camera
Lens names and mount names
Available with some restrictions
263
Lens and Built-in Flash
Unavailable due to vignetting
Turn the rear e-dial S to set the focal length
Setting the Focal Length
264
Attach a lens, and turn the camera on
265
Shaking the Cmos sensor removes dust from the sensor unit
Removing Dust by Shaking the Cmos Sensor Dust Removal
Dust Removal screen appears
267
Sensor Cleaning screen appears
Do not clean the sensor when the mode dial is set to p
Removing Dust with a Blower
Attach the lens or body mount cover
Clean the Cmos sensor
268
Turn the camera off
269
Using the GPS Unit
Astrotracer
270
Shooting Celestial Bodies Astrotracer
Select ASTROTRACER, and press the four-way controller
Press the shutter release button fully again
271
Error Messages
273
274
There is no
Troubleshooting275
Available space on
AF area
Problem Cause Remedy
276
Subject is outside the AF area, aim
Use a tripod
277
File Formats
Main Specifications
Appendix Model Description
Image Capture Unit
LCD Monitor
Focusing System
279
Live View
Shutter
Drive Mode
280
Appendix Exposure Control
Capture Functions
281
Movie
Appendix Playback Functions
282
Customization
283
Power Supply
Dimensions and Weight
Accessories
284
285
Index
286
287
288
289
290
291
Warranty Policy
CE Mark is a Directive conformity mark of the European Union
293
Pour les utilisateurs au Canada
294
For customers in USA
For customers in Canada
295
Class B Personal Computers and Peripherals
296
Memo
SL3 8PN, U.K
France
Deutschland GmbH
Germany
 Changing the Exposure Mode
 1600
1600