Setting Up your DVD/VCR
Important for the United Kingdom
This apparatus is fitted with an approved moulded 13 Amp plug.To change a fuse in this type of plug proceed as follows:
1Remove fuse cover and fuse.
2Fix new fuse which should be a BS1362 3A,ASTA or BSI approved type.
3Refit the fuse cover.
If the fitted plug is not suitable for your socket outlets, it should be cut off and an appropriate plug fitted in its place.
If the mains plug contains a fuse, this should have a value of 3A. If a plug without a fuse is used, the fuse at the distribution board should not be greater than 3A.
The severed plug must be destroyed to avoid a possible shock hazard should it be inserted into a 13A socket elsewhere.
How to connect a plug:
The wires in the mains lead are coloured in accordance with the following code:
BLUE- 'NEUTRAL' ('N') BROWN- 'LIVE' ('L')
4The BLUE wire must be connected to the terminal which is marked with the letter 'N' or coloured BLACK.
5The BROWN wire must be connected to the terminal which is marked with the letter 'L' or coloured RED.
6Do not connect either wires to the earth terminal in the plug which is marked with the letter 'E' or by the safety earth
symbol ![]() or coloured green or
or coloured green or
Before replacing the plug cover, make certain that the cord grip is clamped over the sheath of the
Basic Connections
•Please refer to the instruction books of your TV,VCR, Stereo System or other devices as necessary to make the best con- nections.
•Make one of the following connections, depending on the capabilities of your existing equipment.
The following guidelines are options for the best picture and sound quality available on your DVD/ VCR.
Picture
1 | Use SCART RGB Output (DVD/ VCR(AV1 TV)) for best pic- |
2 | ture quality (for DVD and VCR features). |
Use | |
3 | features only). |
Use SCART Composite Output for good picture quality (for | |
| DVD and VCR features). |
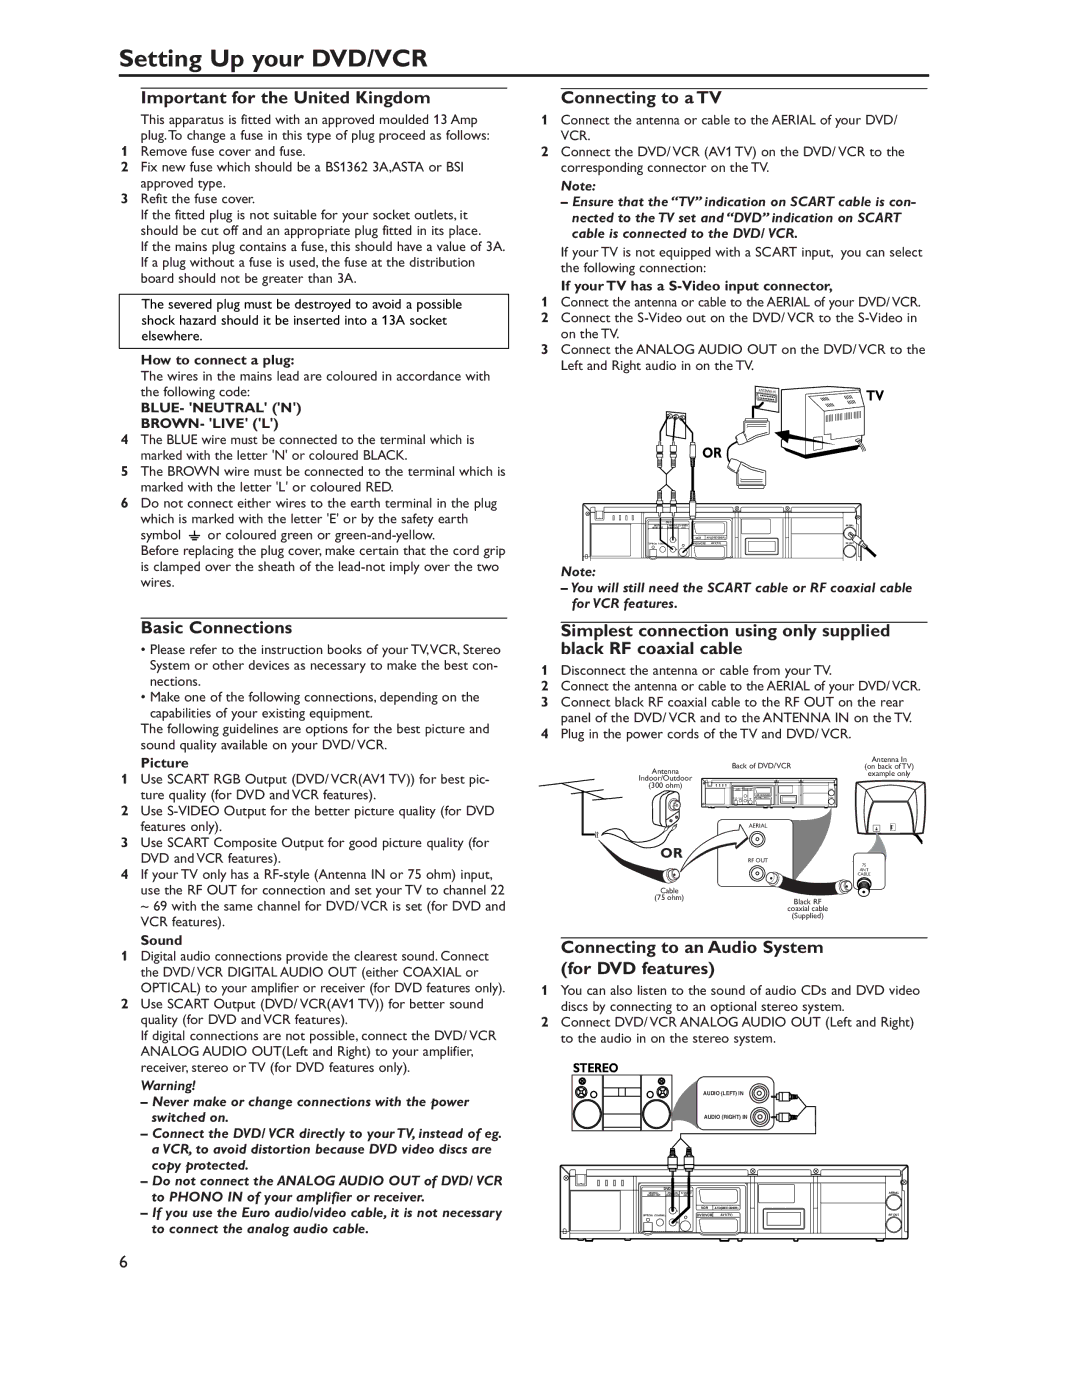
Connecting to a TV
1Connect the antenna or cable to the AERIAL of your DVD/ VCR.
2Connect the DVD/ VCR (AV1 TV) on the DVD/ VCR to the corresponding connector on the TV.
Note:
–Ensure that the “TV” indication on SCART cable is con- nected to the TV set and “DVD” indication on SCART cable is connected to the DVD/ VCR.
If your TV is not equipped with a SCART input, you can select the following connection:
If your TV has a S-Video input connector,
1Connect the antenna or cable to the AERIAL of your DVD/ VCR.
2Connect the
3Connect the ANALOG AUDIO OUT on the DVD/ VCR to the Left and Right audio in on the TV.
![]() TV
TV
![]() OR
OR ![]()
DVD
DIGITAL | ANALOG | AERIAL | |
AUDIO OUT | AUDIOOUT | OUT |
|
L | VCR | AV2(DECODER) |
|
OPTICAL COAXIAL | DVD/VCR | AV1(TV) | RF OUT |
R |
|
|
|
Note:
–You will still need the SCART cable or RF coaxial cable for VCR features.
Simplest connection using only supplied black RF coaxial cable
1Disconnect the antenna or cable from your TV.
2Connect the antenna or cable to the AERIAL of your DVD/ VCR.
3Connect black RF coaxial cable to the RF OUT on the rear panel of the DVD/ VCR and to the ANTENNA IN on the TV.
4Plug in the power cords of the TV and DVD/ VCR.
Back of DVD/VCR | Antenna In | |
(on back of TV) | ||
Antenna | example only | |
Indoor/Outdoor | ||
| ||
(300 ohm) |
|
AERIAL
OR
RF OUT
4 If your TV only has a |
use the RF OUT for connection and set your TV to channel 22 |
Cable
(75 ohm)
75
ANT
CABLE
Black RF
~ 69 with the same channel for DVD/ VCR is set (for DVD and |
VCR features). |
Sound
1Digital audio connections provide the clearest sound. Connect the DVD/ VCR DIGITAL AUDIO OUT (either COAXIAL or OPTICAL) to your amplifier or receiver (for DVD features only).
2Use SCART Output (DVD/ VCR(AV1 TV)) for better sound quality (for DVD and VCR features).
If digital connections are not possible, connect the DVD/ VCR ANALOG AUDIO OUT(Left and Right) to your amplifier, receiver, stereo or TV (for DVD features only).
Warning!
–Never make or change connections with the power switched on.
–Connect the DVD/ VCR directly to your TV, instead of eg. a VCR, to avoid distortion because DVD video discs are copy protected.
–Do not connect the ANALOG AUDIO OUT of DVD/ VCR to PHONO IN of your amplifier or receiver.
–If you use the Euro audio/video cable, it is not necessary to connect the analog audio cable.
coaxial cable
(Supplied)
Connecting to an Audio System (for DVD features)
1You can also listen to the sound of audio CDs and DVD video discs by connecting to an optional stereo system.
2Connect DVD/ VCR ANALOG AUDIO OUT (Left and Right) to the audio in on the stereo system.
STEREO
AUDIO (LEFT) IN
AUDIO (RIGHT) IN
DVD
DIGITAL | ANALOG | AERIAL | |
AUDIO OUT | AUDIOOUT | OUT |
|
| VCR | AV2(DECODER) |
|
| L |
|
|
OPTICAL COAXIAL | DVD/VCR | AV1(TV) | RF OUT |
| R |
|
|
6