CONNECTIONS
When connecting or changing the connection of units, make sure to first turn off the power switch and disconnect the power cord from the outlet.
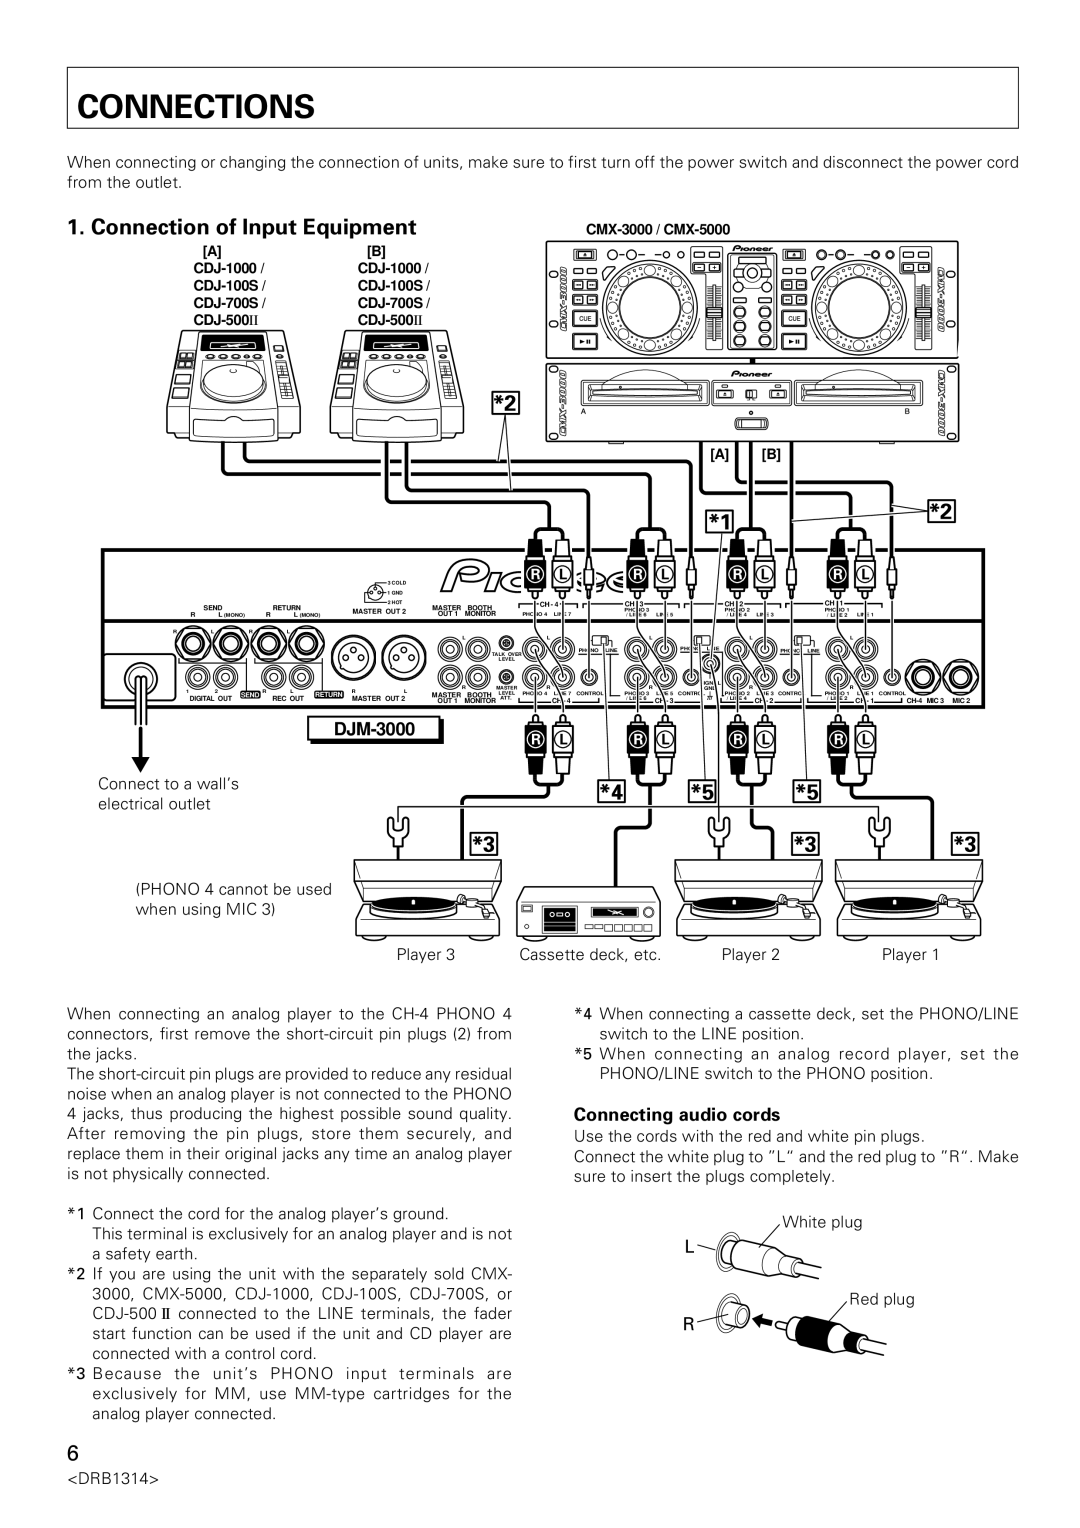
1. Connection of Input Equipment
[A]
[B]
[A]
[B]
|
|
|
|
|
|
| 3 COLD |
|
|
| R | L |
|
| R | L |
| R | L |
| R | L |
|
|
|
|
|
|
|
|
| 1 GND |
|
|
|
|
|
|
|
|
|
|
|
|
|
|
|
|
|
| SEND |
|
| RETURN |
|
| 2 HOT | MASTER | BOOTH |
| CH - 4 |
|
| CH - 3 |
|
| CH - 2 |
|
| CH - 1 |
|
|
| |
|
|
|
| MASTER OUT 2 |
|
|
|
|
| PHONO 3 |
|
| PHONO 2 |
|
| PHONO 1 |
|
|
| |||||
R | L (MONO) | R | L (MONO) | OUT 1 | MONITOR |
| PHONO 4 | LINE 7 |
|
| / LINE 6 | LINE 5 |
| / LINE 4 | LINE 3 |
| / LINE 2 | LINE 1 |
|
| ||||
|
|
|
|
|
|
|
|
| ||||||||||||||||
R | L |
| R | L |
|
|
|
|
|
|
|
|
|
|
|
|
|
|
|
|
|
|
|
|
|
|
|
|
|
|
|
|
| L |
| L |
|
|
| L |
|
| L |
|
|
| L |
|
|
|
|
|
|
|
|
|
|
|
|
|
|
| PHONO | LINE |
|
| PHONO LINE |
|
| PHONO | LINE |
|
|
|
|
|
|
|
|
|
|
|
| TALK OVER |
|
|
|
|
|
|
|
|
|
| |||||
|
|
|
|
|
|
|
|
|
|
|
|
|
|
|
|
|
|
|
|
|
|
| ||
|
|
|
|
|
|
|
|
|
| LEVEL |
|
|
|
|
|
|
|
|
|
|
|
|
|
|
|
|
|
|
|
|
|
|
| R | MASTER | R |
|
|
| R |
| SIGNAL | R |
|
|
| R |
|
|
1 | 2 | SEND R | L |
| R | L |
|
|
|
|
| GND |
|
|
|
|
| |||||||
RETURN | MASTER | BOOTH | LEVEL | PHONO 4 | LINE 7 | CONTROL |
| PHONO 3 | LINE 5 | CONTROL | PHONO 2 | LINE 3 | CONTROL | PHONO 1 | LINE 1 | CONTROL | MIC 2 | |||||||
DIGITAL OUT |
|
| REC OUT |
| MASTER OUT 2 | OUT 1 | MONITOR | ATT. |
| CH - 4 |
|
| / LINE 6 | CH - 3 |
| / LINE 4 | CH - 2 |
| / LINE 2 | CH - 1 | ||||
|
|
|
|
|
|
|
|
| R | L |
|
| R | L |
| R | L |
| R | L |
|
| ||
|
|
|
|
|
|
|
|
|
|
|
|
|
|
|
|
| ||||||||
Connect to a wall’s electrical outlet
(PHONO 4 cannot be used when using MIC 3)
Player 3 | Cassette deck, etc. | Player 2 | Player 1 |
When connecting an analog player to the
The
*1 Connect the cord for the analog player’s ground.
This terminal is exclusively for an analog player and is not a safety earth.
*2 If you are using the unit with the separately sold CMX- 3000,
*3 Because the unit’s PHONO input terminals are exclusively for MM, use
*4 When connecting a cassette deck, set the PHONO/LINE switch to the LINE position.
*5 When connecting an analog record player, set the PHONO/LINE switch to the PHONO position.
Connecting audio cords
Use the cords with the red and white pin plugs.
Connect the white plug to ”L“ and the red plug to ”R“. Make sure to insert the plugs completely.
White plug
L
Red plug
R
6