B. Installing Vent Components

After determining which set of starting collars will be used (top or rear), follow venting instructions accordingly.

Venting Out the Rear Vent

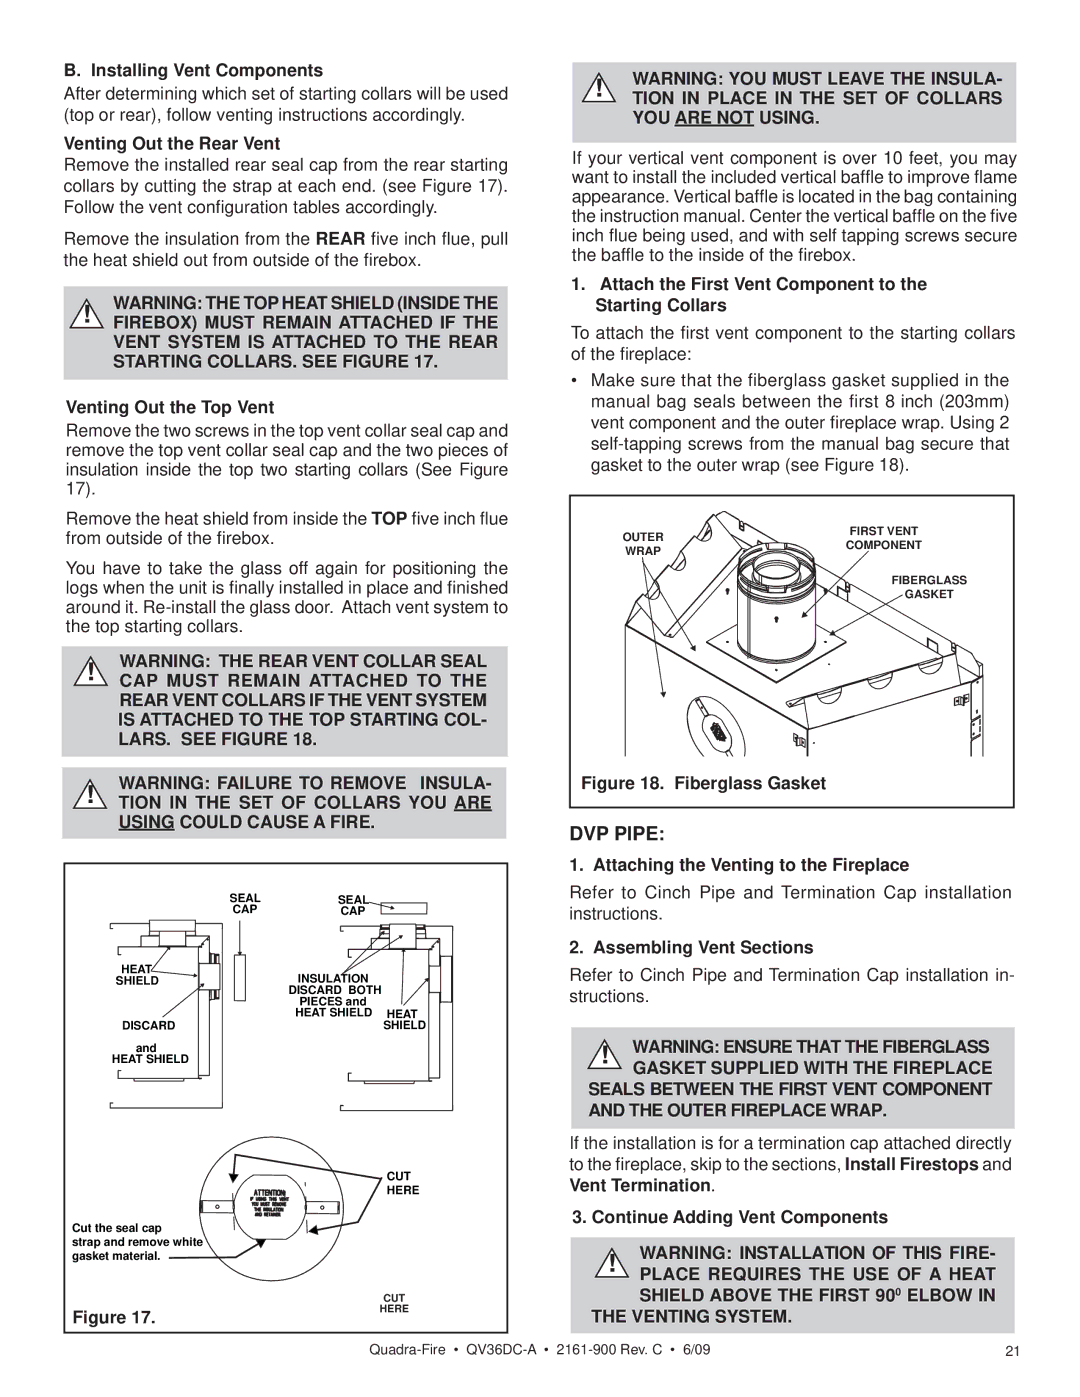
Remove the installed rear seal cap from the rear starting collars by cutting the strap at each end. (see Figure 17). Follow the vent configuration tables accordingly.

Remove the insulation from the REAR five inch flue, pull the heat shield out from outside of the firebox.

!WARNING: THE TOP HEAT SHIELD (INSIDE THE FIREBOX) MUST REMAIN ATTACHED IF THE VENT SYSTEM IS ATTACHED TO THE REAR STARTING COLLARS. SEE FIGURE 17.

Venting Out the Top Vent

Remove the two screws in the top vent collar seal cap and remove the top vent collar seal cap and the two pieces of insulation inside the top two starting collars (See Figure 17).

Remove the heat shield from inside the TOP five inch flue from outside of the firebox.

You have to take the glass off again for positioning the logs when the unit is finally installed in place and finished around it. Re-install the glass door. Attach vent system to the top starting collars.

!WARNING: THE REAR VENT COLLAR SEAL CAP MUST REMAIN ATTACHED TO THE REAR VENT COLLARS IF THE VENT SYSTEM IS ATTACHED TO THE TOP STARTING COL- LARS. SEE FIGURE 18.

!WARNING: FAILURE TO REMOVE INSULA- TION IN THE SET OF COLLARS YOU ARE USING COULD CAUSE A FIRE.

SEAL

SEAL


CAP

CAP


HEAT

INSULATION


SHIELD


DISCARD BOTH


PIECES and

HEAT

DISCARD

HEAT SHIELD


SHIELD

and


HEAT SHIELD


CUT


HERE

Cut the seal cap


strap and remove white


gasket material.


CUT

Figure 17.


HERE


!WARNING: YOU MUST LEAVE THE INSULA- TION IN PLACE IN THE SET OF COLLARS YOU ARE NOT USING.

If your vertical vent component is over 10 feet, you may want to install the included vertical baffle to improve flame appearance. Vertical baffle is located in the bag containing the instruction manual. Center the vertical baffle on the five inch flue being used, and with self tapping screws secure the baffle to the inside of the firebox.

1.Attach the First Vent Component to the Starting Collars

To attach the first vent component to the starting collars of the fireplace:

Make sure that the fiberglass gasket supplied in the manual bag seals between the first 8 inch (203mm) vent component and the outer fireplace wrap. Using 2 self-tapping screws from the manual bag secure that gasket to the outer wrap (see Figure 18).

OUTER

FIRST VENT

COMPONENT

WRAP


FIBERGLASS


GASKET

Figure 18. Fiberglass Gasket


DVP PIPE:

1. Attaching the Venting to the Fireplace

Refer to Cinch Pipe and Termination Cap installation instructions.

2. Assembling Vent Sections

Refer to Cinch Pipe and Termination Cap installation in- structions.

!WARNING: ENSURE THAT THE FIBERGLASS GASKET SUPPLIED WITH THE FIREPLACE

SEALS BETWEEN THE FIRST VENT COMPONENT AND THE OUTER FIREPLACE WRAP.

If the installation is for a termination cap attached directly to the fireplace, skip to the sections, Install Firestops and Vent Termination.

3.Continue Adding Vent Components

!WARNING: INSTALLATION OF THIS FIRE- PLACE REQUIRES THE USE OF A HEAT

SHIELD ABOVE THE FIRST 900 ELBOW IN THE VENTING SYSTEM.

Quadra-FireQV36DC-A2161-900 Rev. C • 6/09

21

Page 18
Image 18
Quadra-Fire QV36DC-A owner manual Shield Above the First 900 Elbow in the Venting System

QV36DC-A specifications

The Quadra-Fire QV36DC-A is a remarkable addition to the world of home heating, exemplifying innovation and efficiency in gas-burning fireplace inserts. Designed for those who seek both aesthetics and functionality in their living spaces, this model offers an impressive blend of features and technologies that enhance not only warmth but also the overall ambiance of any room.

One of the standout characteristics of the QV36DC-A is its direct vent design. This technology allows for a safe and efficient venting system that draws outside air for combustion, ensuring that indoor air quality is maintained. This feature eliminates the need for a traditional chimney, making it an ideal choice for modern homes or those with limited space. The direct vent capability also contributes to a higher efficiency rating, making it more cost-effective and environmentally friendly.

Another key feature of this model is its large viewing area, which is framed by a sleek and stylish surround. The expansive glass front provides a stunning visual display of the flames, creating a warm and inviting atmosphere. The QV36DC-A also comes with a range of decorative options, including various finish choices and customizable log sets, allowing homeowners to tailor the look of their fireplace to suit their personal style.

The QV36DC-A is equipped with advanced heating technologies, including a powerful heating capacity of up to 30,000 BTUs. This ensures that it can effectively heat larger spaces while maintaining a comfortable environment. The unit features adjustable fan speeds and a variable flame control system, allowing users to manipulate the level of heat and ambiance according to their preferences.

Additionally, the Quadra-Fire QV36DC-A is designed for ease of use and maintenance. The included remote control makes it convenient to adjust settings from a distance, while the self-cleaning glass door reduces the frequency of maintenance chores. The durable construction and high-quality materials ensure longevity, making it a wise investment for homeowners.

With its blend of functionality, efficiency, and beauty, the Quadra-Fire QV36DC-A stands as a premier choice for anyone looking to enhance their living space with the warmth and comfort of a gas fireplace insert. Its thoughtful design and advanced features make it not just a source of heat, but a centerpiece that elevates the overall ambiance of any home.