INSTALLATION

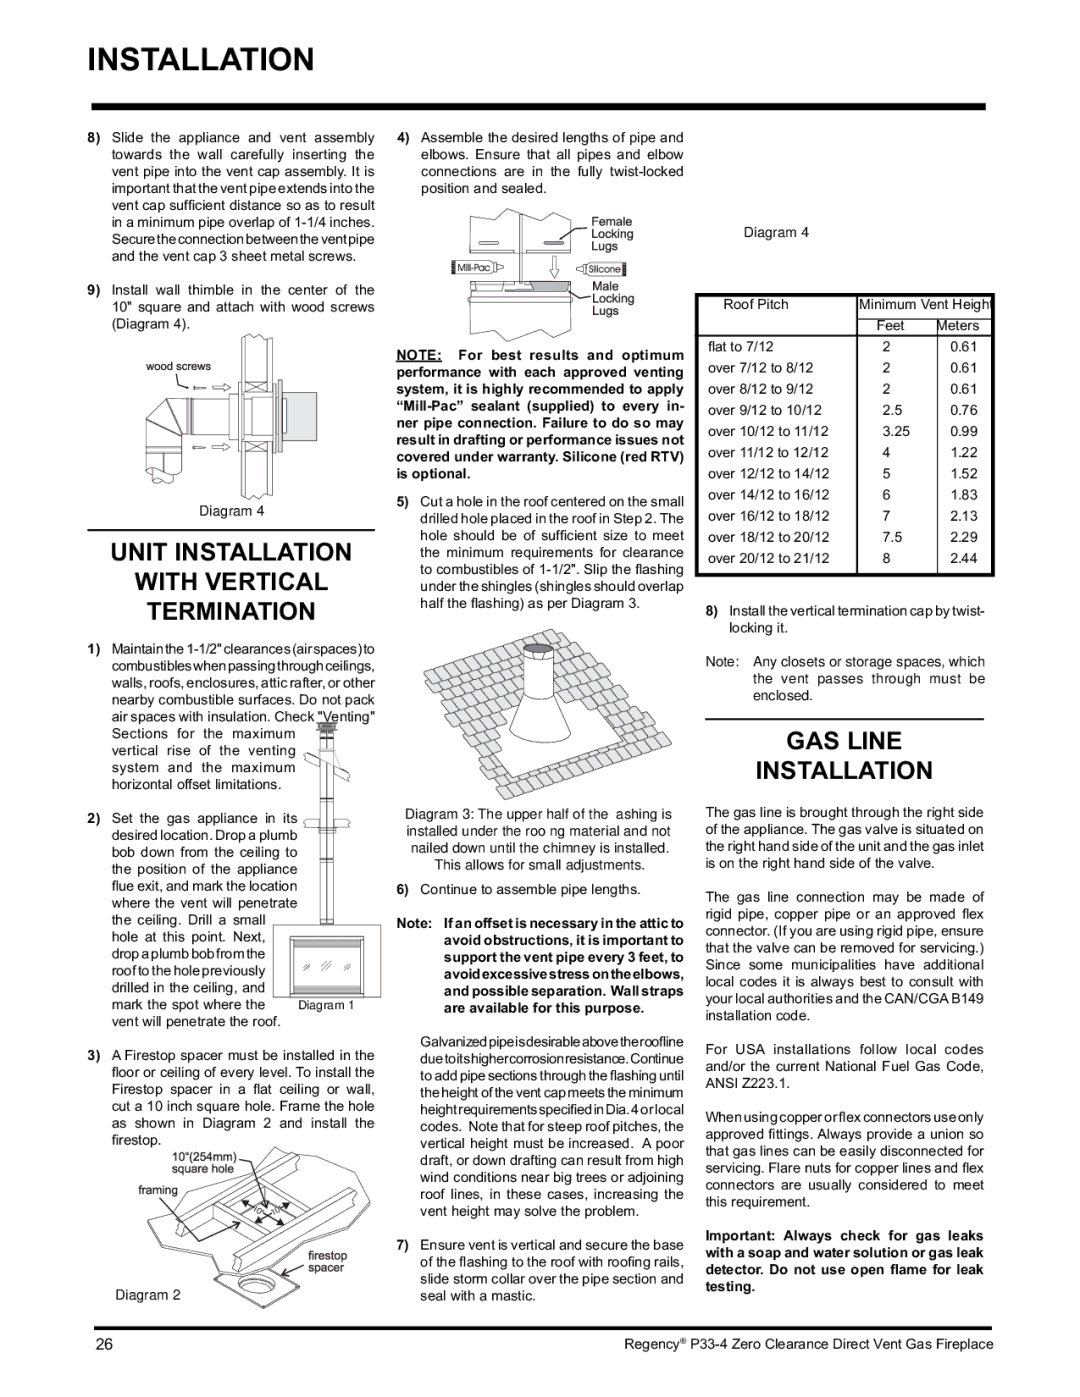
8)Slide the appliance and vent assembly towards the wall carefully inserting the vent pipe into the vent cap assembly. It is important that the vent pipe extends into the vent cap sufficient distance so as to result in a minimum pipe overlap of 1-1/4 inches. Securetheconnectionbetweentheventpipe and the vent cap 3 sheet metal screws.

9)Install wall thimble in the center of the 10" square and attach with wood screws (Diagram 4).

Diagram 4

UNIT INSTALLATION

WITH VERTICAL

TERMINATION

4)Assemble the desired lengths of pipe and elbows. Ensure that all pipes and elbow connections are in the fully twist-locked position and sealed.

NOTE: For best results and optimum performance with each approved venting system, it is highly recommended to apply “Mill-Pac” sealant (supplied) to every in- ner pipe connection. Failure to do so may result in drafting or performance issues not covered under warranty. Silicone (red RTV) is optional.

5)Cut a hole in the roof centered on the small drilled hole placed in the roof in Step 2. The hole should be of sufficient size to meet the minimum requirements for clearance to combustibles of 1-1/2". Slip the fl ashing under the shingles (shingles should overlap half the fl ashing) as per Diagram 3.

Diagram 4

Roof Pitch

Minimum Vent Height


Feet

Meters

fl at to 7/12

2

0.61

over 7/12 to 8/12

2

0.61

over 8/12 to 9/12

2

0.61

over 9/12 to 10/12

2.5

0.76

over 10/12 to 11/12

3.25

0.99

over 11/12 to 12/12

4

1.22

over 12/12 to 14/12

5

1.52

over 14/12 to 16/12

6

1.83

over 16/12 to 18/12

7

2.13

over 18/12 to 20/12

7.5

2.29

over 20/12 to 21/12

8

2.44


8)Install the vertical termination cap by twist- locking it.

1)Maintainthe1-1/2"clearances(airspaces)to combustibleswhenpassingthroughceilings,

walls, roofs, enclosures, attic rafter, or other nearby combustible surfaces. Do not pack air spaces with insulation. Check "Venting" Sections for the maximum vertical rise of the venting system and the maximum horizontal offset limitations.

Note: Any closets or storage spaces, which the vent passes through must be enclosed.

GAS LINE

INSTALLATION

2)Set the gas appliance in its desired location. Drop a plumb

bob down from the ceiling to the position of the appliance

ue exit, and mark the location where the vent will penetrate

the ceiling. Drill a small hole at this point. Next, dropa plumb bob fromthe roof to the hole previously drilled in the ceiling, and

mark the spot where the

Diagram 1

vent will penetrate the roof.


3)A Firestop spacer must be installed in the fl oor or ceiling of every level. To install the Firestop spacer in a fl at ceiling or wall, cut a 10 inch square hole. Frame the hole as shown in Diagram 2 and install the fi restop.

Diagram 2

Diagram 3: The upper half of the fl ashing is installed under the roofi ng material and not nailed down until the chimney is installed.

This allows for small adjustments.

6)Continue to assemble pipe lengths.

Note: If an offset is necessary in the attic to avoid obstructions, it is important to support the vent pipe every 3 feet, to avoidexcessivestressontheelbows, and possible separation. Wall straps are available for this purpose.

Galvanizedpipeisdesirableabovetheroofline duetoitshighercorrosionresistance.Continue to add pipe sections through the flashing until the height of the vent cap meets the minimum heightrequirementsspecifiedinDia.4 or local codes. Note that for steep roof pitches, the vertical height must be increased. A poor draft, or down drafting can result from high wind conditions near big trees or adjoining roof lines, in these cases, increasing the vent height may solve the problem.

7)Ensure vent is vertical and secure the base of the fl ashing to the roof with roofi ng rails, slide storm collar over the pipe section and seal with a mastic.

The gas line is brought through the right side of the appliance. The gas valve is situated on the right hand side of the unit and the gas inlet is on the right hand side of the valve.

The gas line connection may be made of rigid pipe, copper pipe or an approved fl ex connector. (If you are using rigid pipe, ensure that the valve can be removed for servicing.) Since some municipalities have additional local codes it is always best to consult with your local authorities and the CAN/CGA B149 installation code.

For USA installations follow local codes and/or the current National Fuel Gas Code, ANSI Z223.1.

When using copper or flex connectors use only approved fi ttings. Always provide a union so that gas lines can be easily disconnected for servicing. Flare nuts for copper lines and fl ex connectors are usually considered to meet this requirement.

Important: Always check for gas leaks with a soap and water solution or gas leak detector. Do not use open flame for leak testing.

26

Regency® P33-4 Zero Clearance Direct Vent Gas Fireplace

Page 26
Image 26
Regency P33-LP4 Unit Installation With Vertical Termination, GAS Line Installation, This allows for small adjustments

P33-LP4 specifications

Regency P33-LP4 is an innovative and versatile propane gas fireplace designed to provide both warmth and ambiance while enhancing the aesthetic appeal of any living space. This model stands out for its combination of modern technology, functionality, and elegance, making it a popular choice among homeowners seeking an efficient heating solution without sacrificing style.

One of the key features of the P33-LP4 is its contemporary design. The fireplace presents a sleek, minimalist look that integrates seamlessly into both traditional and modern interiors. It offers a range of finishing options, including various trims and glass fronts, allowing homeowners to tailor the appearance of the fireplace to their personal taste and existing decor.

A hallmark of the Regency P33-LP4 is its advanced heating capabilities. With a powerful output of up to 33,000 BTUs, this fireplace can efficiently heat spaces of different sizes, making it suitable for both small cozy rooms and larger open areas. The unit also features a high-efficiency burner that maximizes heat production while reducing fuel consumption, which is ideal for energy-conscious users.

In terms of technology, the P33-LP4 boasts a user-friendly electronic ignition system that ensures reliable startups, even in colder temperatures. The fireplace can be controlled through a convenient remote or a wall switch, allowing users to adjust the flame height and heat settings with ease. Additionally, the unit incorporates a fan that circulates warm air throughout the room, enhancing overall heating efficiency and comfort.

Safety is paramount in the design of the Regency P33-LP4. The fireplace is equipped with a built-in safety shut-off feature that automatically turns off the gas supply in case of an unexpected accident. Moreover, the glass front remains cool to the touch, reducing the risk of burns and making it family-friendly.

Flexibility is another advantage of the P33-LP4, as it can be installed in various configurations, including as a built-in unit or a freestanding fireplace. The options for installation enable homeowners to create a unique focal point in their living space, adapting to different architectural layouts.

In conclusion, the Regency P33-LP4 combines contemporary design, efficient heating technology, and safety features, making it an excellent choice for those seeking a stylish and functional propane fireplace. Its versatility and reliability enhance the home environment while providing a warm and inviting atmosphere for family and guests.