INSTALLATION

INSTALLING THE OPTIONAL FAN

120 Volt AC power is needed for the fan switch and blower.The fan can be hard wired if desired. The receptacle box should be installed on the left hand side of the unit by a qualified electrician. The neutral (wider) slot of the polarized receptacle should be at the top.

Unit must be grounded at all times. Do not cut the ground terminal off under any circumstances.

1) Shut the power off.

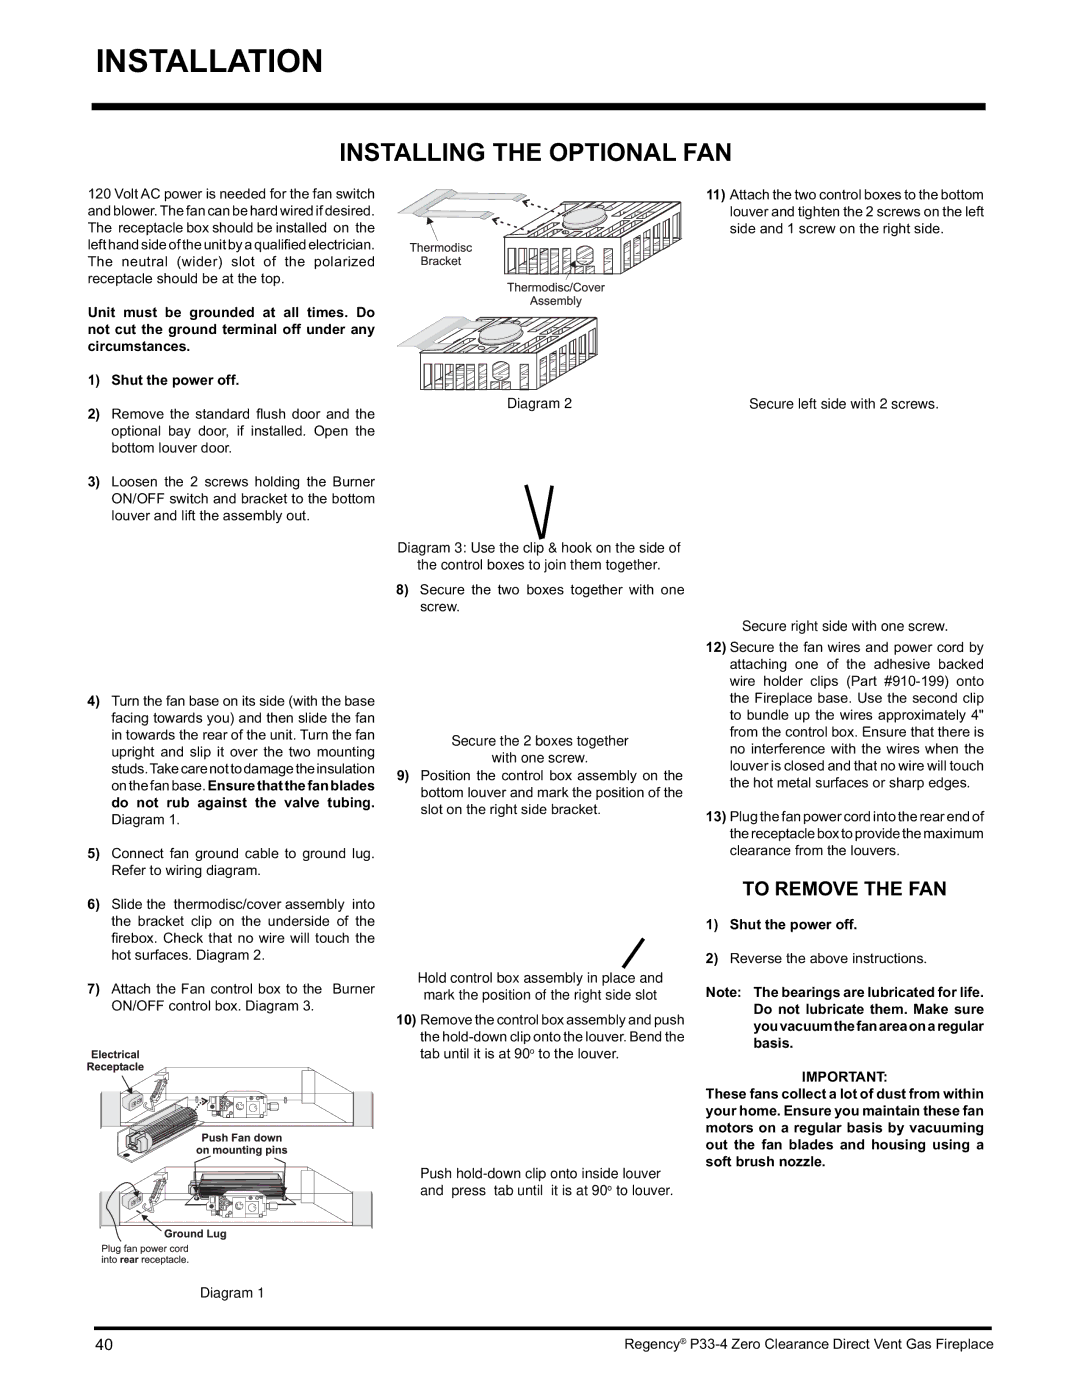
Diagram 2

2)Remove the standard fl ush door and the optional bay door, if installed. Open the bottom louver door.

3)Loosen the 2 screws holding the Burner ON/OFF switch and bracket to the bottom louver and lift the assembly out.

Diagram 3: Use the clip & hook on the side of

the control boxes to join them together.

8) Secure the two boxes together with one screw.

11)Attach the two control boxes to the bottom louver and tighten the 2 screws on the left side and 1 screw on the right side.

Secure left side with 2 screws.

Secure right side with one screw.

4)Turn the fan base on its side (with the base facing towards you) and then slide the fan in towards the rear of the unit. Turn the fan upright and slip it over the two mounting studs.Takecarenottodamagetheinsulation on the fan base. Ensure that the fan blades do not rub against the valve tubing. Diagram 1.

5)Connect fan ground cable to ground lug. Refer to wiring diagram.

6)Slide the thermodisc/cover assembly into the bracket clip on the underside of the fi rebox. Check that no wire will touch the hot surfaces. Diagram 2.

7)Attach the Fan control box to the Burner ON/OFF control box. Diagram 3.

Secure the 2 boxes together

with one screw.

9)Position the control box assembly on the bottom louver and mark the position of the slot on the right side bracket.

Hold control box assembly in place and mark the position of the right side slot

10)Remove the control box assembly and push the hold-down clip onto the louver. Bend the tab until it is at 90o to the louver.

Push hold-down clip onto inside louver and press tab until it is at 90o to louver.

12)Secure the fan wires and power cord by attaching one of the adhesive backed wire holder clips (Part #910-199) onto the Fireplace base. Use the second clip to bundle up the wires approximately 4" from the control box. Ensure that there is no interference with the wires when the louver is closed and that no wire will touch the hot metal surfaces or sharp edges.

13)Plug the fan power cord into the rear end of thereceptacleboxtoprovidethemaximum clearance from the louvers.

TO REMOVE THE FAN

1)Shut the power off.

2)Reverse the above instructions.

Note: The bearings are lubricated for life. Do not lubricate them. Make sure youvacuumthefanareaonaregular basis.

IMPORTANT:

These fans collect a lot of dust from within your home. Ensure you maintain these fan motors on a regular basis by vacuuming out the fan blades and housing using a soft brush nozzle.

Diagram 1

40

Regency® P33-4 Zero Clearance Direct Vent Gas Fireplace

Page 40
Image 40
Regency P33-LP4 installation manual Installing the Optional FAN, Secure the 2 boxes together With one screw

P33-LP4 specifications

Regency P33-LP4 is an innovative and versatile propane gas fireplace designed to provide both warmth and ambiance while enhancing the aesthetic appeal of any living space. This model stands out for its combination of modern technology, functionality, and elegance, making it a popular choice among homeowners seeking an efficient heating solution without sacrificing style.

One of the key features of the P33-LP4 is its contemporary design. The fireplace presents a sleek, minimalist look that integrates seamlessly into both traditional and modern interiors. It offers a range of finishing options, including various trims and glass fronts, allowing homeowners to tailor the appearance of the fireplace to their personal taste and existing decor.

A hallmark of the Regency P33-LP4 is its advanced heating capabilities. With a powerful output of up to 33,000 BTUs, this fireplace can efficiently heat spaces of different sizes, making it suitable for both small cozy rooms and larger open areas. The unit also features a high-efficiency burner that maximizes heat production while reducing fuel consumption, which is ideal for energy-conscious users.

In terms of technology, the P33-LP4 boasts a user-friendly electronic ignition system that ensures reliable startups, even in colder temperatures. The fireplace can be controlled through a convenient remote or a wall switch, allowing users to adjust the flame height and heat settings with ease. Additionally, the unit incorporates a fan that circulates warm air throughout the room, enhancing overall heating efficiency and comfort.

Safety is paramount in the design of the Regency P33-LP4. The fireplace is equipped with a built-in safety shut-off feature that automatically turns off the gas supply in case of an unexpected accident. Moreover, the glass front remains cool to the touch, reducing the risk of burns and making it family-friendly.

Flexibility is another advantage of the P33-LP4, as it can be installed in various configurations, including as a built-in unit or a freestanding fireplace. The options for installation enable homeowners to create a unique focal point in their living space, adapting to different architectural layouts.

In conclusion, the Regency P33-LP4 combines contemporary design, efficient heating technology, and safety features, making it an excellent choice for those seeking a stylish and functional propane fireplace. Its versatility and reliability enhance the home environment while providing a warm and inviting atmosphere for family and guests.