User
Precautions
Safety warnings
Icons used in this manual
Proper recording etiquette
Important information on use
Before using this camcorder
Page
Safety information
Safety information
Safety information
Safety information
Contents
Contents
Inserting/Ejecting the battery and memory card
Getting Started
Learn about your camcorder’s layout, icons, and home screen
Unpacking
Checking your accessories
Top/Front/Left
Camcorder layout
Rear/Right/Bottom
Camcorder layout
Inserting/ejecting the battery
Inserting/Ejecting the battery and memory card
To insert the battery
To eject the battery
Inserting/ejecting a memory card not supplied
Inserting/Ejecting the battery and memory card
To insert a memory card
To eject a memory card
SD cards can be used with current SD enabled host devices
Using the memory card adaptor
Compatible memory cards
Do not bend, drop, or subject the card to strong impacts
Handling a memory card
Recordable number of photos
Recording time available for video in minutes
Charging the battery
Using the AC power adaptor
Using the USB cable
Checking the battery state
Charging the battery
Battery level display
Colour of the LED indicates the power or charging state
Available charging and running time for the battery
Using an AC power source
Continuous Recording without zoom
About the battery
Turning your camcorder on/off
When using this camcorder for the first time
Turn on the camcorder by opening the LCD screen
To turn off the camcorder, press and hold the Home button
Drag
Using the touch screen
Touch
Lightly touch items with your finger to select or execute
Switching the information display mode
Using the touch screen
Open the LCD screen with your finger
Adjusting the LCD screen
Rotate the LCD screen towards the lens
Screen opens up to
Open the LCD screen to turn on the camcorder
Performing the initial setup
Touch the up or down arrows to set the date
Touch the Time tab, and then set the time
Touch Settings General Language
Touch the Return tab to complete the setting
Selecting the language
Press the Home button, and then drag the Home screen left
Learning icons
Video recording mode
Left of the LCD screen
Centre of the LCD screen
Learning icons
Photo recording mode
Video playback mode Single view
Video playback mode Thumbnail view
Top of the LCD screen
Bottom of the LCD screen
Photo playback mode Single view
Photo playback mode Thumbnail view
Using the Home screen
Accessing the Home screen
Icons on the Home screen
Using the grip belt
180˚ Switch grip
90˚ Vertical grip
Basic functions
Learn about basic functions for video and photo shooting
Recording with ease for beginners Smart Auto
Recording videos
Stby mode, touch the Video recording mode tab
Select a subject to record
Press the Recording start/stop button
Recording videos
Camcorder switches to portrait mode vertical position
Recording videos in portrait mode
Press the Home button touch Vertical HD Recording
Rotate the camcorder to 90º for vertical recording
Again
Tagging great moments while recording My Clip function
Press the My Clip button every great moment while recording
Understanding the My Clip function
Stby mode, touch the Photo recording mode tab
Recording photos
Shutter sound is heard and the photo is recorded
Press the Home button touch Smart Auto
Align your subject in the frame
Appropriate scene icon appears on the LCD screen
To zoom
Zooming
To zoom out
Example of zoom-in/out
Learn how to record a video and photo by selecting a mode
Using the Art Time Lapse mode
Extended functions
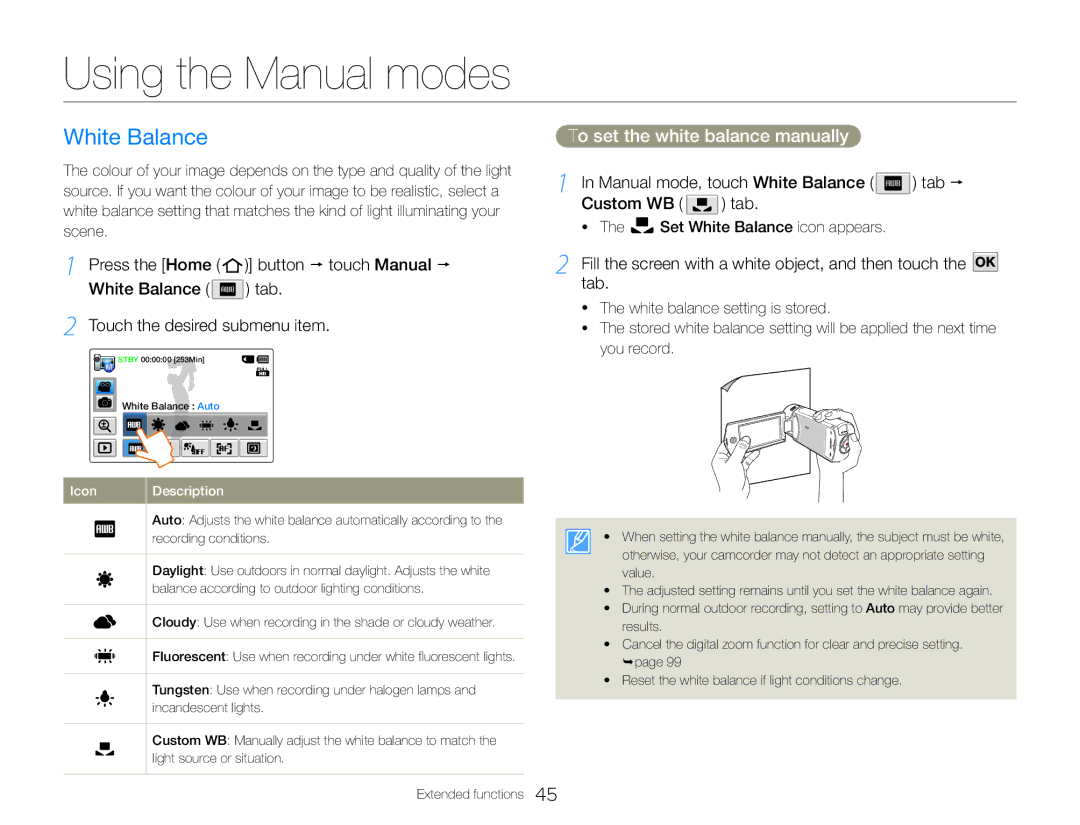
White Balance
Using the Manual modes
To set the white balance manually
Manual mode, touch White Balance tab Custom WB tab
Setting values range from -2.0 to +2.0
Using the Manual modes
EV Exposure Value
Understanding EV Exposure Value
Back Light
Press the Home button touch Manual
Focus
Focus Tab
You can also set the focus manually
Press the Home
Super C.Nite
Button touch Manual
Super C. Nite Tab
Cont. Shot
Self Timer
Using the Art Film modes
Fader
Recording a video with Fade effect
Touch the Digital Effect tab in the video recording mode
Using the Art Film modes
Digital Effect
Press the Home button touch Art Film
Using the Art Time Lapse mode
Touch the Menu tab Touch the desired submenu
Art Time Lapse recording starts
Example of Art Time Lapse recording
Using the Art Time Lapse mode
Learn how to play back and edit videos and photos
Viewing videos or photos in playback mode
Playback/Editing
Starting the playback mode
Viewing videos or photos in playback mode
Viewing videos or photos in playback mode
Playing back videos
Find videos in various ways
To adjust the volume during video playback
Touch the Volume tab on the LCD screen
Touch the / tab to increase or decrease audio volume
Search playback
Playback/Pause/Stop
Skip playback
Slow playback
Thumbnail view Tab
Tagging great moments during playback
Select the video playback mode. page
Press the My Clip button to tag great moments during
Viewing photos
Camcorder displays the photo you selected in full screen
Find photos in various ways
Viewing a slide show
To cancel, touch the Return tab
Zooming during photo playback
Touch the Slide show tab during photo playback
Share
Editing videos or photos
Sharing videos
Touch the Menu tab
Sharing photos
Editing videos or photos
Touch the tab
Delete
Touch Yes
Touch thumbnails
My Clip creation in the video thumbnail view
Smart BGM
Protect
Divide
Combine
Touch Yes Select the video playback mode. page
Touch the Combine tab on the thumbnail view
Touch a thumbnail
File Info
Touch the Menu tab File Info
To exit the menu, touch the Return tab
Wireless network
Connecting to a Wlan and configuring network settings
About the Wakeup on LAN WOL feature
Connecting to a Wlan
Touch the Menu tab Wi-Fi Setting
Press the Home button touch Social Sharing
Configuring the network settings
Connecting to a Wlan and configuring network settings
Touch the tab next to an AP
Touch each submenu and enter the required information
Manually setting the IP address
Touch the tab next to an AP Touch IP Setting Manual
Camcorder connects to the network via the selected AP
Entering text
Network connection tips
Application
Sending videos or photos to a smart phone
Select files to share with the smart phone
On the camcorder, touch Yes
Broadcasting live streaming video from your camcorder
Broadcasting live streaming video from your camcorder
Press the Home button touch Ustream
Live broadcasting icon appears and broadcasting starts
Uploading videos or photos
Using video or photo sharing web sites
Press the Home button touch TV Link the Confirm tab
Viewing videos or photos on a TV Link-enabled TV
Installing the programme for Auto backup on your PC
Using Auto Backup to send videos or photos
Sending videos or photos to a PC
Remove the USB cable
About the Wakeup on LAN WOL feature
Setting the PC to wake up from sleep mode
WOL Wakeup on LAN
Setting the PC to turn on
About the Wakeup on LAN WOL feature
Turn on the PC and press F2 while the PC is booting
Configure the network connection
Using with other devices
Connecting to a high definition TV with Hdmi
Connecting to a TV
Using a micro Hdmi cable
Turn on the camcorder
Connecting to a regular TV
Connecting to a TV
Connecting an Audio/Video cable for the composite output
Select the playback mode on your camcorder, and then
Viewing on a TV screen
Image appearance depends on the TV screen aspect ratio
Images recorded in a 169 ratio
Dubbing videos to VCR or DVD/HDD recorders
System requirements
Transferring files to your Windows computer
Transferring files with Intelli-studio
Transferring files to your Windows computer
If you do not want to save any new files, select No
To disconnect the USB cable
3 4 5 6
About the Intelli-studio main window
Choose the video or photo that you want to play back
Playing back videos or photos Editing videos or photos
Choose the videos or photos you want to edit
Click Movie Edit or Photo Edit
Sharing the videos/photos online
Enter your ID and the password to access
Click the web site you would like to upload files to
Click Upload to start uploading
Viewing the contents of storage media
Photo file
Video file H.264
File format
Video files
Refer to items to configure your camcorder’s settings
Settings
Accessing the settings menu
Settings menu
Press the Home button touch Settings Touch a menu
To exit the menu setting, touch the Return tab
Shooting
Settings menu
Shooting Playback
Using external songs as background music Smart BGM
When the transferring finishes, click OK
To set external songs as background music
To delete the external songs in the memory card
To delete the external songs in the memory card
Playback Display
When connecting to an Hdtv
Auto* The video signals are output in the same
Format. Use this setting only when connecting
Signals through its Hdmi jacks
Connectivity
Automatically when you connect the camcorder to
Your PC
Software
General
Set whether or not to play the shutter sound
Shutter
Sound
Default Set Defaults
Settings
Format
Language
Appendixes
Using your camcorder abroad 123
121
124
Troubleshooting
Battery
Storage media
Recording
Troubleshooting
Delete files
Limit of video
Files is reached
Change to another card which has enough free
Editing videos
Playback
Wireless Network
Symptoms and solutions
Power
Display
Recording stops automatically
Power off
This is not a malfunction
Light, a vertical line appears
Where you press the Recording start/stop
Sound is disabled temporarily
This is not an error
There is a time difference between the point
Adjusting the image during recording
Playback on your camcorder
Playback on other devices TV, etc
Work Check memory card compatibility. page
Video cable From your camcorder. page
Connecting to a computer
Overall operations
Cleaning the camcorder
Maintenance
LCD screen
Maintenance
Power sources
Using your camcorder abroad
On TV colour systems
PAL-compatible countries/regions
AF Auto Focus
Glossary
HMX-QF30/HMX-QF33/HMX-QF300/HMX-QF310/HMX-QF320
Specifications
Samsung Electronics Euro QA Lab
Declaration of Conformity
Declaration sentence in official languages
Declaration sentence in official languages
Region Country Contact Centre Web Site
Contact Samsung World Wide
Contact Samsung World Wide
NO-L-14041/01/2012/ETA/2012 1691/2012/WRLO
Approved
RoHS compliant

 ) tab Custom WB (
  ) tab.
 tab.
tab.