Page
Instructions
Getting to Know your camera
002
Contents
Things to Watch Out for When Taking Pictures Focus lock
Setup 065 Sound menu
Setup menu
Volume Beep Sound Shutter sound Start up sound AF sound
Settings
Play 074 Starting play mode
Display
View Starting the Multi Slide Show
Using the Samsung RAW Converter
116 FAQ
Transferring files to your Mac computer
System chart
Package Contents
Sold Separately
Identification of features
Front & Top
AF Lamp
Shutter button Zoom W Lever Thumbnail
Identification of features
Back
Electronic View finder EVF p.36
EVF/LCD button p.35
Attaching the neck strap
Attaching a lens cap to the camera
Attach the neck strap as shown below
When pressing the Smart Dial
When turning the Smart Dial
Battery chamber cover
Bottom
Self-timer lamp
Mode icon
Connecting to a Power Source
SLB-11A rechargeable battery Specification
Number of images and battery life Using the SLB-11A
Using the AC Adaptor and USB Cable
How to charge the rechargeable battery
015
Insert the battery as shown
Inserting the memory card
Insert the memory card as shown
Instructions on how to use the memory card
Power is switched off or the memory card is removed while
Camera can use SD/SDHC Memory Cards
When using the camera for the first time
Setting up the date, time, and date type
LCD screen indicator
Description Icons
How to use the menu
Use the up or down button to navigate through the menus
Use the left or right button to select a sub menu
Starting the recording mode
Selecting modes
Shooting modes
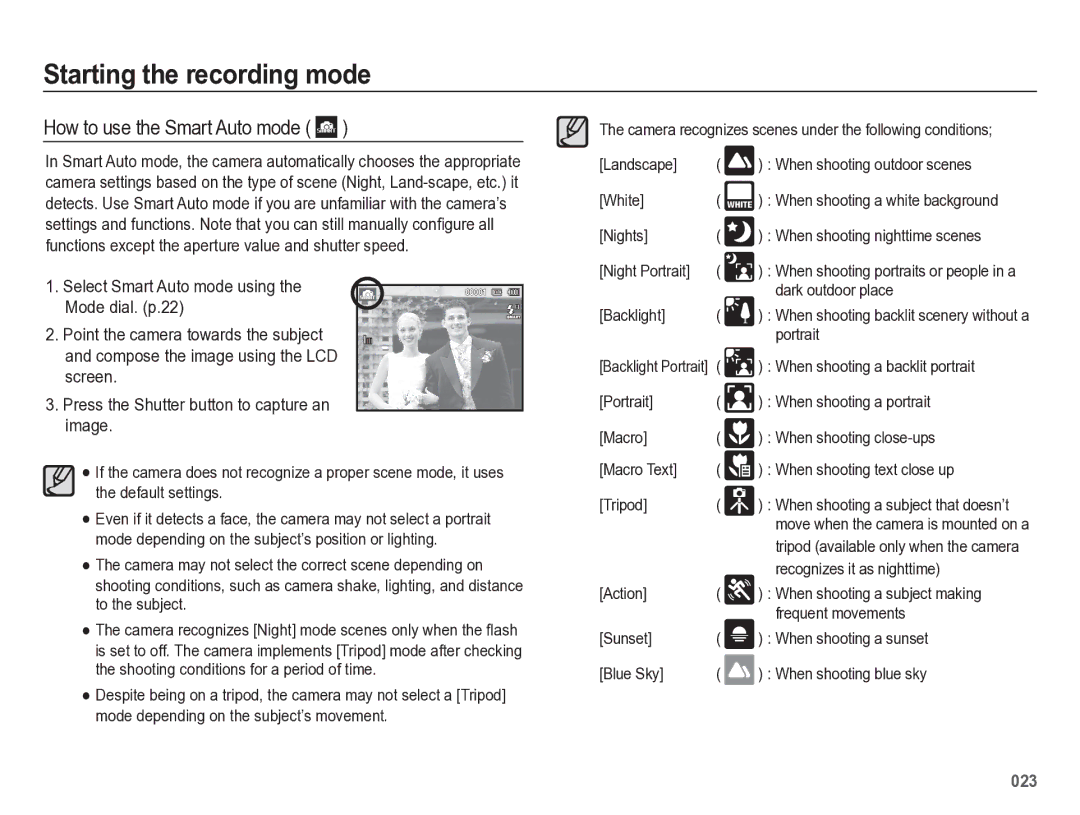
How to use the Smart Auto mode
How to use the Program mode
How to use the Aperture. Shutter Priority mode
Leaves
Macro Color
How to use the Manual mode
How to use the User Setting shooting mode
How to use the Nightscene modes
How to use the Beauty Shot mode
Press the Shutter button to capture images
How to use the Scene modes
Select the Scene mode using the Mode dial. p.22
Scene
How to use the Movie clip mode
Movie clip size and type are listed below
Guide
Recording HD High Definition movie clips
Recording a movie clip without sound
Things to Watch Out for When Taking Pictures
Pressing the shutter button down half way
Power button
You can control the camera by using the camera buttons
Used for turning the camera’s power
Focus lock
Movie clip mode
Shutter button
Zoom W/T Lever
Wide Zoom
Diopter adjustment lever
AEL/Image protection button
Flash pop-up button
You can also use the AEL button for AFL
How to set exposure compensation
Exposure compensation button EVF/LCD button
Bright images or insufficient exposure
Using the electronic view finder EVF
Menu button
OK/AF point button
Info Disp / Up button
Press the UP/DOWN/LEFT/RIGHT buttons to shift the AF points
Face Detection function, the Histogram is not available
When the menu is not showing, you can use the Macro / Down
Macro / Down button
Histogram/Grid Window Histogram
Grid
How to Set Focus Manually
Mode Super
Mode
Flash / Left button
If the flash doesn’t pop up, you can not use the flash
Flash mode indicator
Flash modes you can select, by recording mode Selectable
Self-timer / Right button
Selecting the self-timer
Shooting
Icon
Press the shutter button
Press the Menu button in an available mode
Then press the Right/OK button
White balance
What is color temperature?
Shutter button Saves the new custom white
Fine-tuning the white balance
Numbers
ISO 80, 100, 200, 400, 800, 1600, 3200
Green Amber Magenta Blue
When the person being taken does not look at the camera
Face Detection
This function can detect up to 10 people
Self Portrait
Smile Shot
Blink Detection
Smart Face Recognition
Indicate faces that the camera Automatically registers
Favorite faces, see
Smart FR Edit
Face List
My Star Press the Fn button
Register the face
Face Tone
Photo Size / Movie Size
Face Retouch
Select Face Retouch by pressing the Up/Down button
Mode Movie clip mode Icon
Quality / Frame rate
Smart Range
Drive mode
Metering
Setting AEB Exposure Ranges AEB Area
Auto Focus type
A focus frame will appear
Focus Mark
Flash Intensity
Photo Style Selector
Smart Filter
Image Adjust
Up/Down button
Change the contrast by pressing
Left/Right button
This feature minimizes camera shake when you take a picture
Image Stabilization
Shooting AFL To preset the focus before shooting
Key mapping
Voice Memo
You can map one of four functions to AEL button
Voice Recording
Setting audio for movie recording Setting user mode
You can set the desired voice recording mode in Movie mode
Voice sub menus Off Record a video without sound
Record a video with sound
On Enable scene detection function
Function only in the Movie clip mode
Distortion compensation Smart Scene Detection
Movie clip frame stabiliser
Sound menu
Sound
Setup menu
Setting the Grid Line
Display
Function Description
You can adjust the LCD brightness
Display Bright Display Save
Quick view
Sub menus
Settings
Formatting memory
Initialization
Language
Setting up the Date / Time / Date type
Time Zone
File name
Imprinting the recording date Auto power off
Sub menus Off The power off function does not operate
Auto Focus lamp
Anynet+ HDMI-CEC
On* The AF lamp lights up in low light conditions
Hdmi Size
Setting the USB
Selecting Video out type
Starting play mode
Playing back a still image
Playing back a movie clip
It back, press the OK button again
Movie clip capture function
On camera movie trimming Playing back a recorded voice file
Playing back a voice memo
076
Play mode button
Smart Album
If you have turned on the camera by
Thumbnail º / Digital Zoom í Lever
Searching for or Deleting Files
To delete an image, follow these steps
Use the Up/Down button to move up or down the list
Portions of the enlarged image
Checking the image enlargement indi
Cator shown at the top left of the LCD
Appears
Play & Pause / OK button
File, or a movie clip
Temporarily stops playback
Resumes playback
Left / Right / Down / Menu button
Delete Õ button
Playback menus are listed in the tables below
Sub Menu
Single, 9
Setting up the play back function using the LCD monitor
Menu Tab Main Menu Sub Menu
4X6
Layout
Edit
Resize
Image Press the Menu button
Rotating an image
Icon Description
Left / Right button Change the R, G, or B value
Press the Up/Down button to select
Seem much smaller than it actually is
Make photos look like sketches
As a new file Face Retouch
Select By pressing the Left
Bar appears
Select
Saves the image as a new file
Change the contrast by pressing
Press the OK button and the camera
Change the saturation by pressing
Press the Menu button in playback mode
View
Starting the Multi Slide Show
Start the Multi Slide Show
Setting play interval
Selecting Images
Setting Background Music
File Options
Deleting images
Configure Multi Slide show effects
Protecting images
Press the Fn button to save your changes
Face List Edit
You can add your voice to a stored still image
Zoom W/T Lever
Appears on the thumbnail. You can
Files. The number appears on the LCD screen. Use
Select the Size menu, and then press
Right button again. The Sub-menu
OK button
Images to be printed
Copy To Card
LCD screen
PictBridge
Pressing the OK button
PictBridge Print Setting
PictBridge Picture Selection
PictBridge menu will appears
Press the Up / Down button to select the number of prints
PictBridge Reset Important notes
Handling the camera
Extremes in temperature may cause problems
Samsung cannot be held responsible for camera malfunctions
File Error
Low Battery
Card Locked
Memory Full
Before contacting a service center
Camera power ceases while in use
Images are unclear
Flash does not fire
Incorrect date and time is displayed
Camera buttons do not operate
Images dont play back
Specifications
Specifications
Power Source
Weight
Interface
Audio Microphone Stereo
Transferring files to your Windows computer
For Windows users
Connect your camera to your PC with the USB cable
On your PC, select My Computer Removable Disk Dcim 100PHOTO
Click
Screen Click the pop-up message Remove the USB cable
Using Intelli-studio
Power Mac G3 or later
For Mac users
Minimum 256MB RAM
Mac OS 10.4 or higher
Transferring files to your Mac computer
Turn on the camera
Using the Samsung RAW Converter
Adjusts the contrast
Color Changes the color Sharpness
Correcting the exposure
Illustration below
Mode, Aperture f =
Shutter Speed 1/30 sec, ISO =
Editing JPEG/TIFF files the same as RAW files
Saving the RAW files into Jpeg or Tiff format
FAQ
Samsung Eco-mark
FCC notice
Model No
Address
Telephone No SAMSUNG726-7864

 )
)