AD68-01227Q
VP-D371i/D371Wi D372WHi/D375Wi D975Wi
Inhalt
ContentsInhalt
107
Hinweis
Hinweise zum Drehen des Displays
Hinweise zu Display, Sucher und Objektiv
Hinweise zur Reinigung der Videoköpfe
Wartung und Ersatzteile
Servicing & Replacement Parts
Hinweise zum Camcorder
Hinweise zum Urheberrecht
Leistungsmerkmale
Features
Überblick über den Camcorder
Standardzubehör
Accessories Supplied with Camcorder
Basic Accessories
Mitgeliefertes Zubehör für den Camcorder
TFT LCD Screen Internal Microphone
Ansicht Vorderseite und linke Seite
VP-D375Wi/D975Wi only
Camera
Menu Button T Button
Ansicht Linke Seite
Left Side View
Anschlüsse
Ansicht Rechte Seite und Oberseite
Jacks
Verwendbare Speicherkarten
Ansicht Rückseite und Unterseite
Rear & Bottom View
Usable Memory Cards
√ Direction Button
Handschlaufe
Hand Strap Adjusting the Hand
Installing the Lens Cover after Operation
Lens Cover Attaching the Lens Cover
Lithiumbatterie einsetzen
Lithium Battery Installation
Lithium Battery Installation for Internal Clock
Precaution regarding the Lithium Battery
Charging Recording Times
Ion Battery Pack
Battery Type
Charging the Lithium
Handhabung des Akkus
Battery Level Display
Battery Pack Management
Akkuladestandanzeige
Hinweise zum Akku
About the Operating Modes
Connecting a Power Source
Stromversorgung herstellen
Über die Betriebsmodi
Quick-Menü verwenden Quick Menu
Using the Quick Menu
For example Setting the White Balance
Vorbereitung
OSD in Camera Mode
OSD in Player Mode
Turning the OSD On Screen Display On/Off
OSD in M.Cam Mode
Bildschirmanzeigen ein-/ausschalten
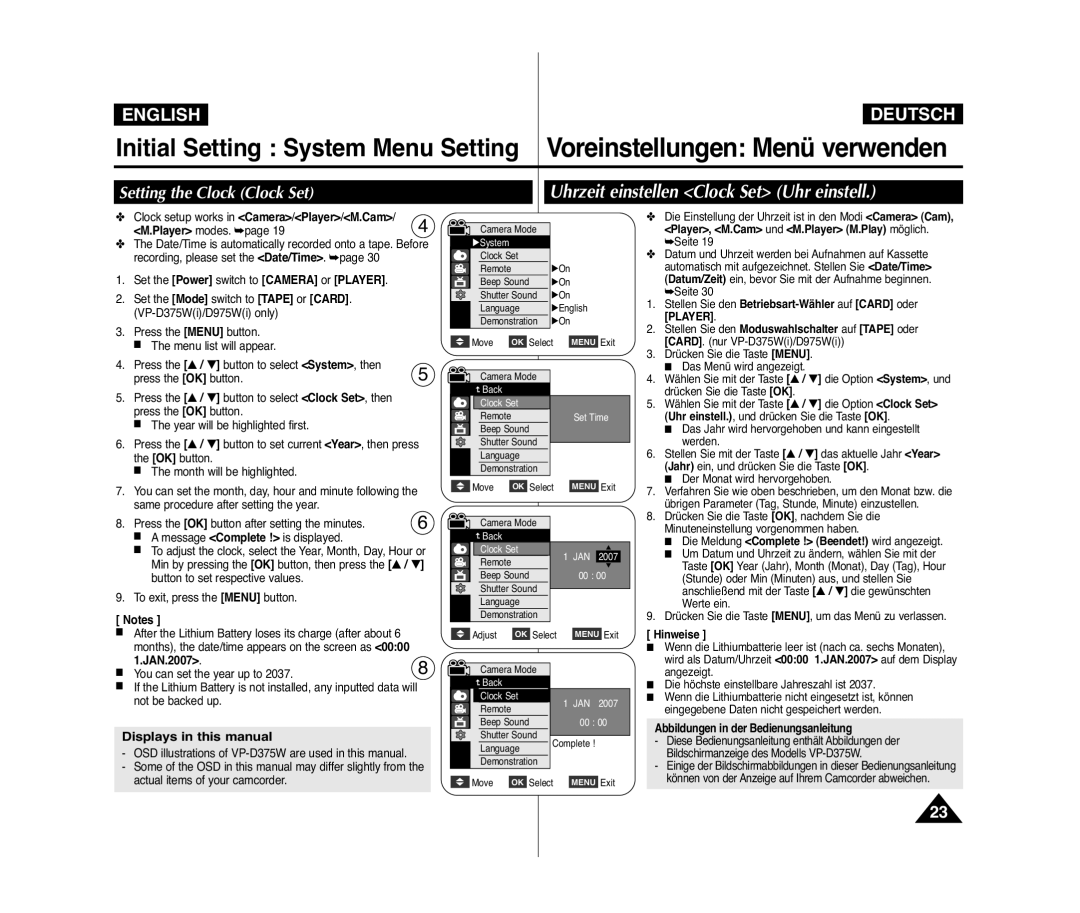
Displays in this manual
Setting the Clock Clock Set
Uhrzeit einstellen Clock Set Uhr einstell
VP-D375Wi/D975Wi only
Fernbedienung nur VP-D375Wi/D975Wi
Steuerung durch Fernbedienung aktivieren Remote
Stellen Sie den Betriebsart-Wähler auf Camera oder Player
Signalton einstellen Beep Sound Signalton
Setting the Beep Sound Beep Sound
Foto-Klickton nur VP-D375Wi/D975Wi
Foto-Klickton einstellen Shutter Sound
Selecting the OSD Language Language
Sprache der Bildschirmanzeige festlegen Language
Viewing the Demonstration Demonstration
Demo-Funktion verwenden Demonstration
Voreinstellungen
Adjusting the LCD Screen LCD Bright/LCD Colour
JAN.2007
Set the Power switch to Camera or Player
Datum und Uhrzeit anzeigen Date/Time Datum/Zeit
Displaying the Date/Time Date/Time
Stellen Sie den Betriebsart-Wählerauf Camera oder Player
Bzw. im Sucher eingeblendet
Press the Menu button Menu list will appear
Press the / button to select TV Display
Inserting / Ejecting a Cassette
Using the Viewfinder
Sucher verwenden
Kassette einlegen / entnehmen
Selbstaufnahme
Verschiedene Aufnahmetechniken
Various Recording Techniques
Self recording
Moduswahlschalter auf
Ihre erste Aufnahme
Making your First Recording
Wähler auf Camera
Words EASY.Q and DIS are displayed at the same time
Recording with Ease for Beginners EASY.Q Mode
Aufnahmen im Easy.Q-Modus EASY.Q
Unavailable buttons during operation
Aufnahmesuchlauf REC Search
Aufnahmesuchlauf REC Search
Reviewing and Searching a Recording REC Search
Record Search REC Search
Den Betriebsart-Wähler auf PLAYER, und
00000
Angezeigt, das entsprechend auf
Keine Hindernisse befinden, damit der Empfang nicht
Zwischen Fernbedienung und Camcorder dürfen sich
Weitwinkelmodus Das Motiv erscheint
Zoomfunktion verwenden
Zooming In and Out
To Stop Recording
Ein- und Ausblenden Fade
To Start Recording
Aufnahme starten
Funktion Colour Nite verwenden C.NITE
Using the Colour Nite
Vorsicht
Please disable 169 Wide mode to use this function.
Advanced Recording Weiterführende Aufnahmefunktionen
Oder Auto
Cutting Off Wind Noise WindCut Plus
Ein oder Auto Automatisch aus, und drücken
Or Auto
Real-Stereo-Ton auswählen Real Stereo Real-Stereo
Selecting the Real Stereo Function
Für Aufnahmen empfohlene Belichtungszeiten
Setting the Shutter Speed & Exposure
Recommended Shutter Speeds when Recording
Adjusting the Exposure When Recording
Manual Focus
Fokus automatisch oder manuell einstellen MF/AF
Auto Focus / Manual Focus
Auto Focus
Programmed Automatic Exposure Modes Program AE
Belichtungsprogramm einstellen
Setting the Program AE
Weißabgleich einstellen White Balance Weissabgleich
Setting the White Balance
Outdoor Aussenaufn. oder Custom WB
Mode Auto, Indoor, Outdoor or
Applying Visual Effects
Visuelle Effekte verwenden Visual Effect Vis. Effekt
Selecting the Visual Effects Visuellen Effekt auswählen
Breitbildmodus einstellen 169 Wide 169 Breit
Setting the 169 Wide mode
Telemakromodus verwenden Macro Makro
Using the Tele Macro Macro
Set the Mode switch to Tape or Card
DIS
Digitale Bildstabilisierung einstellen DIS
BLC Off BLC On
Using Back Light Compensation Mode BLC
Gegenlichtausgleich verwenden BLC
Value Off , 100x , 200x , 400x or
Zooming In and Out with Digital Zoom Digital Zoom
Selecting the Digital Zoom
Digitalen Zoom aktivieren
Foto suchen
Fotos aufnehmen
Still Image Recording
Searching for a still image
Videoaufzeichnung auf dem Display wiedergeben
Adjusting the LCD Bright/LCD Colour during Playback
Adjusting the Volume
PlaybackWiedergabe
Funktionen im Wiedergabemodus Player-Modus
Various Functions while in Player Mode
Wiedergabe
Kassette der Schreibschutz aktiviert ist
Nachvertonung nur VP-D375Wi/D975Wi
Audio Dubbing VP-D375Wi/D975Wi only
Stellen Sie den Betriebsart-Wähler auf Player
Dubbed Audio Playback
Nachträglich aufgezeichneten Ton wiedergeben
Tape Playback on TV Screen
Bandwiedergabe auf dem Fernsehbildschirm
Wiedergabe
Connecting to a TV which has no Audio/Video Input Jacks
Power switch to Player
Anschluss an ein Fernsehgerät ohne AV-Eingang
Voice+
VOICE+ is available only when the Audio/Video cable is
Funktion VOICE+
Voice + Function
Voice Sprache Hebt Stimmen im
Klangeffekt verwenden
Audio Effect
Audio Effect Klangeffekt, und drücken Sie die
Drücken Sie … / †, um Out Ausgang oder
Setting the AV In/Out
Nur VP-D371i/D371Wi/D372WHi/D375Wi/D975Wi
VP-D371i/D371Wi/D372WHi/D375Wi/D975Wi only
VP-D371i/D371Wi
When Copying is Complete
Copying a Camcorder Tape onto a Video Tape
Wenn der Kopiervorgang abgeschlossen ist
Nur VP-D371i/D371Wi/D372WHi/D375Wi/D975Wi
Anschluss an andere Geräte
Mit dem Camcorder aufnehmen bzw. kopieren
Inserting a Memory Card
Digitalkamera-Modus
Nur VP-D375Wi/D975Wi
Memory Card Functions
Bildformat
Ordner- und Dateistruktur auf der Speicherkarte
Structure of Folders and Files on the Memory Card
Image Format
Bildspeicherkapazität von Speicherkarten
Number of Images on the Memory Card
Select the Image Quality
Drücken Sie die Taste Menu Das Menü wird angezeigt
Press the … / † button to select Photo
Size, then press the OK button
Press the … / † button to select 1152 x
Dateinummerierung festlegen File No. Datei-Nr
Setting the File Number
Fotos Jpeg auf der Speicherkarte aufnehmen Photo
Taking a Photo Image Jpeg on the Memory Card
To view a Slide Show
Fotos Jpeg ansehen
Viewing Photo Images Jpeg
To view a Single Image
Sind, wird No image! Kein Bild! angezeigt
Protection from accidental Erasure
Die Meldung Do you want to delete?
Deleting Photo Images and Moving Images
Vorhanden sind, wird No image! Kein Bild
Deleting All Images at Once
Achtung
Speicherkarte formatieren Format Formatieren
Formatting a Memory Card
Mit der Speicherkarte verfügbare Aufnahmezeit
Saving Moving Images onto a Memory Card
Recording time available on the Memory Card
Videoclips auf der Speicherkarte speichern
Digitalkamera-Modus
Menu button and OK button are not available during
STILL, œœ/√√ REV/FWD und Stop steuern
Œœ/√√ REV/FWD and Stop buttons
Während der Aufnahme von Videoclips sind die Tasten
Entsprechendes Bildschirmmenü wird angezeigt
Recording Photo Image from a Cassette
Taste Stop
Off Alle aus, This file Diese Datei oder All Files
Removing the Print Mark
Druckmarke entfernen
Off, This File or All Files, then press the OK
Connect USB-Verbind. und drücken Sie die
Connecting To a Printer
An einen Drucker anschließen
Betriebsart-Wähler auf Player stellen
Selecting Images
Setting the Number of Prints
Setting the Date/Time Imprint Option
Canceling the Printing
System Requirements
Connecting to a DV Device DVD Recorder, Camcorder, etc
Connecting to a PC
Datenübertragung über
VP-D371i/D371Wi D372WHi VP-D375Wi/D975Wi
USB-Schnittstelle verwenden
Using USB Interface
USB-Schnittstelle
Computer bzw. Printer Drucker aus, und
Player M.Play verfügbar. Seite
USB Connect USB-Verbind., und drücken Sie
Programminstallation
DV Media Pro Software installieren
Installing DV Media PRO Program
Program Installation
USB-Kabel entfernen
Connecting to a PC
Disconnecting the USB Cable
Anschluss an einen PC
PC-Kamerafunktion verwenden
Using the PC Camera Function
Als Wechseldatenträger verwenden
Using the USB Streaming Function
Using the removable Disk Function
USB-Streaming-Funktion verwenden
After Finishing a Recording
Wartung und Pflege
Nach Beenden einer Aufzeichnung
Verwendbare Kassettentypen
Videoköpfe reinigen
Cleaning and Maintaining the Camcorder
Cleaning the Video Heads
Camcorder reinigen und warten
Camcorder im Ausland verwenden
Using Your Camcorder Abroad
Moisture Condensation
Troubleshooting
Self Diagnosis Display
Fehleranzeigen
Keine Speicherk
Tel -5 12 12 13 EUR 0,14/Min. ab 2007 Fax 0180-5 12 12
Symptom Explanation/Solution
Symptom Erklärung/Abhilfe
Samsung-Hotline für allgemeine Infos
Menu
Setting menu items
Main Available Mode Sub Menu Functions
Menüoptionen einstellen
Untermenü Funktionen
Fehlerbehebung
Haupt Betriebsmodus
General
Technische Daten
Modelle VP-D371i/D371Wi/D372WHi/D375Wi/D975Wi
System
Index
Deutschland
Schweiz
Österreich
Kontakt zu Samsung
Region Country Customer Care Centre Web Site
Contact Samsung World Wide
RoHS-konform
RoHS compliant