AD68-01227F
Owner’s Instruction Book
Contents
Contents
USB
LCD
This is convenient during playback operations
Servicing & Replacement Parts
Getting to Know Your Camcorder
Features
Lens Cover Lens Cover Strap
Accessories Supplied with Camcorder
Basic Accessories
CR2025
TFT LCD Screen Internal Microphone
Front & Left View
SC-D375H/D975 only
LCD LCD
Left Side View
CARD/TAPE SC-D375H/D975
DC Jack Jacks Jack Cover Cassette Door Hand Strap
Power Switch Camera or Player
Right & Top View
SC-D375H/D975 only
Rear & Bottom View
# SC-D375H/D975 only
Still Button Slow √ Slow √ Button
Remote Control SC-D375H/D975 only
10. œ START/STOP Button Self Timer Button 11. F. ADV Button
Stop Button
Preparation
Using the Hand Strap & Lens Cover
Hand Strap Adjusting the Hand
Installing the Lens Cover after Operation
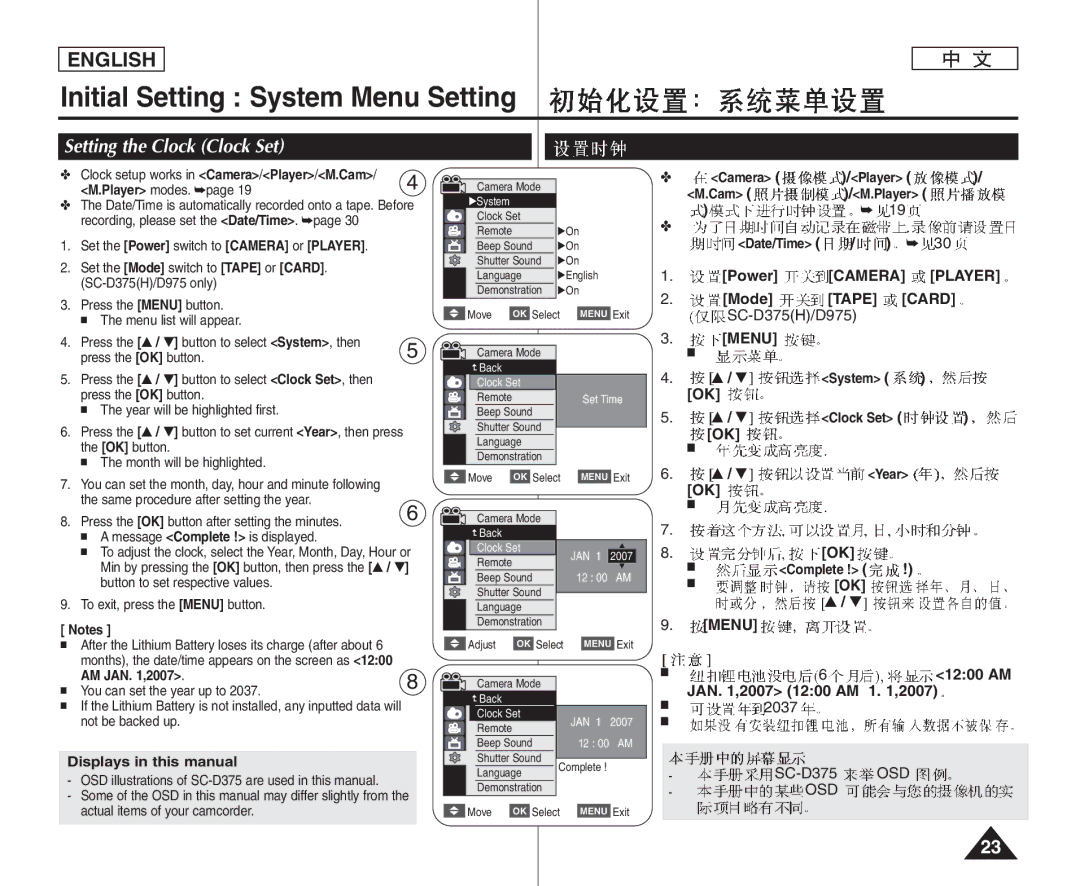
SC-D375H/D975 Date/Time AM JAN ,2007 1200 AM 1 ,2007
Lithium Battery Installation
Lithium Battery Installation for the Internal Clock
Precaution regarding the Lithium Battery
OFF
Using the Lithium Ion Battery Pack
Amount of continuous recording time available depends on
Battery Level Display
Battery Pack Management
Make sure that the Battery Pack is fitted firmly into place
Player
Connecting a Power Source
About the Operating Modes
Menu
Using the Quick Menu
Menu
Auto Indoor Outdoor
Voice+
USB SC-D375H/D975
103
Display
OSD SC-D375H/D975
Turning the OSD On Screen Display On/Off
OSD
Tape Card
Initial Setting System Menu Setting
Setting the Clock Clock Set
Camera
Remote
Then press the OK button
To exit, press the Menu button
System
Off, then press the OK button
Setting the Beep Sound Beep Sound
Power Camera Player Mode Tape Card
Camera /Player /M.Cam
Camera Player
SC-D375H/D975
SC-D375H/D975 only
Photo
OSD Language
Selecting the OSD Language Language
EASY.Q Nite
Viewing the Demonstration Demonstration
Camera
FADE, C.NITE
LCD
Adjusting the LCD Screen LCD Bright/LCD Color
LCD
Initial Setting Display Menu Setting
65~67
Setting the TV Display TV Display
TV TV
OSDOn Screen Display
Push
Using the Viewfinder
Basic Recording
Inserting / Ejecting a Cassette
Self recording
Various Recording Techniques
General recording
Upward recording
Stop
Making your First Recording
Stby
EASY.Q
Camera Power Camera Mode
Words EASY.Q and DIS are displayed at the same time
Unavailable buttons during operation
REC Search
Record Search REC Search
Zero Memory
Camera Player Set the Power switch to Camera or Player
Power Camera Player Mode Tape
Zero Memory SC-D375H/D975
~5m
Power Camera Mode Tape Self Timer Start/Stop
Self Timer
Zoom
Zooming In and Out
Fade
Using the Fade In and Out
To Start Recording
Fade button
Nite √ Color N /30, Color N /15 OFF
Using the Color Nite Color Nite
Color Nite
169
Camera Tape Light Color N /15
Using the Light SC-D372/D375H/D975 only
SC-D372/D375H/D975
Press the Light button until Color N /15 appears
16Bit
Selecting the Record Mode & Audio Mode
Advanced Recording
12Bit
Or Auto
Record
WindCut Plus
Auto
OK button
Camera Tape
SC-D375H/D975 Press the Menu button
Press the … / † button to select Record, then
1000, 1/500
Setting the Shutter Speed & Exposure
500, 1/1000, 1/2000, 1/4000
2000 4000
Manual Focus
Auto Focus / Manual Focus
Both Camera and M.Cam modes
Auto Focus
Spotlight mode
Auto a mode
Sports Mode
Portrait mode
Program AE
Setting the Program AE
Available options are listed
Displayed
White Balance
Setting the White Balance
Camera Auto a Indoor
EASY.Q Menu
Menu Auto
Applying Visual Effects
EASY.Q SC- D372/D375H/D975 169 169 SC-D371
Display mode is set to the selected mode
Selecting the Visual Effects
Visual Effect
Wide Off Menu
Setting the 169 Wide mode
169
Menu Camera , OK Wide
Zoom lever
Using the Tele Macro Macro
Cam
Macro
Setting the Digital Image Stabilizer DIS
BLC On
Using Back Light Compensation Mode BLC
Camera M.Cam Tape Card
Menu Camera OK BLC OK On OK Menu BLC
Camera Digital Zoom
169 Selecting the Digital Zoom
Camera Tape
Still Image Recording
Playing Back a Tape on the LCD Screen
Playback
Slow
Various Functions while in Player Mode
Reverse frame advance
Still mode
Change the direction in F.ADV mode
ADV
Audio Dubbing SC-D375H/D975 only
Audio Select
Dubbed Audio Playback
Select, then press the OK button
Sound1 Sound2 MIX1+2 Menu √ PLAY/STILL MIX1+2 1+2
Audio/Video Input Jacks
Connecting to a TV which has
Tape Playback on TV Screen
Playing back on a TV Monitor
SC-D371/D372
Connecting to a TV which has no Audio/Video Input Jacks
Power switch to Player
Power Player Mode Tape SC-D375H/D975
PLAY/STILL, œœ REW
Power
Voice + Function
Voice+
Audio Effect
AV In/Out AV Menu
Setting the AV In/Out SC-D975 only
Tape Menu
Copying a Camcorder Tape onto a Video Tape
Connection
VCR
Camcorder Tape SC-D975 only
SC-D975
Ejecting a Memory Card
Digital Still Camera Mode SC-D375H/D975 only
Memory Card Functions
Inserting a Memory Card
Structure of Folders and Files on the Memory Card
English Digital Still Camera Mode SC-D375H/D975 only
Number of Images on the Memory Card
Player Cam
Select the Image Quality
Memory
Photo Size
Cam Power
Selecting the recording Photo Size SC-D975 only
Size, then press the OK button
When you want to manage your files on a PC
Setting the File Number
Cam Series Reset 0001
File No Series Reset OK Menu
20,000 Jpeg
Set the Power switch to Camera Set the Mode switch to Card
Camera Card Photo
Viewing Photo Images Jpeg
Digital Still Camera Mode SC-D375H/D975 SC-D375H/D975 only
Protection from accidental Erasure
Yes
Image
Œœ/ √√ REV/FWD
Do you want to delete?
No, then press the OK button
Menu No image Memory Card Error Delete All
Deleting All Images at Once
Message Do you want to delete all? is displayed
Want to format?
Formatting a Memory Card
Format Want to format? is displayed
Mpeg
Recording Moving Images Mpeg on a Memory Card
Avi avi
English Digital Still Camera Mode
Mpeg
Menu OK Menu Quick Menu Menu Q.MENU
Menu Mpeg Menu OK
Player Mpeg
Œœ/√√ REV/FWD and Stop buttons
Button to make it disappear
Photo image is recorded on the Memory Card
Memory Card Set the Power switch to Player
On the image resolution
Play back the cassette Press the Photo button
Memory Card is full
Mode Tape Menu Tape , OK Photo Copy Stop
Player mode.
This
All Files
All Off
This File All Files
PictBridge TM SC-D375H/D975 only
REV/FWD
PictBridgeTM SC-D375H/D975 only
DVD
Ieee 1394 Data Transfer
IEEE1394 i.LINK-DV
PC M.Player
SC-D375H/D975 Power Player Mode Tape
Recording with a DV Connection Cable
Pause
USB
Using USB Interface
USB Interface SC-D375H/D975 only USB
USB
USB USB
Selecting the USB Device USB Connect
DV Media PRO
Installing DV Media PRO Program
Program Installation
Installation selection screen appears
USB Interface
Connecting to a PC
Disconnecting the USB Cable
DV , DirectX PC PC 15 fps USB 2.0 640X480 VGA
Using the PC Camera Function
Connector on your computer
Power , Mode , Zoom
Power Camera PLAYER, Mode Card
Using the USB Streaming Function
Using the removable Disk Function
Power Camera PLAYER, Mode Tape
Usable Cassette Tapes
Maintenance
Power OFF Battery Release
After Finishing a Recording
100
Cleaning and Maintaining the Camcorder
Cleaning the Video Heads
Blue screen Mode Tape SC-D375H/D975
PAL Ntsc
Using Your Camcorder Abroad
101
Self Diagnosis Display
Troubleshooting
Troubleshooting
102
Informs that Action
103
Display
104
Samsung authorized service center
Symptom Explanation/Solution
105
Setting menu items
Sub Menu Functions
106
107
Specifications
Model Name SC-D371/D372/D375H/D975
SC-D371/D372/D375H/D975
80~81
Index
108
100
Region Country Customer Care Center Web Site
Contact Samsung World Wide
Cd Pb Hg Cr+6 PBBs PBDEs
This Camcorder is Manufactured by