Only for DV-NC70W
DV-NC70 DV-NC70X
Icon Meaning
About This Manual
Only for DV-NC70X
Only for DV-NC70W/70
Rear of product
Do not put any foreign object on the disc tray
Location and Handling
Region number for this Player is
Types of Discs that Can Be Played on This Product
DVD-R/DVD-RW Recording Modes
Samples of region number marks compatible with this Player
Icons Used on DVDs
Disc Function or Operation that is Not Available
Title, Chapter and Tracks
Handling Precautions
Disc Handling and Maintenance
Maintenance
Contents
Dpss Digital Program Search System
Programming the Timer with G-CODESystem
Recording a DVD Disc onto a Video
101
Accessories
Features
Remote control unit
VIDEO/AUDIO cable
VCR Main Unit Front
Major Components
VCR Front Panel Display
DVD Front Panel Display
DVD Main Unit Front
Loading the Batteries
Remote VCR Operation Buttons
11 GB
Remote DVD Operation Buttons
18 VCR/DVD Change Switch
Number buttons REV Stop
Cursor
13 GB
Main Unit Rear
Basic Connection
Connecting to Antenna IN/RF OUT
Jack
This Product
Using the Component Colour Y, PB CB and PR CR Output Jacks
Connecting a TV Equipped with VIDEO/AUDIO Input Jacks
Colour Output Jacks Y, PB CB and PR CR
15 GB
Connecting to Audio Equipment
Connecting a TV Equipped with S-VIDEO Input Jacks
DVD Audio Connections
Playing 2 channel audio
17 GB
Playing Dolby Digital 5.1 channel, DTS or Mpeg audio
This Product
Audio equipment
Preparing to Watch a VCR or a DVD
Preparations Before Using the Product
VCR functions on
Remote will now Take priority
19 GB
Adjusting the Video Channel
RF pattern
Adjusting the Video Channel
21 GB
Auto Tuning System
Page
23 GB
Menu Screen Mode Selection
Channel Skip
Menu Screen
VCR Setup
Menu item list
Menu Screen
25 GB
Mode Selection
Set Ntsc to 3.58, 4.43 or PAL TV\with/. Then press
Nicam signal reception and a lot of noise is
Select OFF when your TV does not have good
Heard when the Auto mode is set. Selecting
OFF will change it to normal audio signal
27 GB
Setting the Channels
Press / to select AUTO. PressSET to confirm
Auto Tuning
Selected CH078 will disappear
29 GB
Press / to select Manual and pressSET to confirm
Manual Tuning
31 GB
Select Channel Preset and pressSET to confirm
Channel Skip/Cancelling Skip
Press / to select MANUAL. PressSET to confirm
Press / to select Skip
Press \ / to set on and press SET to confirm
33 GB
Press \ / to set OFF and press SET to confirm
Cancelling Skip
Initial Setting of Clock
Setting the Clock
35 GB
Press SET to return to the normal screen
Changing the Clock Setting
Initial Setting of Language
Setting the Language
Changing Language
37 GB
VCR Display Information
How to Display Indicators
Display Examples
39 GB
Language Code List for Disc Language
About the Setup Screen
DVD Setup
Setup item list
Refer to the pages where the setting
41 GB
TV Mode Setting
Preparation See Preparing to Watch a DVD on
Preparation
Parental Level Setting
See Preparing to use DVD on
43 GB
Country Code List
Press to select Code and then press Enter
Setting the Compression Dolby Digital output level
Audio Setting
Preparation See Preparing to Watching a VCR or a DVD on
Digital setting in succession, proceed to below
Setting the Dolby Digital
45 GB
Use or to select on or OFF
Setting the Cinema Voice
Setting the Mpeg
Setting SUBTITLE, Audio and Menu languages
Disc Language Setting
47 GB
Preparation See Preparing to Watch a VCR or a DVD on
Example Selecting Other in Audio
Selecting languages from Other
DVD Display Information
Operation Mode Indicators
49 GB
Display Examples TV Screen DVD Front Panel Display Remarks
Language Code List for Disc Language
Programming the Timer with G-CODESystem DV-NC70W only
Simple Recording Timer
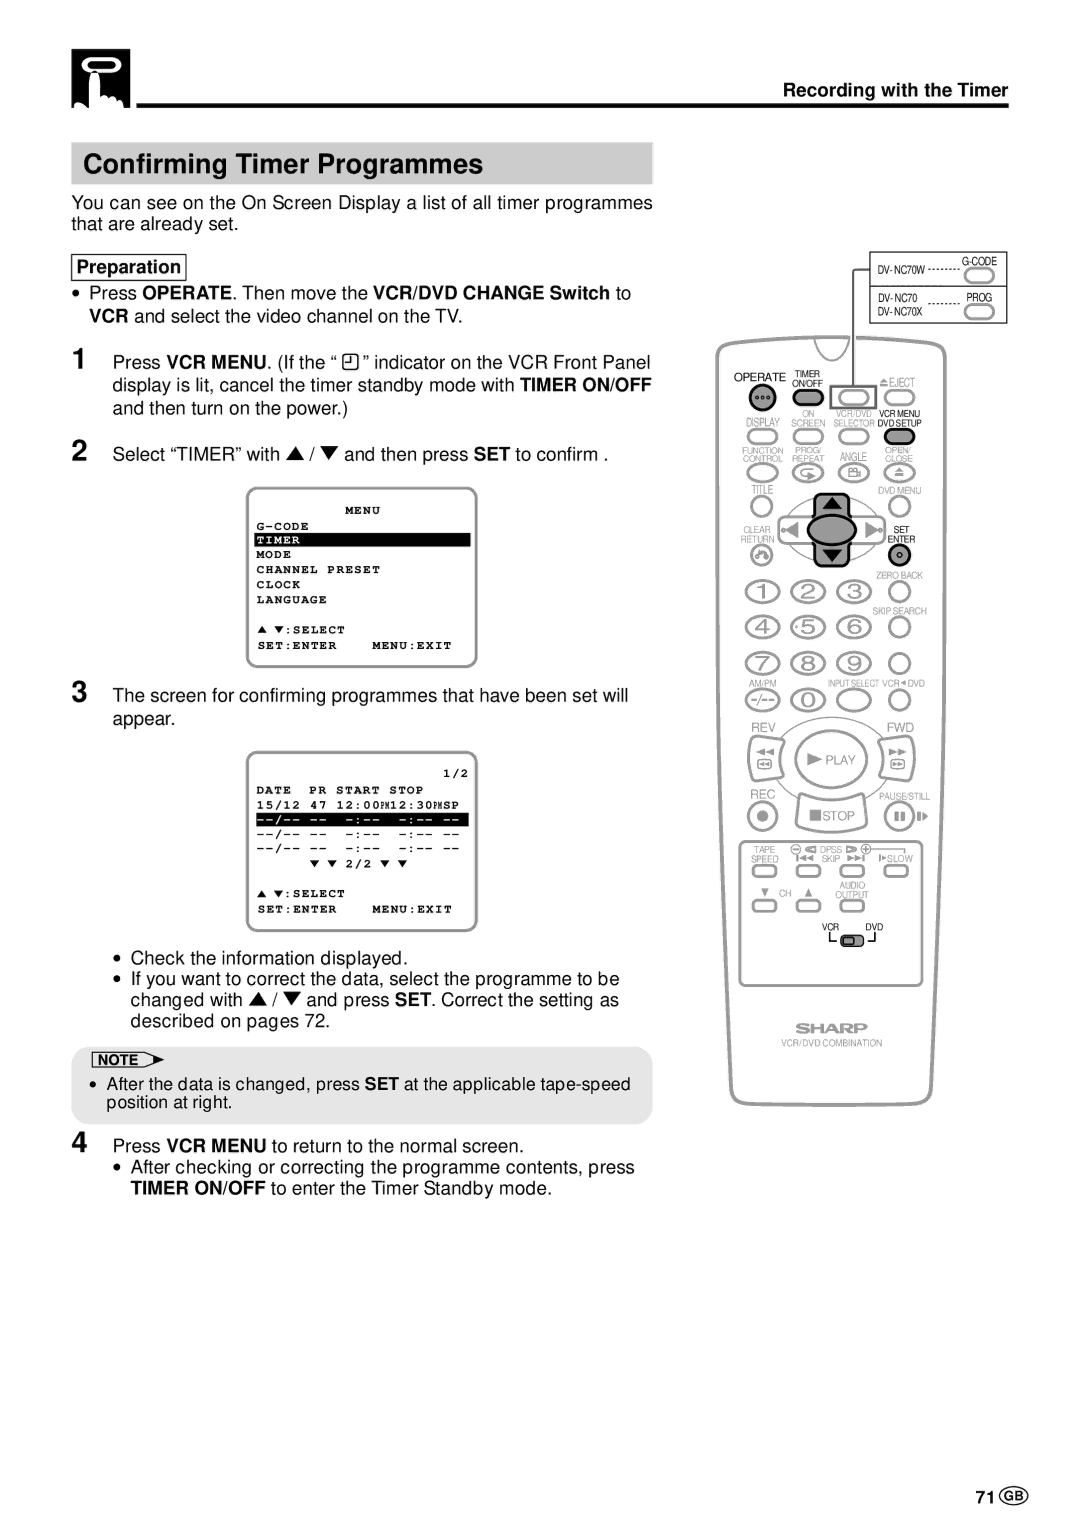
Recording with the Timer
Playback
Inserting a Video Cassette
Playback
Playback
Video Search with the Remote
Slow Motion Playback with the Remote
Fast Forwarding and Rewinding
Still Picture and Frame Advance
Double Speed Playback
Ntsc Tape Play Back on PAL TV
Auto Head Cleaning System
Full Auto Playback
Auto Tracking Control System
55 GB
Auto Rental
Press \ / to select AUTO, PAL, Mesecam or Ntsc
Press / to select Colour
Adjusting Hi-Fi Audio Tracking
Audio Output Mode
Playback of Hi-Fi Recorded Tapes
57 GB
Select S.PICTURE with / . Then set it to on or OFF with \
Sharp Super Picture
59 GB
Auto Repeat
Auto Zero Back
Dpss Digital Program Search System/Skip Search
Index signal
Skip Search
61 GB
Cassette Erase Protection
TV Programme Recording
To Watch Another TV Programme While Recording
Cassette has a removable tab to prevent accidental
63 GB
Recording NICAM/IGR Multiplex Broadcasts
Hi-Fi track
Normal track
Immediate Recording
Simple Recording Timer
Set the G-CODEnumber with the number buttons 0 to
65 GB
Press SET
Select the tape speed with
Programming the Timer with G-CODESystem
Setting the Programme Number In Step
PR Preset Channel
67 GB
Press VCR MENU. Then select Timer with / and press
Recording with the Timer
SP will be displayed automatically
Once Weekly Daily Select Change Setenter Menuexit
69 GB
Select the speed with
Select Timer with / and then press SET to confirm
Confirming Timer Programmes
71 GB
Cancelling Timer Programmes
Tape Dubbing Connection Instructions
Tape Dubbing
73 GB
Recording a DVD Disc onto a Video Cassette
Recording a DVD disc onto a Video cassette Tape Editing mode
Recording a DVD Disc onto a Video Cassette
75 GB
Page
Basic Play Track Direct Playback
77 GB
Angle Selection Playing MP3 Discs
Selecting Scenes by Title Number
When connecting a TV with the DVD/VCR shared output jacks
When connecting a TV with the DVD output jacks
Move VCR/DVD Change Switch on the Remote to DVD
Preparing to Use DVD
Track Direct Playback
Basic Play
Disc
79 GB
Slow-Motion Play
Fast Forward/Fast Reverse
Frame Advance
Still/Pause
Skip Forward/Reverse
81 GB
Stipulated by the manufacturers is
Angle Selection DVD
Sequence of angle shots
Example
Regarding MP3 discs
Playing MP3 Discs
Playing MP3 discs
83 GB
To play another file music title while playing
To play MP3 discs
To skip the file while playing
While the MP3 disc is playing
85 GB
About the Function Control Screen
Use or to select Then press Enter
Direct skip title track/chapter/time
Example Direct title skip
87 GB
Subtitle language setting
Use or to select and then press Enter
Press or to select the angle number you want
Angle setting
89 GB
+R L R Press Enter to confirm the setting
Press or to select the audio format you want to use
To use the 3D Virtual Surround function
3D Virtual Surround setting
91 GB
Digital Gamma setting
Press or to toggle Digital Gamma between on and OFF
Use \ or to change the level
Selecting Scenes from the Menu Screen
Chapter Programmed Playback
Programmed Playback
93 GB
Will be cleared Press ûPLAY
Example CD Program screen
Track Programmed Playback
95 GB
MP3 Files Programmed Playback
Press or to select the desired folder and then press
Repeat playback
Repeat Playback DVD
97 GB
DVD C D Repeat
Resume Function DVD
This resume operation is cancelled in the following cases
Problem Suggested Solution
Troubleshooting
99 GB
See page 2 for information Condensation
Troubleshooting
101 GB
Definition of Terms
Common names Names of Nations and Areas
Only for DV-NC70W, DV-NC70
Definition of Terms Only for DV-NC70X
103 GB
List of the region number 4 countries
Common names
Specifications
Memo
Memo
Sharp Corporation