![](/images/new-backgrounds/1076427/7642719x1.webp)
![](/images/new-backgrounds/1076427/7642719xi2.webp)
![](/images/new-backgrounds/1076427/7642719xi3.webp)
USING
THE
STOP KEY![](/images/new-backgrounds/1076427/7642719xi7.webp)
![](/images/new-backgrounds/1076427/7642719xi8.webp)
![](/images/new-backgrounds/1076427/7642719xi9.webp)
![](/images/new-backgrounds/1076427/7642719xi10.webp)
![](/images/new-backgrounds/1076427/7642719xi11.webp)
![](/images/new-backgrounds/1076427/7642719xi12.webp)
![](/images/new-backgrounds/1076427/7642719xi13.webp)
![](/images/new-backgrounds/1076427/7642719xi14.webp)
![](/images/new-backgrounds/1076427/7642719xi15.webp)
![](/images/new-backgrounds/1076427/7642719xi16.webp)
![](/images/new-backgrounds/1076427/7642719xi17.webp)
![](/images/new-backgrounds/1076427/7642719xi18.webp)
![](/images/new-backgrounds/1076427/7642719xi19.webp)
![](/images/new-backgrounds/1076427/7642719xi20.webp)
![](/images/new-backgrounds/1076427/7642719xi21.webp)
![](/images/new-backgrounds/1076427/7642719xi22.webp)
![](/images/new-backgrounds/1076427/7642719xi23.webp)
![](/images/new-backgrounds/1076427/7642719xi24.webp)
![](/images/new-backgrounds/1076427/7642719xi25.webp)
![](/images/new-backgrounds/1076427/7642719xi26.webp)
![](/images/new-backgrounds/1076427/7642719xi27.webp)
![](/images/new-backgrounds/1076427/7642719xi28.webp)
![](/images/new-backgrounds/1076427/7642719xi29.webp)
![](/images/new-backgrounds/1076427/7642719xi30.webp)
![](/images/new-backgrounds/1076427/7642719xi31.webp)
![](/images/new-backgrounds/1076427/7642719xi32.webp)
![](/images/new-backgrounds/1076427/7642719xi33.webp)
Use the STOP key to:
1.Erase a mistake during programming.
2. Stop the oven temporarily during cooking.
3.Cancel a programme during cooking, press the STOP key twice.
![](/images/new-backgrounds/1076427/7642719xi34.webp)
![](/images/new-backgrounds/1076427/7642719xi35.webp)
SETTING
THE CLOCK![](/images/new-backgrounds/1076427/7642719xi38.webp)
![](/images/new-backgrounds/1076427/7642719xi39.webp)
![](/images/new-backgrounds/1076427/7642719xi40.webp)
![](/images/new-backgrounds/1076427/7642719xi41.webp)
![](/images/new-backgrounds/1076427/7642719xi42.webp)
![](/images/new-backgrounds/1076427/7642719xi43.webp)
![](/images/new-backgrounds/1076427/7642719xi44.webp)
![](/images/new-backgrounds/1076427/7642719xi45.webp)
![](/images/new-backgrounds/1076427/7642719xi46.webp)
![](/images/new-backgrounds/1076427/7642719xi47.webp)
![](/images/new-backgrounds/1076427/7642719xi48.webp)
![](/images/new-backgrounds/1076427/7642719xi49.webp)
![](/images/new-backgrounds/1076427/7642719xi50.webp)
![](/images/new-backgrounds/1076427/7642719xi51.webp)
![](/images/new-backgrounds/1076427/7642719xi52.webp)
![](/images/new-backgrounds/1076427/7642719xi53.webp)
![](/images/new-backgrounds/1076427/7642719xi54.webp)
![](/images/new-backgrounds/1076427/7642719xi55.webp)
![](/images/new-backgrounds/1076427/7642719xi56.webp)
![](/images/new-backgrounds/1076427/7642719xi57.webp)
![](/images/new-backgrounds/1076427/7642719xi58.webp)
![](/images/new-backgrounds/1076427/7642719xi59.webp)
![](/images/new-backgrounds/1076427/7642719xi60.webp)
![](/images/new-backgrounds/1076427/7642719xi61.webp)
![](/images/new-backgrounds/1076427/7642719xi62.webp)
![](/images/new-backgrounds/1076427/7642719xi63.webp)
![](/images/new-backgrounds/1076427/7642719xi64.webp)
![](/images/new-backgrounds/1076427/7642719xi65.webp)
![](/images/new-backgrounds/1076427/7642719xi66.webp)
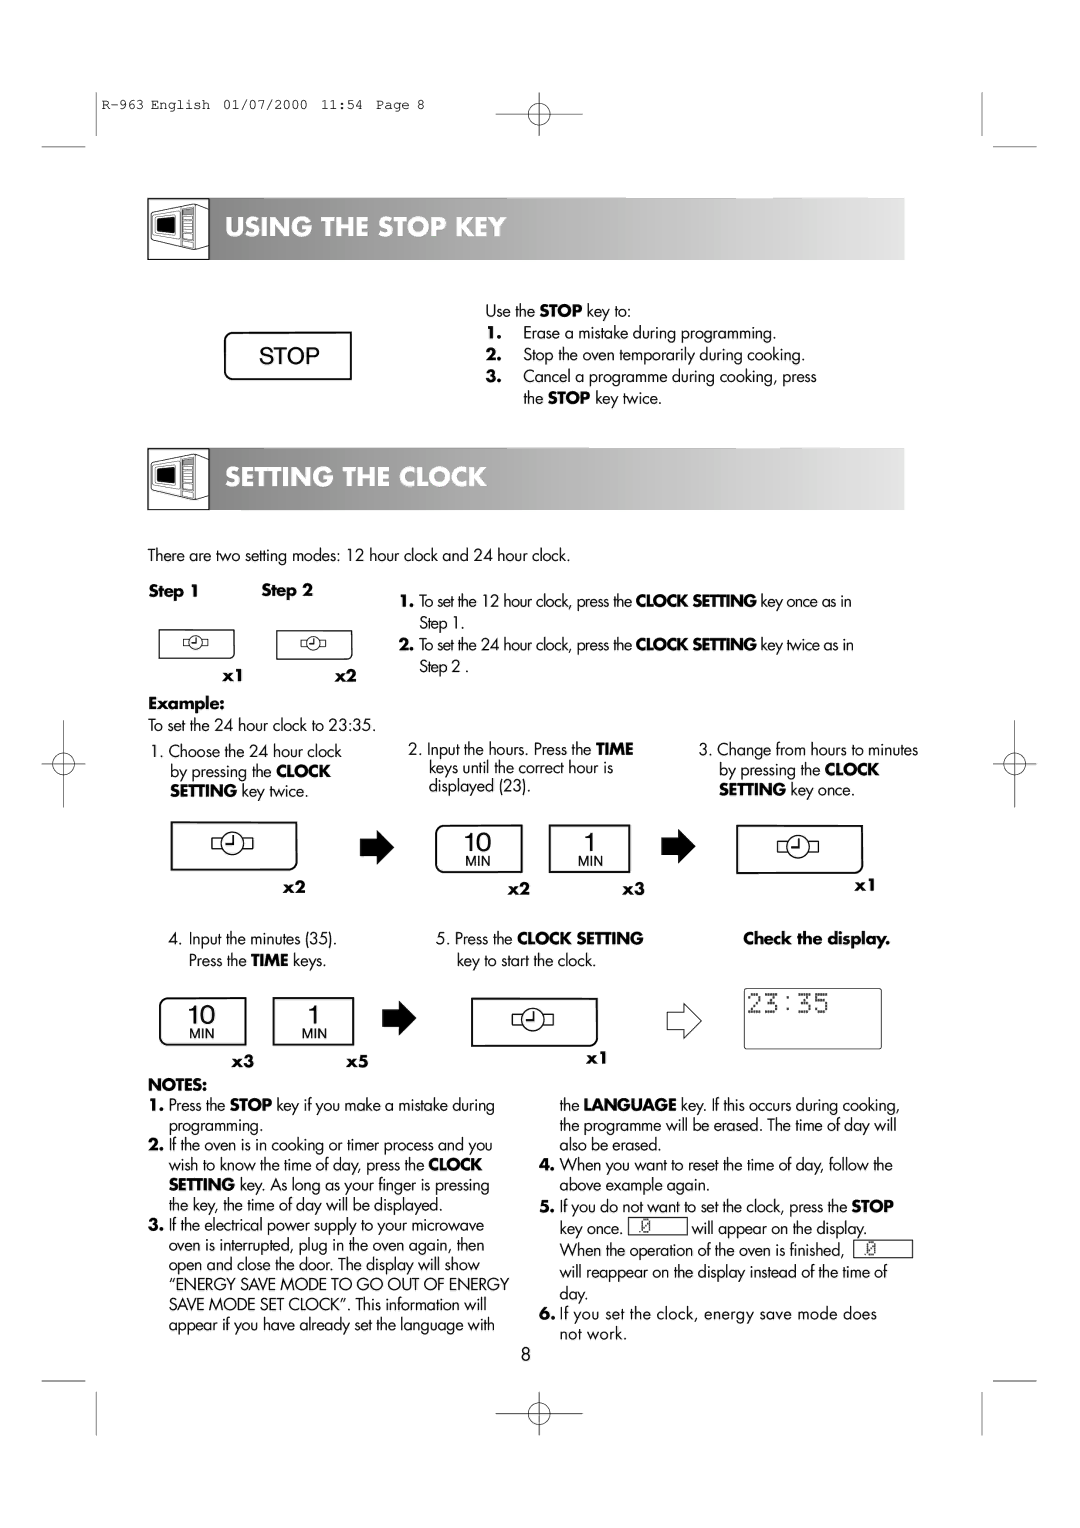
There are two setting modes: 12 hour clock and 24 hour clock.
Step 1 | Step 2 |
| 1. To set the 12 hour clock, press the CLOCK SETTING key once as in |
|
|
| |
|
|
| Step 1. |
|
|
| 2. To set the 24 hour clock, press the CLOCK SETTING key twice as in |
x1 |
| x2 | Step 2 . |
|
|
Example:
To set the 24 hour clock to 23:35.
1.Choose the 24 hour clock by pressing the CLOCK SETTING key twice.
2.Input the hours. Press the TIME keys until the correct hour is displayed (23).
3.Change from hours to minutes by pressing the CLOCK SETTING key once.
x2 | x2 | x3 | x1 |
4. Input the minutes (35). | 5. Press the CLOCK SETTING | Check the display. | |
Press the TIME keys. | key to start the clock. |
|
|
x3 | x5 | x1 |
|
| ||
NOTES: |
|
|
|
|
| |
1. Press the STOP key if you make a mistake during | the LANGUAGE key. If this occurs during cooking, | |||||
programming. |
| the programme will be erased. The time of day will | ||||
2. If the oven is in cooking or timer process and you | also be erased. |
|
| |||
wish to know the time of day, press the CLOCK | 4. When you want to reset the time of day, follow the | |||||
SETTING key. As long as your finger is pressing | above example again. | |||||
the key, the time of day will be displayed. | 5. If you do not want to set the clock, press the STOP | |||||
3. If the electrical power supply to your microwave | key once. |
| will appear on the display. | |||
oven is interrupted, plug in the oven again, then | When the operation of the oven is finished, |
| ||||
| ||||||
open and close the door. The display will show | will reappear on the display instead of the time of | |||||
“ENERGY SAVE MODE TO GO OUT OF ENERGY | ||||||
day. |
|
| ||||
SAVE MODE SET CLOCK”. This information will |
|
| ||||
6. If you set the clock, energy save mode does | ||||||
appear if you have already set the language with | ||||||
not work. |
|
| ||||
|
|
|
|
8