See page 93 for use of Demo mode
Model No Serial No
Thank you for purchasing this camcorder from Sharp
Applies to the supplied AC adapter
Sharp Camcorder
Specifications are subject to change without notice
Trademarks
Iii
Should never be blocked by placing
Page
Attaching the Battery Pack
Charging the Battery Pack
Turning the Power on
Switching the Media
Inserting a Mini DV Cassette Inserting a SmartMedia Card
Close the card slot cover
Zooming
Easy Camera Recording on Tape
Tape Playback
Quick Operation Guide
Viii
Card Recording
Card Playback
Press the Still button to begin recording
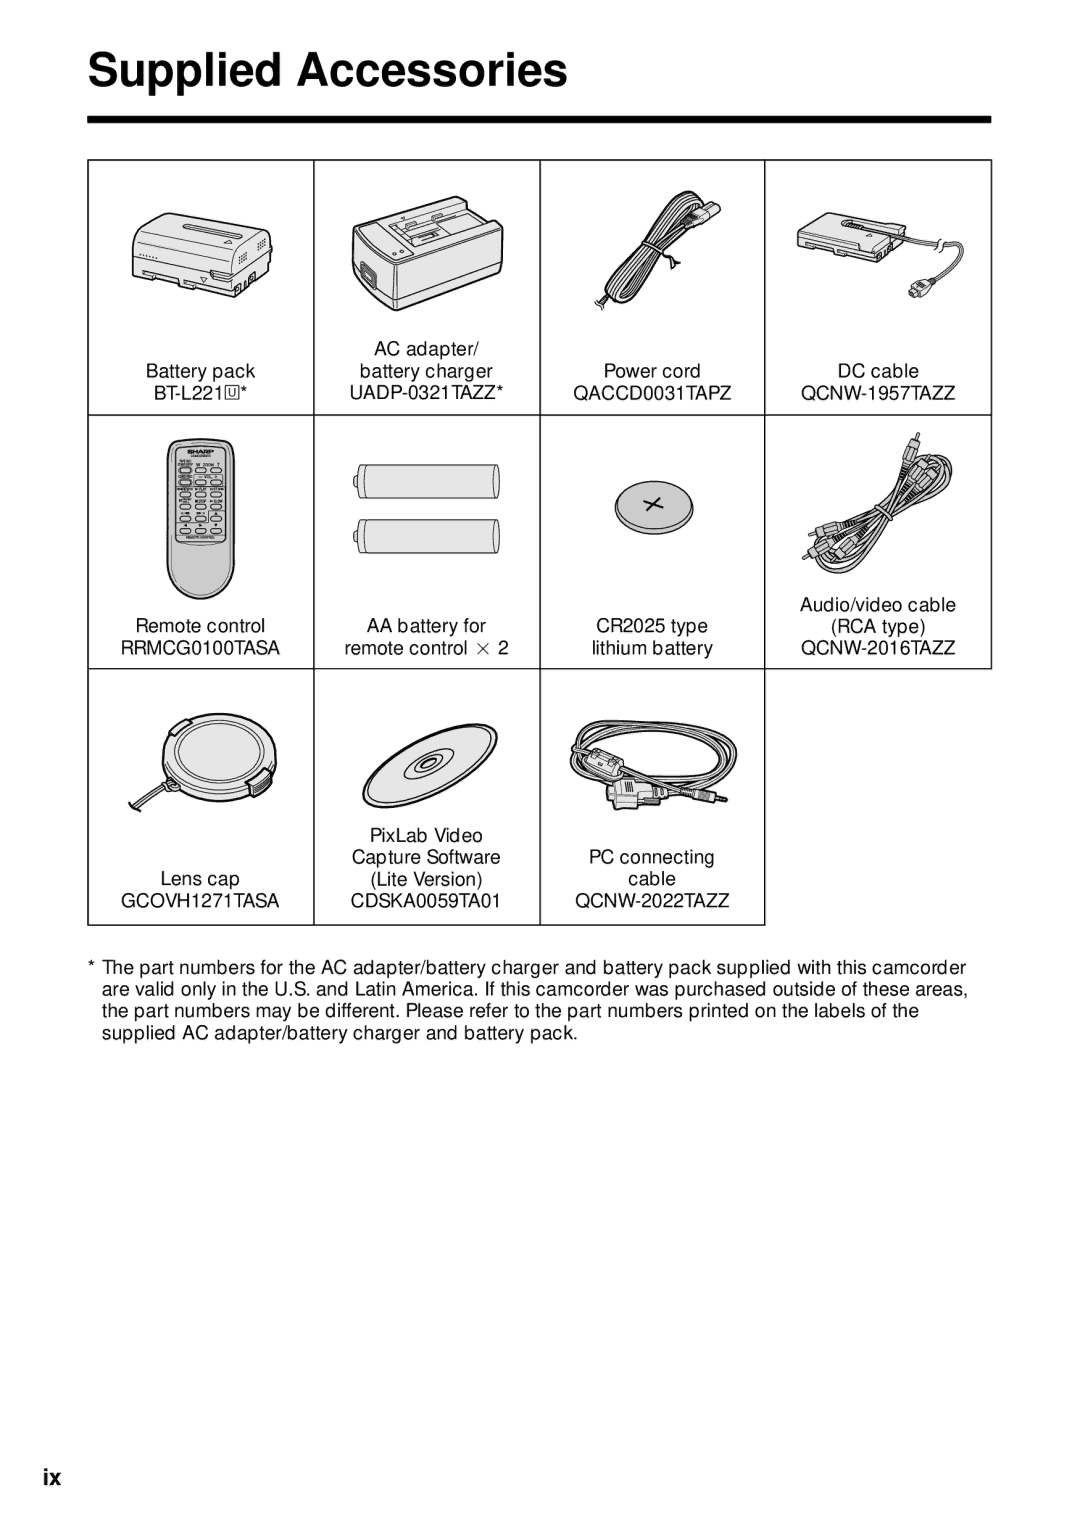
Supplied Accessories
Optional Accessories
Precautions
Do not aim the lens at the sun
Contents
Contents
Appendix
Features
SmartMedia Card
Xiv
Part Names
Remote sensor p
Button pp
Open release
Jack cover pp , 67
Operation References
Pp , 65
References
Quick Reference List
Operation References
Easy mode p
TAPE-CAMERA mode
TAPE-VCR mode
On-screen Display Index
CARD-CAMERA mode
CARD-VCR mode
AS S E T T E
Card with a new one see
Setting see
How the card is inserted see
SmartMedia card has no images recorded in the format
Preparation
Extending battery pack life
Max
Attaching the Battery Pack
Attaching and Removing the Battery Pack
Removing the Battery Pack
Preparation
Powering the Camcorder from an AC Outlet
Removing the DC cable from the camcorder
Removing a Cassette
Inserting and Removing a Mini DV Cassette
Inserting a Cassette
Perform above, then take out the cassette
Installing the Lithium Battery
Installing the Lithium Memory Battery
Removing the lithium battery
On-screen Display
Setting the Language
Selecting the Language for
Changing the Language
Setting the Area, Date and Time
0 0 AM
SE T T I NG
Changing to the 24-hour Time Mode
Displaying the Date and Time of Recording
SP L AY DA T E + T I ME
Open the hand strap flap 1
Adjusting the Hand Strap Using the Lens Cap
Grip strap Strap as shown below
Adjusting the Diopter
Using the Viewfinder
Closing the viewfinder
Using the LCD Monitor
Closing the LCD monitor
To pause recording
To turn the power off
Camcorder is now ready to record Recording Standby mode
Basic Operations
Basic Operations Camera Recording
Remaining Recording Time Display
Remaining Battery Power Display
End
Watching the Playback in the Viewfinder
Volume Control
To stop playback
Watching the Playback on a
About the S-video socket
Basic Operations Playback
Video Search
Still
To return to normal playback, press y again
CARD-CAMERA mode CARD-VCR mode
Selecting the Camcorder Mode
TAPE-CAMERA mode TAPE-VCR mode
Useful Features
Power switch
Using the Controls
Useful Features
MENU/DISPLAY button
Selecting the User Mode
User mode
Press d or y 1 to select
Using the Menu Screens
To turn off the menu screen
Desired menu item, then press r
Recording in LP Long Play
Recording Mode
To return to SP mode
AP E SP E E D LP
To return to DIS mode
Useful Features Camera Recording
To return to 12-bit audio recording mode
Turning Off the DIS Function
Press d or y to select 50, 100 or 780, then press e
Setting the Digital Zoom
To use optical zoom only
Select OFF in above
Compensation
To cancel Gamma Brightness Compensation
Gamma Brightness
To obtain a brighter picture
To cancel the gain-up function
Gain-up
Set the CAT’S EYE switch to OFF
To cancel Night Recording
Night Recording Cat’s Eye
Edit Search
Quick Return
QK. RE T URN S E a RCH
Fade In and Fade Out
Setting Fade Mode
Using Fade Mode
Adeon
Wide Screen
To cancel Fade mode
Select OFF in in Setting Fade Mode
To use Fade Out only
To cancel the still image
Selecting Still Recording Mode
Using Still Recording
Still Recording on Tape
Snap E F F . PHO T O SHO T
Using Photo SHOT, 9 Frames or 16 Frames mode
Still Recording Effects
Selecting a still recording effect
To pause recording on tape
Useful Features Camera Recording Using P-IN-P mode
To cancel still recording effects
To turn off the inset image
Shot
Set the Power switch to Camera
Letting the Subject Monitor
Subject is displayed
Turning on the Remote Control Mode
Auto Focus Using the Remote Control
Installing the Batteries in the Remote Control
Macro Shots
VOL. +/L buttons p
Operating the Remote Control
Remo T E on
FF button pp Stop button pp Slow button p
Reverse Playback
Playback Functions with the Remote Control
Frame Advance
Slow
ME Code D I SP . on
Using the Time Code
OU T
Displaying the time code on a TV during playback
Press e to display the focus setting screen
Manual Focus
Press d or y 1 to focus on the subject, then press e
To cancel Manual Focus mode
Advanced Features
Press e
Advanced Features Camera Recording
Setting the Shutter Speed
To return to Auto Shutter Speed mode
Recommended Shutter Speeds
Tips on Using the Manual Shutter Speed
Situation Recommended
Manual Exposure
To cancel Manual Exposure mode
Press e to display the exposure setting
Screen
Aim the lens at a white object
To cancel White Balance Lock
White Balance Lock
Press the MENU/DISPLAY button to set the white balance lock
Digital Picture Effects
To cancel the digital picture effect
Type of Digital Picture Effects
Scene Menu Program AE
Type of Scene Settings
To cancel the scene setting
SC E NE Menu Sport
OOM M I C AUT O
Using the Zoom Microphone Optional Accessory
Selecting Zoom Microphone Mode
Mounting the Zoom Microphone
To cancel Windbreak
Setting the Confirmation Sounds
Type of Confirmation Sound Settings
Windbreak
Are a
Time Zone Chart
World Clock
Camcorder while travelling anywhere
Area Table
Area number Area name Countries or areas
Selecting Daylight Saving Time
To reset to standard time
DY L T SAV E on
Playback Zoom
To cancel Playback Zoom
Press the Zoom W button to zoom out to the widest angle
To cancel Multiple Strobe Playback
Advanced Features Playback
To cancel Gamma Playback
Gamma Playback
Playback Effects
Using Playback Effect
To cancel the playback effect
Type of Playback Effects
Picture Effect Playback
To cancel Picture Effect Playback
Type of Picture Effects
Adjusting the Backlight
Picture/Backlight Adjustments
Adjusting the Picture
Press d or y to select AUTO, Normal or BRIGHT, then press e
Cutting Unwanted Sequences
Editing
To stop editing
To stop recording
Recording from an External Source
To Record from an External Source
Press d on the Operation button
IEEE1394
Set the camcorder to TAPE-VCR mode
Editing with the DV Terminal
To Record from Video Equipment
Audio Dubbing mode
Audio Dubbing Feature
Normal recording mode
Microphone for Audio Dubbing
To quit audio dubbing
Audio Dubbing
To pause audio dubbing
Press e
You can select any of the following audio playback modes
Selecting the Audio Playback Mode
AUD I O
Audio 1+2
Installing the Software
Configuring Software for PC Connection
Connecting the camcorder to a Personal Computer
System Requirements
Select your print settings, then click OK
Using the Software
Installing Adobe Acrobat Reader
Language File name
Inserting a SmartMedia Card
Removing a SmartMedia Card
Number of shots taken Number of shots remaining Lock button
SmartMedia Card Features Camera Recording
Selecting the Picture Resolution
RE C Mode Normal
Type of resolution settings
Recording with the Self-timer
Formatting a SmartMedia
Card
Press y Selected image is displayed in full- screen
Available Operations during Full- screen Display
To return to a thumbnail of the images, press d
Slide Show Playback
SmartMedia Card Features Playback
To stop Slide Show Playback
Press y to cancel the protection R indicator disappears
To cancel the protection setting
Press y to set the protection R indicator appears
Delete-protection
Deleting One Stored Image
Press e or r to select the image to Be deleted
Deleting All Stored Images
Press y to delete all the images
About Dpof
Print Order
Assigning Print Order to an Image
M indicators are turned off
To cancel the print order for an image
To cancel the print order for all images
Assigning Print Order to All Images
Image Folders and File Names
Transferring the Data on a SmartMedia Card to a Computer
Adapters for the SmartMedia Card
DVC00001.JPG Still image DVC00002.JPG
Lighting
Useful Information
Hints for Better Shooting
Tips on good lighting
DV and conventional video cassette tapes
High horizontal resolution
Appendix DV Technology
PCM digital recording
Copyright Protection
Precautions when using a Mini DV cassette
Mini DV Cassette
To protect recordings against acciden- tal erasure
Appendix
Precautions on handling SmartMedia card
SmartMedia Card
Charging
Battery Pack
This camcorder uses a lithium-ion type battery pack
Use
Replacing the Fluorescent Lamp
AC Adapter/Battery Charger
Dew Formation
Using Your Camcorder Abroad
Using a Cleaning Tape Commer- cially Available
Cleaning
Remove the cleaning tape To cancel cleaning, press e
Canceling Demo Mode
Demonstration Mode
Demo Mode on
EMO MOD E O F F
Power
Before Requesting Service
Symptom Possible cause Suggested solution
Mode
Card
Properly pp
AC Adapter/Battery Charger UADP-0321TAZZ
Specifications
Service Information For the U.S
Camcorder
Guía de operación rápida en español
Se aplica al adaptador de CA suministrado
Precauciones
Deformar la videocámara o hacer que ésta funcione mal
Productos que van a ser utilizados con
Utilícelo solamente Con un carrito
La compañía eléctrica local. Para los
Energía de baterías u otras fuentes
Notas acerca de la utilizació n de la pila de litio
100
Conexió n de la alimentació n
Carga de la batería
Colocació n de la batería
Cambio de medio
102
Inserció n de un minivideocasete DV
Cierre la cubierta de la ranura de tarjeta
Reproducció n de cinta
Grabació n fá cil con la videocá mara en una cinta
Empleo del zoom
Para detener la reproducció n
104
Grabació n con tarjeta
Reproducció n de tarjeta
Pulse el botón Still para iniciar la grabación
Modo TAPE-VCR
Modo TAPE-CAMERA
Modo fá cil FÁ CIL
105
Modo CARD-VCR
Modo CARD-CAMERA
106
Mode TAPE-VCR
Mode TAPE-CAMERA
Mode facile Facile
107
Mode CARD-VCR
Mode CARD-CAMERA
108
Uct, be sure it is insured and packaged securely
Valid for warranty service in the U.S. only
Where to Obtain Service What to do to Obtain Service
Sharp Plaza, Mahwah, New Jersey