SlickEdit Corev3.3
Page
SlickEdit Core v3.3 for Eclipse
SlickEdit Core v3.3 for Eclipse
Page
Page
Table of Contents
Code Navigation
101
Language-Specific Editing 229
Tools and Utilities 307
Appendix 469
479
Xii
List of Figures
163
260
374
SlickEdit
Xviii
List of Tables
Page
Introduction
Cool Features
Cool Features
Getting the Most Out of SlickEdit Core
Write More Code, Faster
Get Started
Get Started
Documentation and Conventions
Accessing Documentation
Documentation Conventions
Code Syntax Conventions
Supported Languages and En Vironments
Supported Languages and Environments
Supported Languages and File Types
Feature Languages Javadoc Editor
Supported Languages and File
Select/Hide Code Block
Selective Display
Embedded Languages in Html
Embedded Languages
Embedded Languages in Perl and Other Scripting Languages
Supported Editor Emulations
Supported Editor Emulations
Install/Uninstall
Installing SlickEdit Core
Installing with the Update Manager
Installing with ZIP Files
Finding Updates
Setup on Windows
Setup on Linux
Licensing
Repairing a License
Activation
Deactivation
Vsact deactivate
Adjusting the System Date
Uninstalling SlickEdit Core
Uninstalling SlickEdit Core
Using the Help System
Using the Help System
Help and Product Support
Product Support
Quick Start
General Options
Extension-Specific Options
Extension-Specific Options
Changing the tab and indent styles
Extension-Specific Options
User Interface
Workbench
Screen Layout
Workbench
Workspace
Perspectives
SlickEdit Core Editor
Perspectives
SlickEdit Core Editor
Switching Between SlickEdit Core Editor and Ec
Opening Source Files with SlickEdit Core
Menus
Menus
Views
Status Area
Dialogs
Lipse Editors
Command Line
Command Line
SlickEdit Views
Opening SlickEdit Core Views
Available SlickEdit Core Views
Bookmarks
Find Symbol
Class
Outline
Find and Replace
Symbols
SlickEdit Core Command Line
SlickEdit Search
Slick-CStack
Activating the Command Line
SlickEdit Core Command Line
Activating the Command Line
Command Line History
Command Line Completions
Using Shortcuts Inside the Command Line
Using the Command Line to View Key Binding Associations
Starting a Program from the Command Line Shelling
Command Line Prompting
Determining the Command of a Key Binding
Determining the Key Binding of a Command
Common SlickEdit Core Commands Description
Common SlickEdit Core Commands
Common SlickEdit Core Com Mands
Using the Mouse and Keyboard
Command Description
Find a symbol
Execute command outside of editor
Key Shortcuts in Text Boxes
Using the Mouse and Keyboard
Text Box Editing Keys
Key Shortcuts in Text Boxes
Redefining Common Keys
Redefining Common Keys
Redefining Common Keys
User Preferences
Introduction to User Preferences
Global Preferences
Extension-Specific Preferences
Global Preferences
Emulations
Supported Emulations
Changing Emulations
Changing Emulations
Xcode
Determining Keys/Functions
Determining Keys/Functions
What is a Binding?
What is a Binding?
Key and Mouse Bindings
Managing Bindings
Managing Bindings
Tip
Viewing and Filtering Bindings
Creating Bindings
Bind Key Dialog
Editing Bindings
Removing Bindings
Exporting and Importing Bindings
Exporting Bindings
Key Binding Settings
Saving a Bindings Chart
Running a Command/Macro using the Key Bindings Dialog
Resetting Default Bindings
Using Shorter Key Names in Menus
Cursor, Mouse, and Scroll Set Tings
Cursor, Mouse, and Scroll Settings
Setting the Cursor Style
Scroll Style Settings
Hiding the Mouse Pointer
Setting Fonts and Colors
Setting Fonts for Screen Elements
Fonts
Fonts
Command Line Fonts
Recommended Fonts for Elements
Colors
Command Line Font Recommendations Platform
Colors
Setting Colors for Screen Elements
Setting Colors for Screen Ele Ments
Using Color Schemes
Setting an Embedded Language Color
Restoring Settings on Startup
Restoring Settings on Startup
Page
Context Tagging
Context Tagging Overview
Tag-Driven Navigation
List Members
Tag-Driven Navigation
Parameter Information
Parameter Information
Auto List Compatible Parameters
Auto List Compatible Paramet Ers
Completions
Symbol Browsing
Completions
Statement Level Tagging
Statement Level Tagging
Building and Managing Tag Files
Building Tag Files
Creating Tag Files for Run-Time Libraries
Building Tag Files
Creating Extension-Specific Tag Files
Add Tag File Dialog
Add Tags Database Dialog
Configuring Context Tagging for Cobol
Managing Tag Files
Tagging Run-Time Libraries
Managing Tag Files
Tag File Categories
Tag File Search Order
Rebuilding Tag Files
Example Java Tag File Search Order
Example C/C++ Tag File Search Order
General Context Tagging Options
Context Tagging Options
Context Tagging Options
Extension-Specific Context Tagging Options
Editing Features
Symbol Navigation
Navigation
Code Navigation
Code Navigation
Using the Find Symbol View
More Symbol Navigation Methods
Begin/End Structure Matching
Navigating Between Multiple Instances
Viewing and Defining Begin/End Pairs
Example
Setting the Paren Match Style
Cursor Navigation
Navigating in Pages and Files
Cursor Navigation
Navigating Between Words
Navigating in Statements and Tags
Navigating to a Specific Line
Symbol Browsing Gotoline linenumber
Navigating to an Offset
Class View
Symbol Browsing
Class View
Class View
Filtering in the Hierarchy Pane
Class Exclusion Manager
Filtering and Sorting in the Members Pane
Outline View
Outline View
Outline View Options
Find Symbol View
Find Symbol View
Preview View
Preview View
Information Displayed by the Preview View
References View
References View
References View
Symbols View
Symbols View
References View Options
Filtering Symbols in the Symbols View
Symbols View Options
Viewing Symbol Uses with the Calling Tree
Symbol Uses/Calling Tree Dialog
Viewing Base and Derived Classes
Base Classes Dialog
Symbol Browser Filter Options
Symbol Browser Filter Options Dialog
Class Members
Declarations
Functions/Methods
Symbol Properties View
Symbol Properties View
Data Members
Display or Hide
Code Templates
Instantiating a Template
Code Templates
Instantiating a Template
12. Parameter Entry Dialog
Creating Templates
Create the Template Source Files
Insert Substitution Parameters into the Template Files
Creating Templates
Substitution Parameters
Use the Template Manager to Create a New Template
Add the Template Files to the Newly-Defined Template
Predefined Substitution Parameters
$fileinputname$
$safeitemname$
Custom Class, then the $safeitemname$ would
$upcasesafeitemname$
Organizing Templates
Template Manager Operations
Creating a New Category
Creating a New Template
Editing an Existing Template
Template Manager Dialog
Details Tab
Files Tab
Custom Parameters Tab
Template Options Dialog
Add File Dialog
Add Parameter Dialog
Global Substitution Parameters
Add New Item Dialog
Add New Item Dialog
Installed Templates
Locating Templates
Manually Creating a Template
User Templates
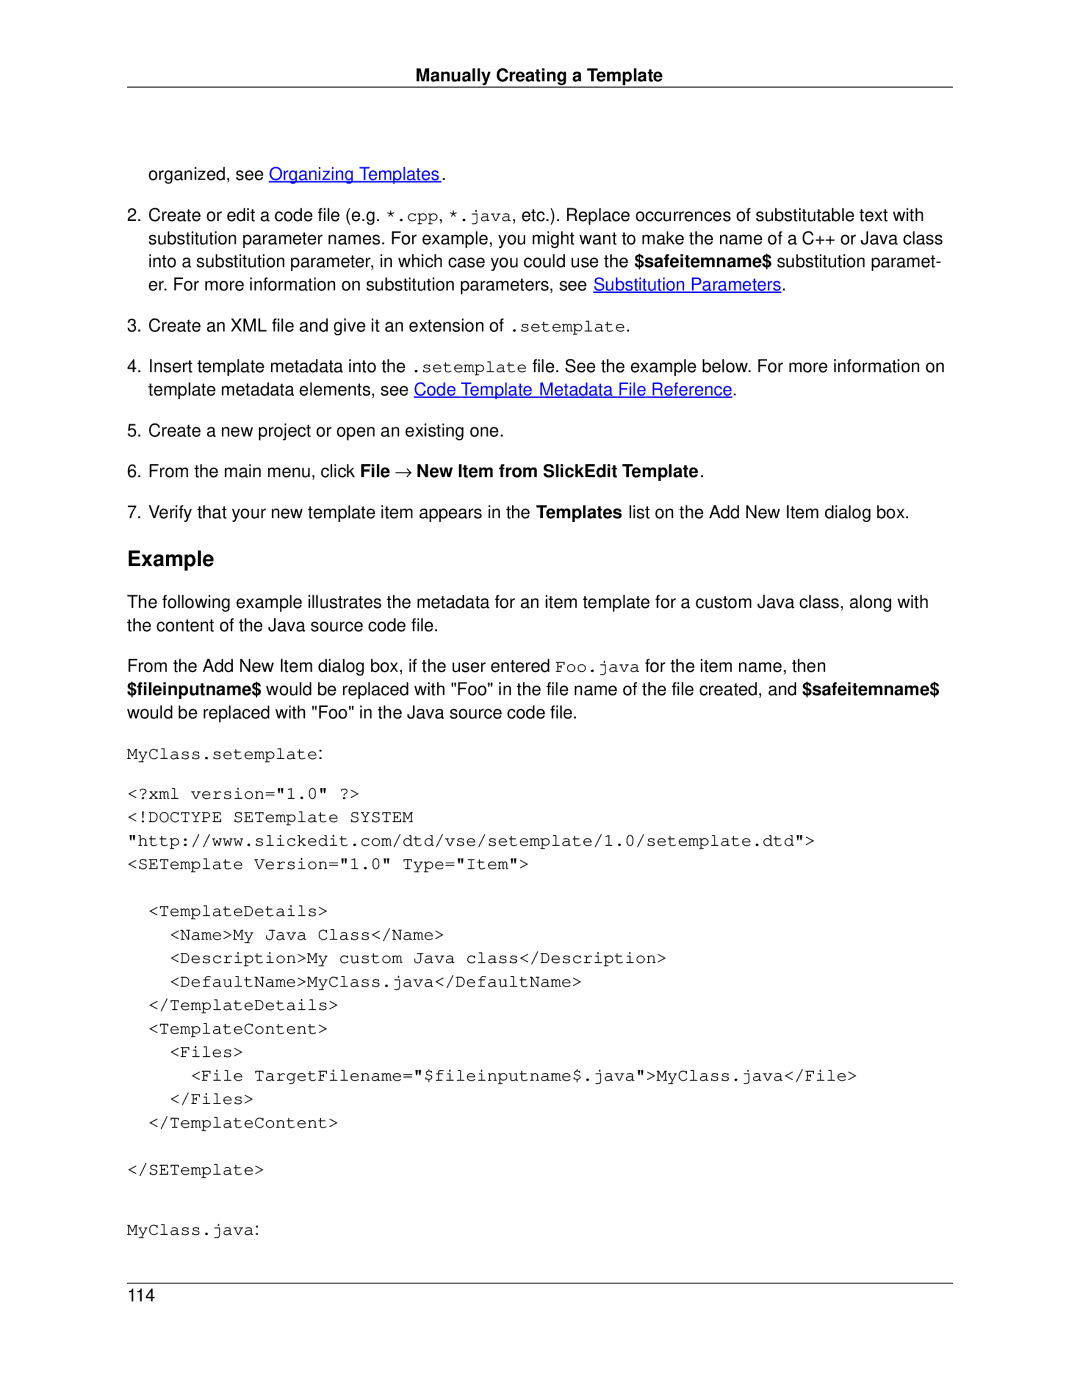
Example
Manually Creating a Template
Creating a Multi-file Template
Code Template Metadata File Reference
Code Template Metadata File Reference
Summary of Metadata Element Child Elements Attributes
DefaultName
Elements
Description
Attributes None
Child elements None Parent elements TemplateContent
File
Files
Name
Parameter
Child elements None Parent elements Parameters Value N/A
Parameters
SETemplate
SortOrder
TemplateContent
TemplateDetails
Text Editing
Text Editing
Selections
Character Selections
Block Selections
Editing a Block of Text Block Insert Mode
13. Block Insert Mode Example
Line Selections
Selection Keys
Modifying Selected Text
Selections Command Key Sequence or Menu Item Description
Window → Preferences, expand
SlickEdit and click General
Moumovetocursor Ctrl+R
Adjustblock Edit → Other → Adjust block
Line insert style to Before
Fillselection, guifillselection Edit → Fill
Indentselection Tab
Executeselection Alt+=
Put filename
Guiwriteselection Name. Use File → Insert a File to
Append filename
Counting Selected Lines and Characters
Adding Numbers to a Selection Enumeration
Setting Selection Options
Using Clipboards
Cutting, Copying, and Moving Text
Dragging and Dropping
Setting the Maximum Number of Clipboards
Working with Lines
Clicking Past the End of a Line
Highlighting the Current Line
Setting the Line Insert Style
Sorting Text
Preserving the Column on Top/Bottom
Sorting Text
Sort Commands
Inserting Literal Characters
Inserting Literal Characters
Sorting Options Description
Resetting Modified Lines on Save
Resetting Modified Lines on Save
Color Coding
Adding Color-Coded Keywords to Supported Languages
Color Coding Configuration
Color Coding Configuration
Creating Color Coding for a New Language
Advanced Color Coding Configuration
Color Coding Settings
Color Coding Settings
Setting Tab Spacing
Syntax Indent and SmartPaste
Syntax Indent
Indenting with Tabs
Setting the Backspace Unindent Style
Setting Tab to Indent Selections
Setting Tabs for the Current File
SmartPaste
Completions
Using Auto-Complete
Completions
Auto-Complete
Auto-Complete
Tip
Word Completion
Configuring Completion Settings
Word Completion
Aliases
Aliases
Directory Aliases
Defining a New Directory Alias
Directory Aliases
Using Directory Aliases
Embedding Environment Variables in Directory Aliases
Extension-Specific Aliases
Creating an Extension-Specific Alias
Choosing the Alias File
Extension-Specific Aliases
Using the Alias Editor
20. Alias Editor Dialog
154
Alias Escape Sequences
Alias Escape Sequences Description
Escape Sequence Examples
Escape Sequence Description
\m surtext%
Escape Sequence Examples Alias Name and Description Value
Creating an Alias for Parameter Prompting
Parameter Prompting
Alias Name and Description Value
Creating an Extension-Specific Alias from a Selection
Syntax Expansion
Syntax Expansion Settings
Syntax Expansion Settings
Syntax Expansion
Adding Syntax Expansion for Other Languages
Modifying Syntax Expansion Templates
Modifying Syntax Expansion Templates
Dynamic Surround and Sur Round With
Dynamic Surround
Dynamic Surround and Surround With
Dynamic Surround
22. Dynamic Surround Example
23. Dynamic Surround Example
24. Dynamic Surround Example
Surround With
Surround With
Modifying Surround With Templates
25. Surround With Dialog
Surround With Commands
VSARG2REQUIRESEDITORCTL VSARG2MARK VSARG2REQUIRESABSELECTION
Deleting Code Blocks
Unsurround
Unsurround
Bookmarks
Command Line Shortcut sb
Bookmarks
Named Bookmarks
Naming Bookmarks
Using a Key Binding for the Name
Command Line Shortcut gb
Navigating Named Bookmarks
Deleting Named Bookmarks
Setting Bookmark Options
Pushed Bookmarks
Pushing a Bookmark
Popping a Bookmark
Setting Breakpoints
Setting Breakpoints
Setting Conditional Breakpoints
Setting Java Exception Breakpoints
Setting Conditional Breakpoints
Comment Block and Line Settings
Commenting
Commenting Blocks and Lines
Commenting Blocks and Lines
Doc Comment Examples
Creating Doc Comments
Creating Doc Comments
Javadoc Format
XMLdoc Format
String Editing
Comment Wrapping
Doxygen Format
String Editing
Reflowing Comments
Find and Replace
Find and Replace
Quick Search and Replace
Incremental Searching
Quick Search
Incremental Searching
Incremental Search Key Keys Function Ctrl+R
Ctrl+S
Ctrl+T
Find and Slash / Commands
Find and Replace Commands
Find and Replace Commands Keys Ctrl+Shift+W Function
Find and Replace Commands
Option Description
=SlickEdit-regular-expression
Click Window → Preferences, expand SlickEdit
Find and Replace Commands Option
XCCLetters CCCLetters
Replace and c Commands
11. Replace Key
Restore cursor after replace option
Key Action Or Space
Or Backspace
Or Dot
Replace Command Search Examples
Saving Search and Replace Values
Find and Replace View
Find and Replace View
Syntax-Driven Searching
Setting Options
Search Results Output
Find and Replace with Regular Expressions
Special Characters in Regular Expression Find/Replace
Find and Replace with Regular Expressions
Unix and SlickEdit regular expression
Brief regular expression
Unix regular expression
Using Tagged Search Expressions
Using Expressions to Search for Binary Characters
14. Examples of Tagged Search Expressions
Minimal versus Maximal Matching
Unix regular expression Search for 0-9+ Replace with $\1
Undoing/Redoing Replacements
Beautifying Code
Code Beautifiers
Reflowing Text
Code Beautifiers
Refactoring
Quick Refactoring
Available Quick Refactorings
Quick Rename
Quick Extract Method
30. Quick Extract Method Refactoring
++ Refactoring
Quick Modify Parameter List
Quick Replace Literal with Constant
++ Refactoring
Rename
Available C++ Refactorings
Extract Method
Modify Parameter List
33. C++ Refactoring Modify Parameter List
Push Down to Derived Class
34. C++ Refactoring Push Down to Derived Class
35. C++ Refactoring Push Down Selecting Members to Move
Pull Up to Super Class
36. C++ Refactoring Pull Up to Super Class
37. C++ Refactoring Pull Up Selecting Members to Move
Encapsulate Field
38. C++ Refactoring Encapsulate Field
Extract Class
39. C++ Refactoring Extract Class
Extract Super Class
41. C++ Refactoring Extract Super Class
Move Method
42. C++ Refactoring Move Method
Move Static Field
43. C++ Refactoring Move Method
Convert Static to Instance Method
Convert Global to Static Field
Convert Local to Field
Replace Literal with Constant
Create Standard Methods
48. C++ Refactoring Create Standard Methods
Test Parsing Configuration
49. Test Parsing Configuration Example
50. Test Parsing Configuration Example
++ Refactoring
51. Test Parsing Configuration Example
Reviewing Refactoring Changes
Reviewing Refactoring Changes
52. Refactoring Results
Java Refactoring
Java Refactoring
Page
Hexadecimal View and Edit Mode
Hex Mode Key Bindings
Hexadecimal View and Edit Mode
Viewing and Displaying
Special Character Toggles
Selective Display
Defining Special Characters
53. Selective Display
Expanding/Collapsing Code Blocks
Selective Display Regions
Other Display Options
Displaying a Vertical Line
Viewing Line Numbers
Other Display Options
228
Language-Specific Editing
Language-Specific Editing Overview
Language Editing Modes
Changing and Creating Modes
Language Editing Modes
Referring to Extensions
Extension Options
Extension Options
Deleting an Extension
Creating a New Extension
C++
C++
++ Formatting Options
Begin-End Style Tab
++ Formatting Options
Indentation Tab
C/C++ Formatting Options Indentation Tab
MyLongMethodNamefirstarg Secondarg, thirdarg Firstarg
Other Tab
C/C++ Formatting Options Other Tab
++ Beautifier
++ Beautifier
C/C++ Beautifier Begin-End Style Tab
Indenting Tab
C/C++ Beautifier Indenting Tab
Comments Tab
C/C++ Beautifier Comments Tab
Stand alone
C/C++ Beautifier Other Tab
Schemes Tab
10. C/C++ Beautifier Schemes Tab
++ Compiler Settings
++ Compiler Settings
Creating New Configurations
++ Preprocessing
Building the Tag File
++ Preprocessing
12. C/C++ Preprocessing Dialog
Java
Java Formatting Options
Java
Java Formatting Options
Java Formatting Options
250
Javadoc Beautifier
Java Beautifier
Java Beautifier
Javadoc Editor
Organizing Java Imports
Adding Imports
Import Options
Java Refactoring
XML and Html
XML Formatting Options
XMLdoc Editor
XML Beautifier
Indent Tab
XML
Tags Tab
17. XML Beautifier Tags Tab
Blockquote Reformat, Indent
Attributes/Values Tab
18. XML Beautifier Attributes/Values Tab
Comments Tab
19. XML Beautifier Comments Tab
Advanced Tab
20. XML Beautifier Advanced Tab
DTD Caching
URL Mappings
Schemes Tab
Opening DTD Files from XML
22. URL Mappings Dialog
Toggling Between Begin and End XML Tags
Configuring the Web Browser
Exporting to Html
Html Formatting Options
24. Html Formatting Options Dialog
HREF=file//c/dev/html/index.htm#sample link/A
Html Beautifier
DIV ALIGN=CENTER /DIV
25. Html Beautifier Indent Tab
26. Html Beautifier Tags Tab
XMP Literal
Blockquote Reformat, Indent Style Reformat, Literal
27. Html Beautifier Attributes/Values Tab
28. Html Beautifier Comments Tab
Stand alone comment
29. Html Beautifier Advanced Tab
XML/HTML Formatting
XML/HTML Formatting
Enabling/Disabling XML/HTML Formatting
Enabling/Disabling Globally
Enabling/Disabling XML/HTML Formatting
Enabling/Disabling for the Current Document
31. Current Document Options Dialog
Working with Schemes
Working with Schemes
Default Schemes
Specifying the Scheme to Use
Specifying a Different Default Scheme
Creating Schemes
Default Tags
Working with Tags
Saving and Deleting Schemes
Base Tags
Formatting Settings
General Settings
Formatting Settings
Adding and Deleting Tags
Formatting Settings
Content Wrap Settings
35. XML/HTML Formatting Content Wrap Tab
Tag Content Width Settings
Tag Layout Settings
36. XML/HTML Formatting Tag Layout Tab
Div
More Settings
Ada
Ada
Ada Formatting Options
Ada Beautifier
Ada Formatting Options
Ada Beautifier
Indent Tab
Lines
Horizontal Spacing Tab
Statements/Declarations Tab
Vertical Alignment Tab
Blank Lines Tab
Following options are available on the Comments tab
Advanced Tab
If a = B C = D then null End if
Cobol
Cobol Formatting Options
Cobol Formatting Options
Pascal
Pascal Formatting Options
Pascal
Pascal Formatting Options
PL/I
PL/I Formatting Options
PL/I Formatting Options
Python
Begin/End Structure Matching for Python
Python
Begin/End Structure Matching For Python
306
Tools and Utilities
Using the DIFFzilla Dialog
Comparing and Merging
DIFFzilla
Dynamic Difference Editing
Comparing Two Files
Comparing Symbols or Parts of Files
From the Compare With submenu, click Each Other DIFFzilla
Comparing All Symbols of Two Files
Comparing Two Directories
Generating File Lists
Save Multi-File Output Dialog
Automatic Directory Mapping
Diffing File History
Performing a Three-Way Merge
Way Merge
Way Merge
Way Merge Results Dialog
Way Merge Settings
File History and Backups
Compare Two Backup History Elements Using DIFFzilla
File History and Backups
Compare Two Backup History Elements Using DIFFzilla
Working with FTP
FTP View
Creating a New FTP Profile
Working with FTP
Starting a Connection
Setting FTP Options
Setting FTP Options
Stopping a Connection
Opening FTP Files
Using the Regex Evaluator
Using the Regex Evaluator
Regex Evaluator
Entering Test Cases
Entering a Regular Expression
Using the Calculator and Math Commands
Regex Evaluator Options
Using the Calculator and Math Commands
Calculator
Calculating Expressions with Mixed Bases
Calculator
Math Commands
Math Commands
Binary Operators Description
Math Command Examples
Overflow/Underflow
Prime Numbers
Document Math
OS File Browser
OS File Browser
328
Macros and Macro Programming
Recorded Macros
Recorded Macro Operations
Recording a Macro
Recorded Macro Operations
Binding Recorded Macros to Keys
Binding Macros Using the Key Bindings Dialog
Binding Recorded Macros
Binding Macros Using executelastmacrokey
Running a Recorded Macro
Saving and Editing Recorded Macros
Using Macros to Discover Control Options
Using Macros to Discover and Control Options
Deleting Recorded Macros
Setting Macro Variables
Programmable Macros
Loading Macros
Loading Macros
Setting Macro Variables
338
SlickEdit Core Dialogs
Editing Dialogs
Select Text to Paste Dialog
Enumerate Dialog
Select Text to Paste Dialog
Filter Selection Command Dialog
Filter Selection Command Dia Log
Filter Selection Command Dialog
Search Dialogs
Search Dialogs
Find and Replace View Context Menu
Find Tab
Find and Replace View
Find and Replace View
Find in Files Tab
Find and Replace Find in Files Tab
Find and Replace View
Find and Replace View
Replace Tab
Find and Replace Replace Tab
Find and Replace View
Replace in Files Tab
Find and Replace Replace in Files Tab
353
Find Symbol View
Find Symbol View
Find Symbol View
Go to Definition Dialog
Go to Definition Dialog
Selective Display Dialog
Dialogs Related to Viewing and Displaying
Selective Display Dialog
Function Definitions
Search Text
Preprocessor Directives
Multi-Level
Paragraphs
Hide Selection
Expansion Options
Macro Dialogs
Save Macro Dialog
List Macros Dialog
Save Macro Dialog
Variable Editor Dialog
13. Variable Editor Dialog
Variable Editor Dialog
Grid Settings Dialog
Grid Settings Dialog
Menu Editor Dialog
Menu Editor Dialog
Auto Enable Properties Dialog
Auto Enable Properties Dialog
Auto Enable Properties Dialog
Tools Dialogs
Organize Imports Options Dialog
Tools Dialogs
Organize Imports Options Dialog
Way Merge Dialog
Way Merge Dialog
Way Merge Dialog
DIFFzilla Dialog
DIFFzilla Files Tab
Diff Types
Path Information and Filespecs
DIFFzilla Options Tab
File Compare Options
Dialog Setup Options
21. DIFFzilla Dialog Setup Options
Multi-File Diff Output Dialog
22. Multi-File Diff Output Dialog
Context Tagging Tag Files Dialog
23. Context Tagging Tag Files Dialog
Options Dialogs
Options Dialogs
General Options Dialog
General Tab
General Options Dialog
General Options Dialog
General Options Dialog
Search Tab
25. General Options Search Tab
General Options Dialog
General Options Dialog
Selections Tab
26. General Options Selections Tab
General Options Dialog
Special Characters Tab
27. General Options Special Characters Tab
More Tab
28. General Options More Tab
Tip
Elements and Setting Macro Variables for more information
Exit Tab
29. General Options Exit Tab
General Options Dialog
Virtual Memory Tab
30. General Options Virtual Memory Tab
General Options Dialog
Extension Options Dialog
31. Extension Options Dialog
Extension Options General Dialog Settings
32. Extension Options Indent Tab
Extension Options Dialog
Word Wrap Tab
33. Extension Options Word Wrap Tab
Extension Options Dialog
34. Extension Options General Tab
Extension Options Dialog
35. Extension Options Comments Tab
If !enabled TabState = Tisdisabled
Comment Block
Tisdisabled
Comment Line
Doc Comments
Cursor Here
Comment Editing
Comment Wrap Tab
String Editing
Extension Options Dialog
37. Extension Options Advanced Tab
Extension Options Dialog
Auto-Complete Tab
38. Extension Options Auto-Complete Tab
Extension Options Dialog
Context Tagging Tab
39. Extension Options Context Tagging Tab
List Members
Parameter Information
This-foodForThoughtcursor hereBar
Miscellaneous Options
Select a Tag Dialog
Select a Tag Dialog
File Options Dialog
File Options Dialog
Load Tab
41. File Options Load Tab
File Options Dialog
Save Tab
42. File Options Save Tab
File Options Dialog
Backup Tab
AutoSave Tab
File Options Dialog
File Filters Tab
44. File Options File Filters Tab
Key Bindings Dialog
45. Key Bindings Dialog
Key Bindings Dialog
Key Bindings Dialog
Bind Key Dialog
46. Bind Key Dialog
Redefine Common Keys Dialog
47. Redefine Common Keys Dialog
Redefinable Keys
More Options
Context Tagging Options Dialog
Context Tagging Options Dia Log
Context Tagging Options Dia Log
Context Tagging Options Dia Log
Color Coding Setup Dialog
Color Coding Setup Dialog Minimum 8 MB Default 64 MB
Color Coding Setup Dialog
Color Coding Setup Options General Dialog Settings
Tokens Tab
Color Coding Setup Dialog
51. Color Coding Setup Numbers Tab
Numbers Tab
Hex numbers
Strings Tab
Floating point numbers
Double quoted strings
Language Tab
Single quotes
448
54. Color Coding Setup Comments Tab
Color Coding Setup Dialog
55. Color Coding Setup Tags Tab
Tags Tab
Color Settings Dialog
Color Settings Dialog
56. Color Settings Dialog
Font Configuration Dialog
57. Font Configuration Dialog
XML/HTML Formatting Dialog
XML/HTML Formatting Dialog
URL Mappings Dialog
URL Mappings Dialog
Proxy Settings Dialog
Proxy Settings Dialog
Network Options Dialog
Web Browser Setup Dialog
Network Options Dialog
Web Browser Setup Dialog
61. Web Browser Setup Dialog
FTP Options Dialog
FTP Options Dialog
63. FTP Options Advanced Tab
Firewall/Proxy Tab
64. FTP Options Firewall/Proxy Tab
FTP Options Dialog
SSH/SFTP Tab
Debug Tab
Reflow Comment Dialog
Reflow Comment Dialog
Current Document Options Dialog
Current Document Options Dia Log
68. Current Document Options Dialog
Appendix
Using Unicode
Using Unicode
Encoding
Unicode File Recognition
Opening Unicode Files
Surrogate Support
Converting Unicode to UCN
Unicode Limitations
Using Unicode
Unicode Implementation
Environment Variables
Environment Variables
Environment Variables Description
Environment Variable Description
Ting Vslickxterm to /usr/X11/bin/xterm
Setting Environment Variables in vslick.ini
Using the set Command
Configuration Variables
Set envvarname =value
Configuration Variables
Viewing Configuration Variables
Setting/Changing Configuration Variables
Table of Configuration Variables
Table of Configuration Variables
Configuration Variable Description
Defeclipseswitchbuf
Deferrorre2
Configuration Variable Description Deffilelistshowdotfiles
Deffromcursor
Caseword, lowcaseword, and capword will
Deflinewrap
Configuration Variable Description Defplusminusblocks
Defswitchbufcd
Defupdatecontextmaxfilesize
Defpreplace
Directories and Files
Defxmlnoschemalist
Defvtgtornado
Configuration Directory
Changing the Configuration Directory
Configuration Directory
Directories and Files
Table of User Configuration Files
Backing Up the Configuration Directory
User Configuration Files
User Config File Description
User.vlx
System Configuration Files
Table of System Configuration Files
System Configuration Files
System Configuration File System Config File Description
System Config File Description
File Search Order
Search Order for Configuration Files
Search Order for Configuration Files
File Search Order
Search Order for Executable Files
VLX File and Color Coding
VLX File and Color Coding
Modifying the VLX File to Change a Color Definition
Creating a Lexer Name and a New VLX File
Modifying the VLX File to Change a Color Definition
VLX File Statement
Bol1color, symbol2color, symbol3color, or sym
Checkfirstleading endsymbol lastchar
Idchars=startidchars afteridchars
Styles= style
Linecomment= symbol col col+
Creating a Lexer Name and a
Statement Description
Mlckeywords= keyword keyword
Table of style Value Value of style Description Linenum
Table of style Values
Dqbackslash
Value of style Description Dqbackslashml
Dqmultiline
Dqdoubles
Dqterminate
Value of style Description
Octo
Octq
Poundbase
Editing the Key Binding Source
Editing the Key Binding Source
Menu Editing
Menu Editing
Creating and Editing Menus
Creating a New Menu Resource
Creating and Editing Menus
Using the Ispf and Xedit Emu Lations
Editing Menus
Defining Menu Item Aliases
Enabling/Disabling Menu Items
Ispf Options Dialog
Using the Ispf and Xedit Emulations
Ispf Options Dialog
Ispf Primary Commands
Ispf Line Labels Define a label
Ispf Primary Commands
Command Description Ispfcopy
Ispfcreate
Ispfcut
Ispfdelete
Ispf Line Commands
Ispf Line Commands Description Ispf Line Labels
Ispf Line Command Shift
Ispf Line Command a
Ispf Line Command B
Ispf Line Command Documentation
Ispf Line Labels .label
Ispf Insert After a
Ispf Shift Lines Left or Right
Remarks
Ispf Insert Bounds Ruler Bnds
Ispf Insert Before B
Ispf Copy Lines C and CC for blocks
Ispf Delete Lines D and DD for blocks
Ispf Insert Columns Ruler Cols or Scale
Ispf Expose First Lines F and FF
Ispf Lowercase Lines LC, LCC and Lclc for blocks
Ispf Insert Lines
Ispf Expose Last Lines L and LL
Ispf Insert Mask Line Mask
Ispf Move Lines M and MM for blocks
Ispf Make Data Lines MD, MDD and Mdmd for blocks
Ispf Repeat Lines
Ispf Overlay Lines O and OO for blocks
Ispf Expose Next Level of Code S and SS
Ispf Insert Text TE
Ispf Insert Tabs Ruler Tabs or Tabl
Ispf Insert Lines TF
Ispf Split Line TS
Ispf Join Lines TJ
Ispf Uppercase Lines UC, UCC and Ucuc for blocks
Ispf Exclude Lines X and XX for blocks
Xedit Line Commands
Ispf Select Lines Z and ZZ for blocks
Ispf Unsupported Primary Commands
Command Description Imacro
Recovery
Level
Model
Regular Expression Syntax
Regular Expression Syntax
Unix Regular Expressions
Unix Regular Expression Definition Xn1,?
N2?
Xn1,n2?
?!X
Unix Regular Expression Definition
\xhhhh
\xhh
=hh=0xff
=ddd=255
\od
Unix Regular Expression Definition \ol
\f ?\\\\\/=+, \t’+ Windows Matches
??0-9+?\.0-9+\.0-9+?Ee?\+-0
\p ??A-Za-z?\\/?\f?\\/*\f Win
Unix Regular Expression Examples
SlickEdit Regular Expressions
14. SlickEdit Regular Expressions Definition
N1,n2
SlickEdit Regular Expressions Definition
#dX
UnicodeIsBlockSpec. Where UnicodeIsB
\ddd
\gd
SlickEdit Regular Expressions Definition \ol
~\\\\\/=+, \t’# Windows Matches a
9#.0-9#.0-9#Ee\+-0-9#
Za-z\\\/f\\/@f Windows
Brief Regular Expressions
SlickEdit Regular Expression Examples
16. Brief Regular Expressions Definition
\n1
\,n2
\n1,n2
Brief Regular Expression Definition \,n2?
\n1,n2?
\X\
@dX
Brief Regular Expression Definition
Use \d10 if you want to match a 10 character
Brief Regular Expression Examples
Unicode Category Specifications for Regular Expressions
\pMainCategoryLetter Subcategories
Unicode Category Specifications For Regular Expressions
Unicode Character Blocks for Regular Expressions
Unicode Character Blocks for
Unicode Character Blocks for Regular Expressions
Range Block Name
Unicode Character Blocks for
DB80..DBFF
FEFF..FEFF
Page
USA