Installation (Cont.)
To Replace Batteries:
1. Remove battery cover.
Caller ID Setup
To Set Area Code
Caller ID Setup/Telephone Operation
To Set Handset Display Contrast | Telephone Operation |
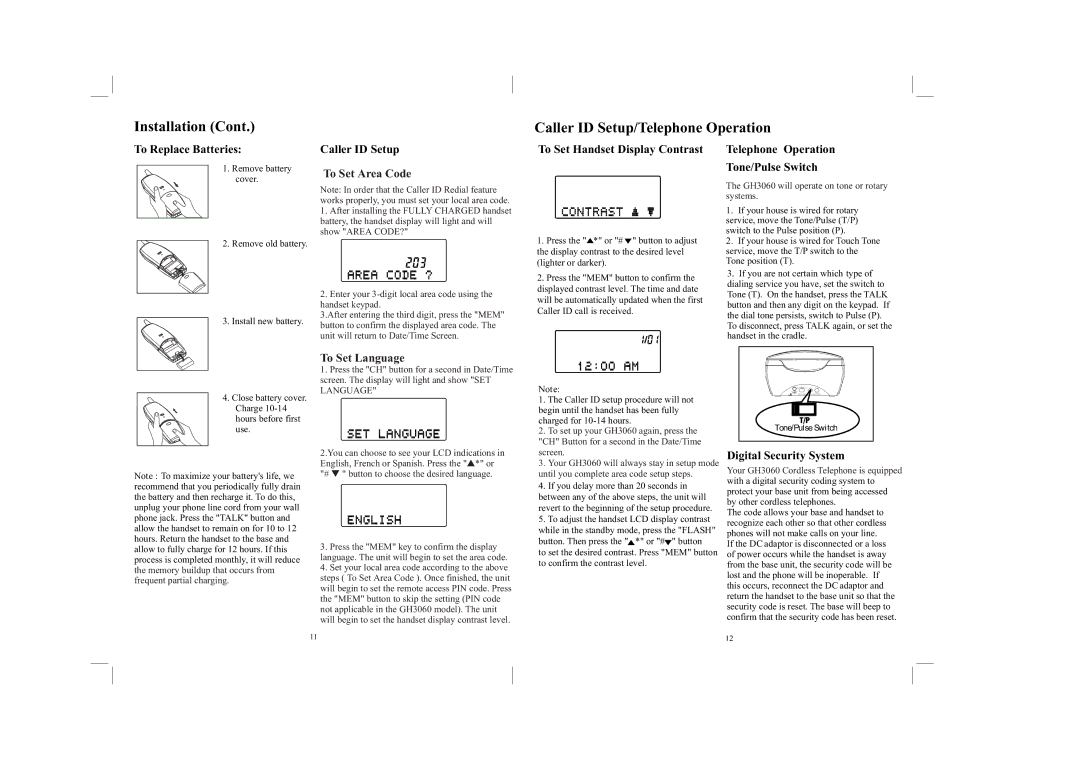
| Tone/Pulse Switch |
2. Remove old battery.
3. Install new battery.
4. Close battery cover. Charge
Note : To maximize your battery's life, we recommend that you periodically fully drain the battery and then recharge it. To do this, unplug your phone line cord from your wall phone jack. Press the "TALK" button and allow the handset to remain on for 10 to 12 hours. Return the handset to the base and allow to fully charge for 12 hours. If this process is completed monthly, it will reduce the memory buildup that occurs from frequent partial charging.
Note: In order that the Caller ID Redial feature works properly, you must set your local area code.
1.After installing the FULLY CHARGED handset battery, the handset display will light and will show "AREA CODE?"
2.Enter your
3.After entering the third digit, press the "MEM" button to confirm the displayed area code. The unit will return to Date/Time Screen.
To Set Language
1.Press the "CH" button for a second in Date/Time screen. The display will light and show "SET
LANGUAGE"
2.You can choose to see your LCD indications in English, French or Spanish. Press the "▲*" or "# ▼ " button to choose the desired language.
3.Press the "MEM" key to confirm the display language. The unit will begin to set the area code.
4.Set your local area code according to the above steps ( To Set Area Code ). Once finished, the unit will begin to set the remote access PIN code. Press the "MEM" button to skip the setting (PIN code not applicable in the GH3060 model). The unit will begin to set the handset display contrast level.
1.Press the "![]() *" or "#
*" or "# ![]() " button to adjust the display contrast to the desired level (lighter or darker).
" button to adjust the display contrast to the desired level (lighter or darker).
2.Press the "MEM" button to confirm the displayed contrast level. The time and date will be automatically updated when the first Caller ID call is received.
Note:
1.The Caller ID setup procedure will not begin until the handset has been fully charged for
2.To set up your GH3060 again, press the "CH" Button for a second in the Date/Time screen.
3.Your GH3060 will always stay in setup mode until you complete area code setup steps.
4.If you delay more than 20 seconds in between any of the above steps, the unit will revert to the beginning of the setup procedure.
5.To adjust the handset LCD display contrast while in the standby mode, press the "FLASH" button. Then press the "![]() *" or "#
*" or "#![]() " button
" button
to set the desired contrast. Press "MEM" button to confirm the contrast level.
The GH3060 will operate on tone or rotary systems.
1.If your house is wired for rotary service, move the Tone/Pulse (T/P) switch to the Pulse position (P).
2.If your house is wired for Touch Tone service, move the T/P switch to the Tone position (T).
3.If you are not certain which type of
dialing service you have, set the switch to Tone (T). On the handset, press the TALK button and then any digit on the keypad. If the dial tone persists, switch to Pulse (P).
To disconnect, press TALK again, or set the handset in the cradle.
Tone/Pulse Switch
Digital Security System
Your GH3060 Cordless Telephone is equipped with a digital security coding system to protect your base unit from being accessed by other cordless telephones.
The code allows your base and handset to recognize each other so that other cordless phones will not make calls on your line.
If the DC adaptor is disconnected or a loss of power occurs while the handset is away from the base unit, the security code will be lost and the phone will be inoperable. If this occurs, reconnect the DC adaptor and return the handset to the base unit so that the security code is reset. The base will beep to confirm that the security code has been reset.
11 | 12 |