5
6 2
1
4
3
6 2
1 | KN |
| 001BA122 |
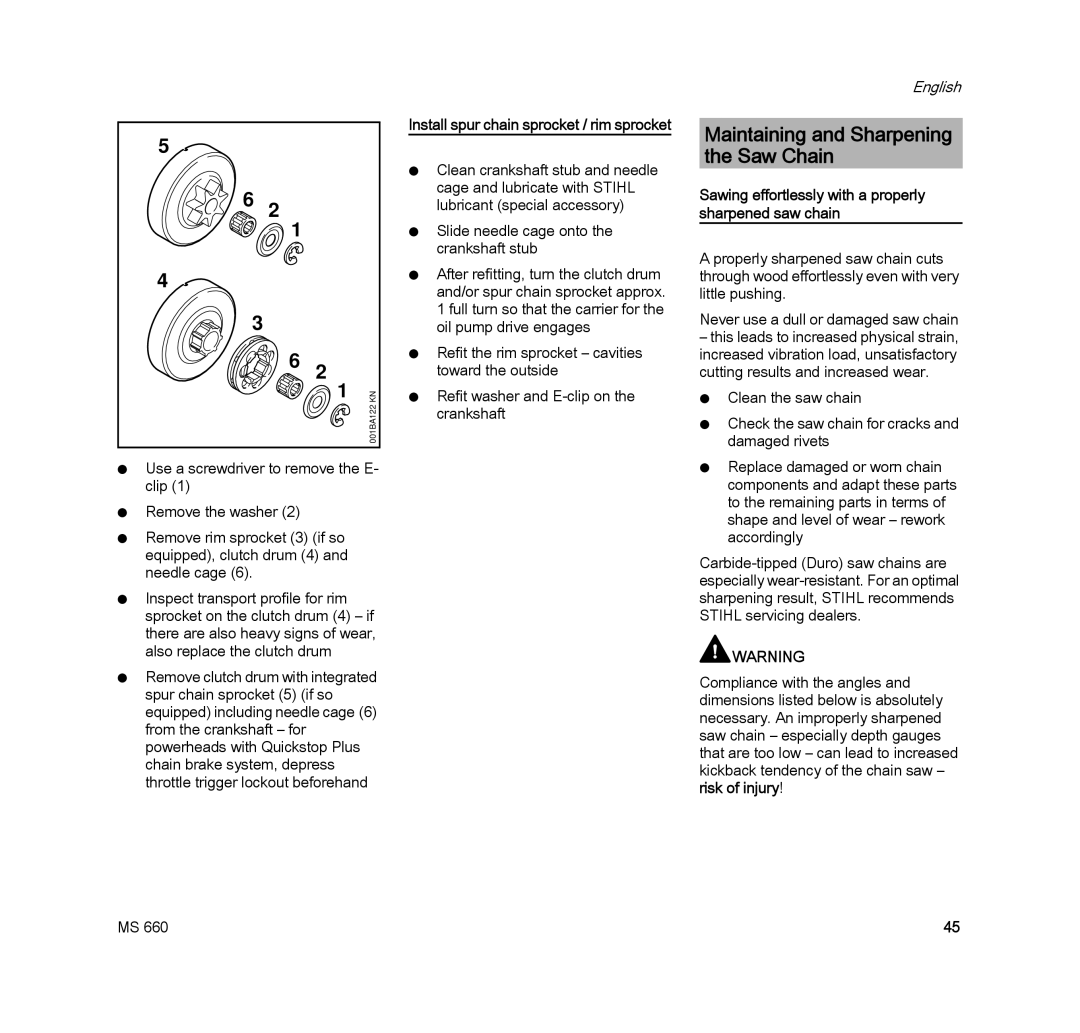
NUse a screwdriver to remove the E- clip (1)
NRemove the washer (2)
NRemove rim sprocket (3) (if so equipped), clutch drum (4) and needle cage (6).
NInspect transport profile for rim sprocket on the clutch drum (4) – if there are also heavy signs of wear, also replace the clutch drum
NRemove clutch drum with integrated spur chain sprocket (5) (if so equipped) including needle cage (6) from the crankshaft – for powerheads with Quickstop Plus chain brake system, depress throttle trigger lockout beforehand
Install spur chain sprocket / rim sprocket
NClean crankshaft stub and needle cage and lubricate with STIHL lubricant (special accessory)
NSlide needle cage onto the crankshaft stub
NAfter refitting, turn the clutch drum and/or spur chain sprocket approx. 1 full turn so that the carrier for the oil pump drive engages
NRefit the rim sprocket – cavities toward the outside
NRefit washer and
English
Maintaining and Sharpening the Saw Chain
Sawing effortlessly with a properly sharpened saw chain
A properly sharpened saw chain cuts through wood effortlessly even with very little pushing.
Never use a dull or damaged saw chain
–this leads to increased physical strain, increased vibration load, unsatisfactory cutting results and increased wear.
NClean the saw chain
NCheck the saw chain for cracks and damaged rivets
NReplace damaged or worn chain components and adapt these parts to the remaining parts in terms of shape and level of wear – rework accordingly
![]() WARNING
WARNING
Compliance with the angles and dimensions listed below is absolutely necessary. An improperly sharpened saw chain – especially depth gauges that are too low – can lead to increased kickback tendency of the chain saw – risk of injury!
MS 660 | 45 |
