www.ti.comKit Operation
|
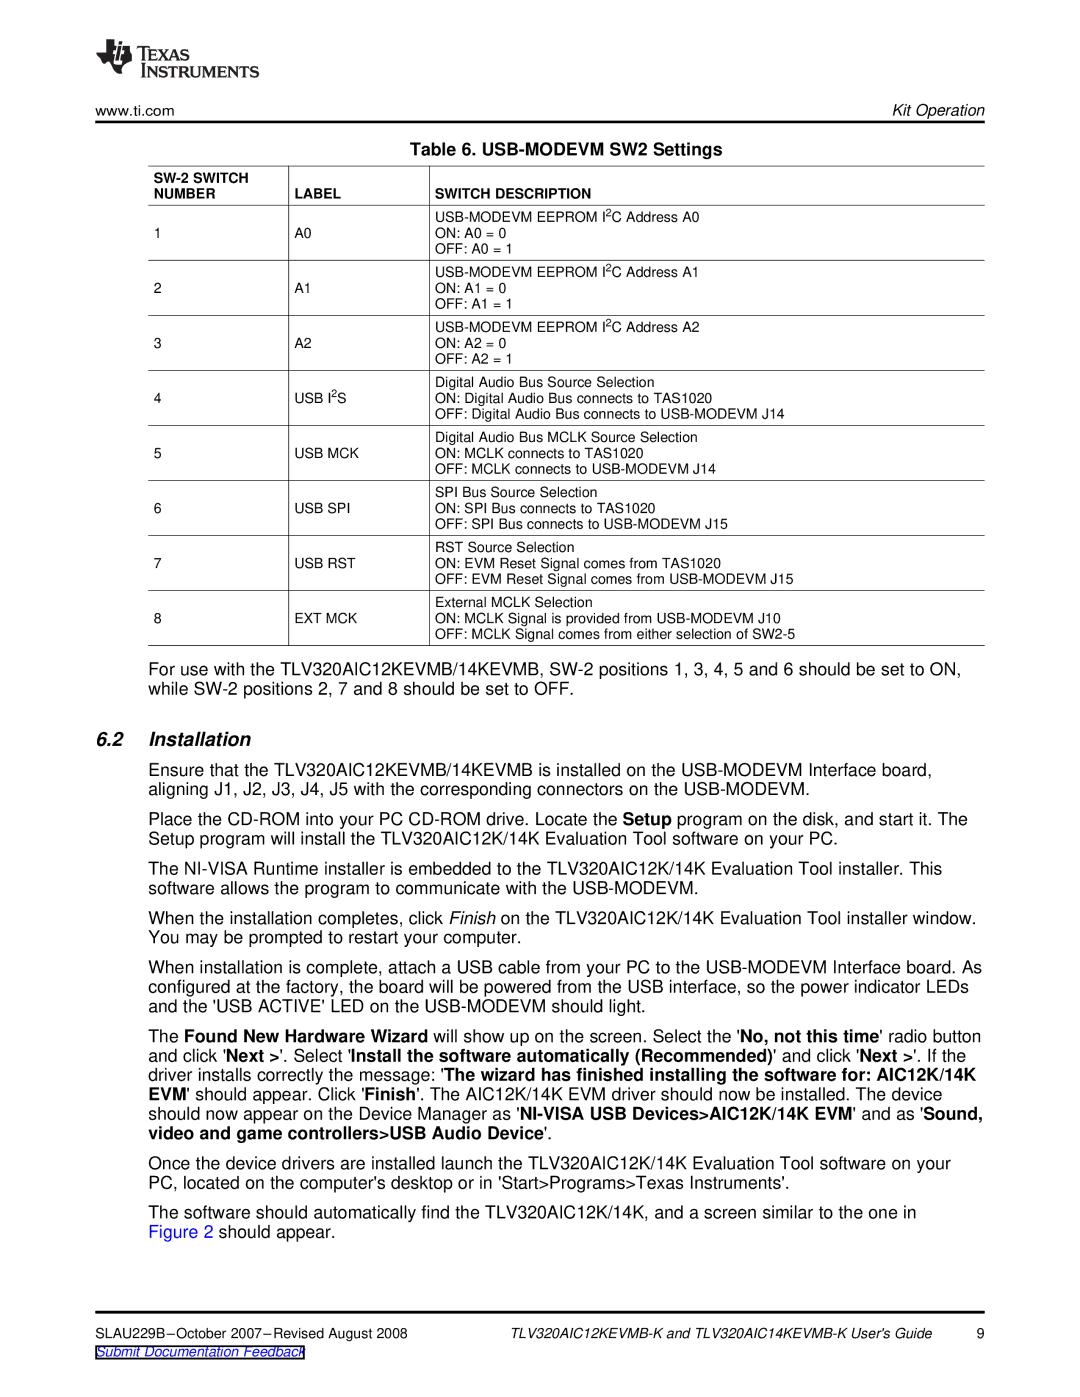
| Table 6. |
|
|
|
NUMBER | LABEL | SWITCH DESCRIPTION |
|
| |
1 | A0 | ON: A0 = 0 |
|
| OFF: A0 = 1 |
|
| |
2 | A1 | ON: A1 = 0 |
|
| OFF: A1 = 1 |
|
| |
3 | A2 | ON: A2 = 0 |
|
| OFF: A2 = 1 |
| USB I2S | Digital Audio Bus Source Selection |
4 | ON: Digital Audio Bus connects to TAS1020 | |
|
| OFF: Digital Audio Bus connects to |
|
| Digital Audio Bus MCLK Source Selection |
5 | USB MCK | ON: MCLK connects to TAS1020 |
|
| OFF: MCLK connects to |
|
| SPI Bus Source Selection |
6 | USB SPI | ON: SPI Bus connects to TAS1020 |
|
| OFF: SPI Bus connects to |
|
| RST Source Selection |
7 | USB RST | ON: EVM Reset Signal comes from TAS1020 |
|
| OFF: EVM Reset Signal comes from |
|
| External MCLK Selection |
8 | EXT MCK | ON: MCLK Signal is provided from |
|
| OFF: MCLK Signal comes from either selection of |
For use with the TLV320AIC12KEVMB/14KEVMB,
6.2Installation
Ensure that the TLV320AIC12KEVMB/14KEVMB is installed on the
Place the
The
When the installation completes, click Finish on the TLV320AIC12K/14K Evaluation Tool installer window. You may be prompted to restart your computer.
When installation is complete, attach a USB cable from your PC to the
The Found New Hardware Wizard will show up on the screen. Select the 'No, not this time' radio button and click 'Next >'. Select 'Install the software automatically (Recommended)' and click 'Next >'. If the driver installs correctly the message: 'The wizard has finished installing the software for: AIC12K/14K EVM' should appear. Click 'Finish'. The AIC12K/14K EVM driver should now be installed. The device should now appear on the Device Manager as
Once the device drivers are installed launch the TLV320AIC12K/14K Evaluation Tool software on your PC, located on the computer's desktop or in 'Start>Programs>Texas Instruments'.
The software should automatically find the TLV320AIC12K/14K, and a screen similar to the one in Figure 2 should appear.
9 |
Submit Documentation Feedback