INTRODUCTION
Introduction
Have you assembled your WonderBorg?
The WonderBorg is not operated by remote control: it is an autonomous robot. In other words, it uses its own sensors to find out about its surroundings, and decides for itself how it should move. If you teach your WonderBorg what to do in a given situation, it will exhibit all sorts of behavior. This teaching process is called "programming the WonderBorg".
Ordinary programming requires specialist knowledge of computers, but this is not necessary to program the WonderBorg for PC. This is because you use special software called Robot Works, which allows you to create programs very easily using your computer,s mouse. Read on, and learn how to program your own WonderBorg by following our practical guide.
Robot Works software is designed exclusively for Windows ME / 98 /
95.Robot Works uses your PC’s external serial port, so have your PC manual in hand when you begin the setup operation.
System Requirements
-A DOS / V format PC.
-A PC running Windows ME / 98 / 95, and having a
(If your PC has a different type of serial connector, you will need suitable adapter. Contact your PC,s manufacturer for more information. The use of a
-The PC must be a Pentium 100MHz or higher, with at least 32MB of memory,
-A
23
SET UP
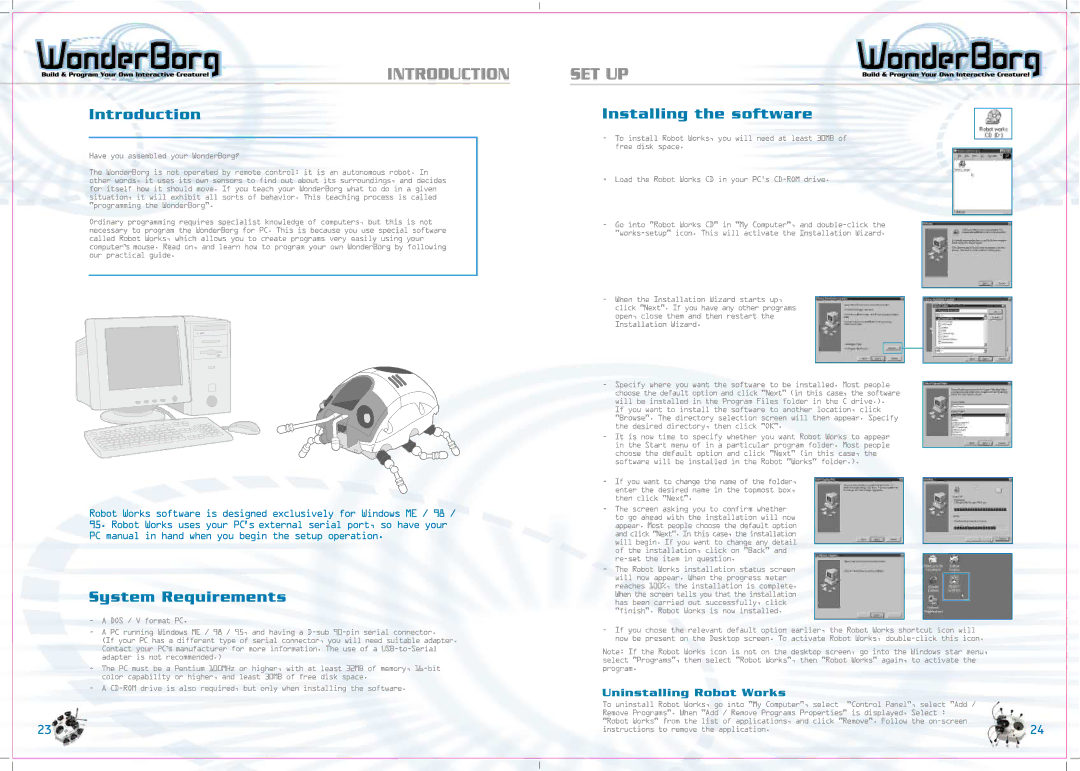
Installing the software
-To install Robot Works, you will need at least 30MB of free disk space.
-Load the Robot Works CD in your PC
-Go into "Robot Works CD" in "My Computer", and
-When the Installation Wizard starts up, click "Next". If you have any other programs open, close them and then restart the Installation Wizard.
-Specify where you want the software to be installed. Most people choose the default option and click "Next" (in this case, the software will be installed in the Program Files folder in the C drive.). If you want to install the software to another location, click "Browse". The directory selection screen will then appear. Specify the desired directory, then click "OK".
-It is now time to specify whether you want Robot Works to appear in the Start menu of in a particular program folder. Most people choose the default option and click "Next" (in this case, the software will be installed in the Robot "Works" folder.).
-If you want to change the name of the folder, enter the desired name in the topmost box, then click "Next".
-The screen asking you to confirm whether to go ahead with the installation will now appear. Most people choose the default option and click "Next". In this case, the installation will begin. If you want to change any detail of the installation, click on "Back" and
-The Robot Works installation status screen will now appear. When the progress meter reaches 100%, the installation is complete. When the screen tells you that the installation has been carried out successfully, click "finish". Robot Works is now installed.
-If you chose the relevant default option earlier, the Robot Works shortcut icon will now be present on the Desktop screen. To activate Robot Works,
Note: If the Robot Works icon is not on the desktop screen, go into the Windows star menu, select "Programs", then select "Robot Works", then "Robot Works" again, to activate the program.
Uninstalling Robot Works
To uninstall Robot Works, go into "My Computer", select | "Control Panel", select "Add / |
Remove Programs". When "Add / Remove Programs Properties" is displayed, Select : | |
"Robot Works" from the list of applications, and click "Remove". Follow the | |
instructions to remove the application. | 24 |