46WX800U 55WX800U
Child Safety
Personal Injury DEATH, or Equipment Damage
Additional Safety Precautions
Installation
Like
Risk of Electric Shock
Care
Removing the Pedestal Stand
Service
To Display your LCD TV using a Wall Bracket
To Display your LCD TV on the included Pedestal Stand
About lithium battery
Observe the following for the battery of the 3D glasses
Do not drop, exert pressure on, or step on the 3D glasses
FCC Compliance Statement
Wireless Radio
Trademark Information
Page
Contents
Index
Advanced features
Troubleshooting
Appendix
Energy Star qualified
Features
Overview of installation, setup, and use
Introduction
Back panel connections
Front panel controls
Stand type
Bundling the cables
Wall Mount type
Overview of cable types
Connecting your TV
About the illustrations
To view basic and premium cable channels
Connecting to Satellite dish, Antenna, or Cable TV
To view the antenna or cable signal
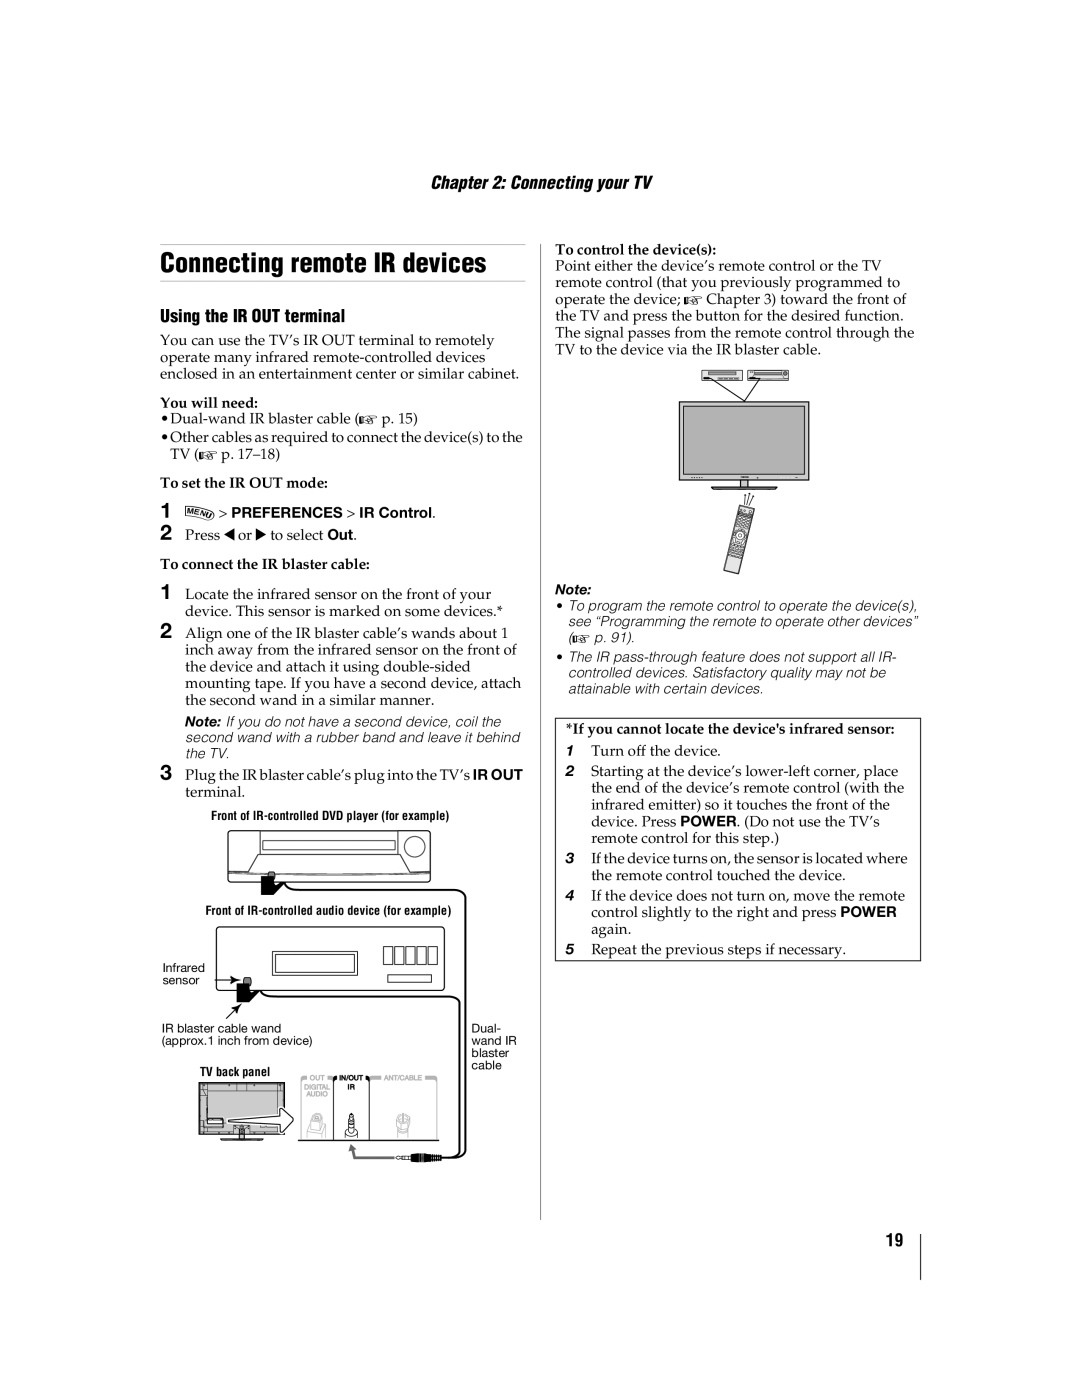
You will need Coaxial cables
To connect a DVI device, you will need
Connecting an Hdmi or DVI device to the Hdmi input
To connect an Hdmi device, you will need
To view the Hdmi device video
VCR
Using the IR OUT terminal
Connecting remote IR devices
Preferences IR Control
Before controlling the audio
Connecting a digital audio system
Using the IR in terminal
To set the IR in mode
Connecting a Hdmi audio system
Using the TV remote and REGZA-LINKto control other devices
HDMIs ARC Audio Return Channel feature
Connection to the TV’s Hdmi terminal
Connecting a PC
Connecting to the TV’s PC in terminal
Pin Signal Name
You will need Standard LAN cables
Connecting to a home network
Toshiba device
Using the remote control
Installing batteries
Controlling other devices
Modes TV , CABLE/SAT , BD , DVD
Remote’s buttons
Initial Setup
Initial Setup and Menu
ANT/CABLE
If channels are not found after scanning
Setup Quick Setup OK
Navigating the menu system
Start Scan
Quick menu
Main menu layout
Changing Initial settings
Setting up your TV
Storing channels in memory optional
Skipping channels
Manual Tuning
Skipping video inputs
Configuring shared inputs
Setting the Auto Input feature
Labeling video inputs
About the connecting cable
Basic features
Before using 3D function, see the following
Health precautions
Switching display mode or selecting 3D format
Using 3D functions
Option Description
Setting the auto start mode
Setting the 3D PIN code
Preferences 3D Setup OK
Setting Enable 3D Timer
Setting 3D Start Message
Setting 3D Lock
Setting 3D Timer Lock
Using the Channel Browser
Tuning channels
Setting the Channel Tuning Mode
Tuning to the next programmed channel
REGZA-LINK
Using Channel Return
Using SurfLock
Adding and clearing channels and inputs in the History List
Analog CC mode
Using closed captions
Selecting the video input to view
Changing or deleting your PIN code
Setting the PIN code
Digital CC settings
Entering a new PIN code
Preferences Parental Control and Locks OK
Using parental controls
Blocking TV programs and movies by rating V-Chip
Downloading an additional rating system
Unlocking programs
Displaying ratings
Rating system
Locking the control panel
Setting a time limit for games
Locking specific channels
Locking video input
Controlling REGZA-LINKplayback devices
Using REGZA-LINK
REGZA-LINKinput source selection
Other REGZA-LINKfunctions
Adjusting the amplifier’s audio
Preferences REGZA-LINK Setup
To set the REGZA-LINKSetup
ModeDescription
Using the Hdmi settings feature
Setting the Hdmi audio mode
Viewing the Hdmi signal information
Setting the PC audio
Using your PC with the TV
Setting the timer to turn on the TV
Adjusting the image
Preferences Energy Saving Settings
Setting the sleep timer
Setting Automatic Power Down
Setting No Signal Power Down
Preferences Blue Screen Press C or c to select On. Press O
Setting Blue Screen
Adjusting Power LED’s Dimmer
Displaying TV status information
Setup Reset TV OK
Resetting to Factory Defaults
Power failure
Setup System Information
Selecting the picture size
Picture and sound controls
To select the picture size
TheaterWide For letter box programs
Full For 169 480i, 480p source programs only
For 1080i, 1080p, and 720p program sources
Picture Size TheaterWide For 43 format programs
Freezing the picture
Using the Auto Aspect feature
Using the 43 Stretch
Scrolling the picture
Picture Picture Mode
Adjusting the picture
Selecting the picture mode
Adjusting the picture quality
Using the advanced picture settings features
Room Lighting
Backlight Adjustment Pro
Mode Descriptiom
Smart Sensor
Expert Picture Settings
Copy to All Inputs
Locking the picture settings
Setting Type
Viewing the TV’s brightness
Selecting stereo/SAP broadcasts
Adjusting the audio
Adjusting the audio balance
Muting the sound
Using Dolby Volume
Using advanced sound features
Using surround sound
Using under wireless LAN environment
Advanced features
Using your home network
When you enjoy Internet services by wireless
Easy Setup using PIN Personal Identification Number
Setting up the Network
Wireless Setup
Easy Setup using PBC Push Button Configuration
Enhanced 11n
Manual Setup
DNS Setup
Advanced Network Setup
Wireless Information
IP Address Setup
Network Connection Test
To cancel the Network Connection Test
MAC Address
Viewing the Software Licences
Using the software keyboard
Performing a Software Upgrade
Setup Software Licences OK
Netflix
Using the NET TV feature
Guided Setup
NET TV menu
Preferences Vudu Deactivation
Preferences Netflix Setup OK
YouTube
ButtonDescription
To use Function menu
Switching the pointer
Switching the frame
To use the Drag Mode
Setting other features
Setting the view feature
Widgets OK
Using the Profile Widget
Profile Widget configures your user profile
Yahoo! TV Widgets
Preferences Media Renderer Setup
Setting up the Media Renderer feature
Using the Widget Gallery
Using other Yahoo! Widgets
Maximum Volume Setup
Device Name Setup
Web Password Setup
Media Controller Setup
Basic operation
Using the Media Player
Media Player Specifications
Using Media Player with USB and SD Memory Card
Setting Dlna Certified Server waking up
Using Media Player with Dlna Certified Server
To display the device information
Item Description
Viewing Movie files
To use Avchd device
File specifications
Playing Music file
To display the file status information
Advanced features
Viewing Photo files
Photo Select
Using the Photo Frame feature
Photo Edit
Auto Power Off
General troubleshooting
Troubleshooting
Troubleshooting
Blue blinks
Touch Sensor Power LED Blue
Touch Sensor except Power LED White
No light
Appendix
Specifications
ColorStream component video HD Input
PC in signal formats
Acceptable signal formats for PC in and Hdmi terminals
Format Resolution Frequency
Vesa Standard
Hdmi signal formats
Resolution Aspect ratio Frequency
Acceptable signal formats for 3D
3D Structure
Remote control functional key chart
VCR PVR
Remote DVD/VCR
SAT
Control Cable
Home
Blu-Ray
DVD AMP KEY DVD-R Blue
Home
Operating other devices
Device code setup
Programming the remote to operate other devices
Clearing the remote’s programming
Locking the volume keys
To unlock the remote’s volume keys
Searching for a device code
Hdmi
Operating TV with combination buttons
Behavior/Mode
Button
Cable/PVR Combo
Remote control codes
Audio Amplifier
Cable Set Top Box
Audio Receiver
Audio Accessory
Satellite Set Top Box
Video VCR
SAT/PVR Combo
BrandCode
STS
DVD/VCR Combo
NAD
Video DVD
DVD High Definition HD-DVD
DVD High Definition Blu-Ray
Limited United States Warranty
Limited One 1 Year Warranty on Parts and Labour
Limited Canadian Warranty
Disclaimer and Limitation of Remedy
Arbitration and Dispute Resolution
Wmdrm End User Notice
How to Obtain Warranty Services
Critical Applications
General Provisions
104
Index
105
Service Centers