Using the TV’s features
Activating blue screen
With the blue screen function On, the screen will automatically turn blue and the sound will be muted when no signal is being received.
1 | From the FUNCTION menu, press or to select |
| Blue screen. |
2 | Press or to select On or Off. |
Note:
In the PC input mode (- page 21), teletext mode (- page
24)or
Adjusting the brightness of side panel
You can adjust the brightness of side panel in 14:9 or 4:3, etc. mode.
1 | From the FUNCTION menu, press or to select | ||||
| Side panel. |
|
|
| |
2 | Press or to adjust the settings as required. | ||||
|
|
|
|
|
|
|
| Side panel | 1 |
|
|
Selecting the video input source to view
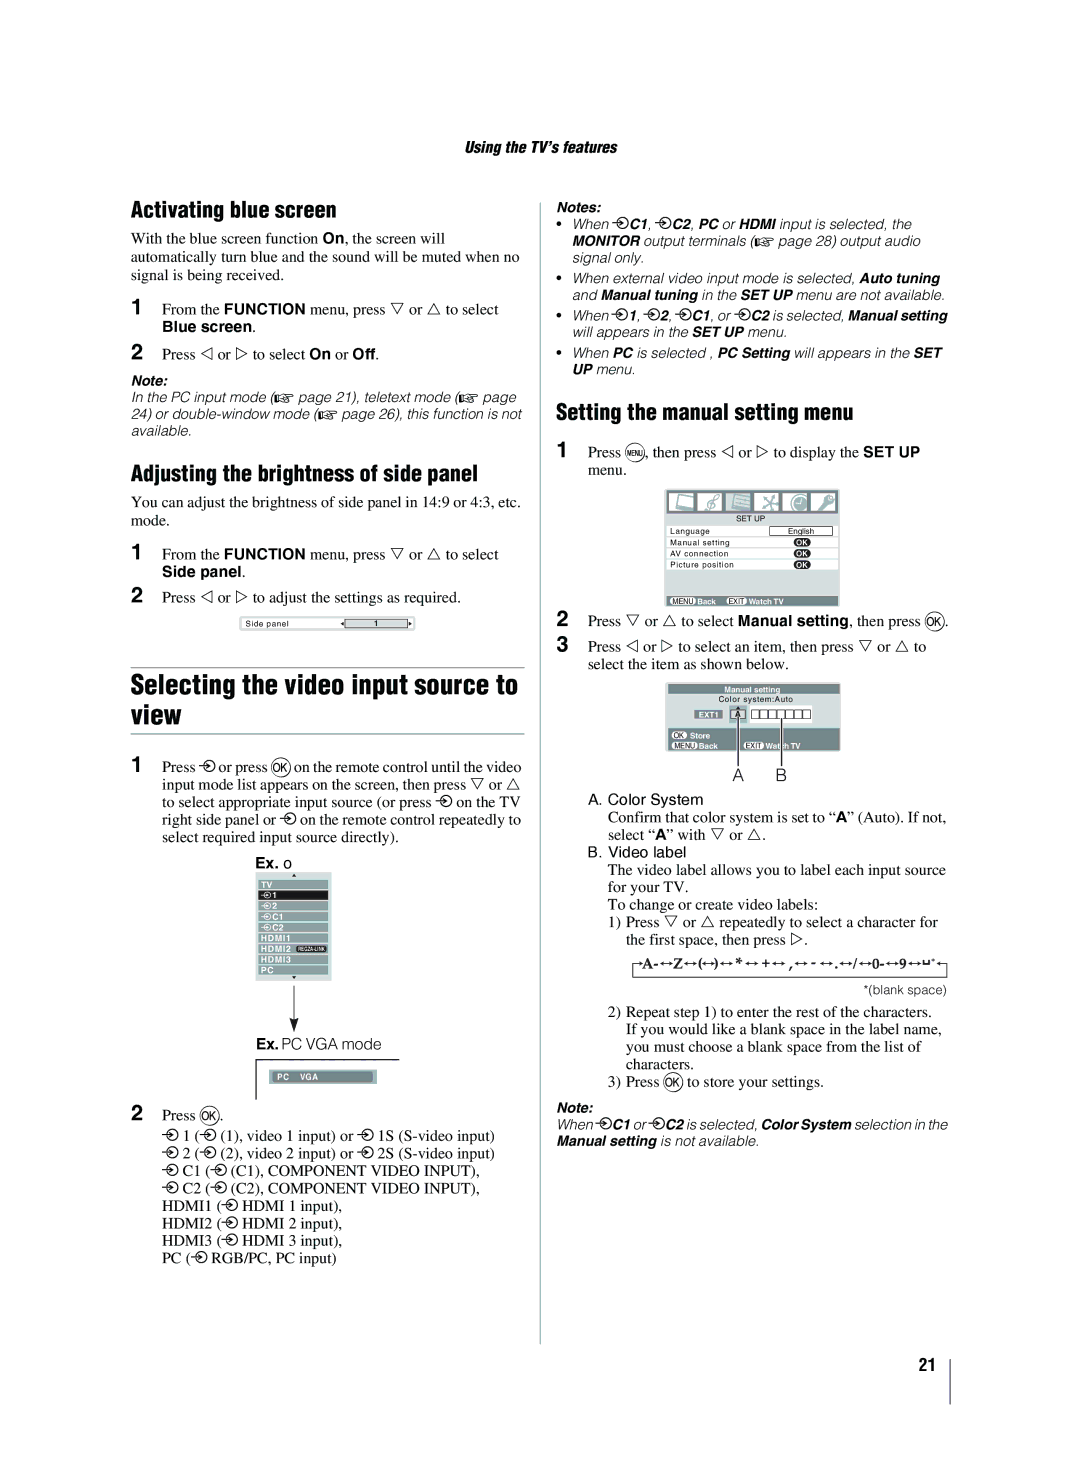
1 Press o or press Qon the remote control until the video input mode list appears on the screen, then press or to select appropriate input source (or press o on the TV right side panel or o on the remote control repeatedly to select required input source directly).
Ex. o
TV
![]() 1
1
![]() 2
2
![]() C1
C1
![]() C2
C2
HDMI1
HDMI2
HDMI3
PC
Ex. PC VGA mode
PC VGA
2 Press Q.
o 1 (o (1), video 1 input) or o 1S
HDMI2 (o HDMI 2 input), HDMI3 (o HDMI 3 input), PC (o RGB/PC, PC input)
Notes:
•When oC1, oC2, PC or HDMI input is selected, the MONITOR output terminals (- page 28) output audio signal only.
•When external video input mode is selected, Auto tuning and Manual tuning in the SET UP menu are not available.
•When o1, o2, oC1, or oC2 is selected, Manual setting will appears in the SET UP menu.
•When PC is selected , PC Setting will appears in the SET UP menu.
Setting the manual setting menu
1 | Press M, then press |
|
| or | to display the SET UP | ||||||||||
| menu. |
|
|
|
|
|
|
|
|
|
|
|
|
|
|
|
|
|
|
|
| SET UP |
|
|
|
|
|
| |||
|
|
| Language |
|
|
|
|
|
|
|
|
|
| ||
|
|
|
|
|
|
|
|
|
| English |
|
| |||
|
|
| Manual setting |
|
| OK | |||||||||
|
|
| AV connection |
|
| OK | |||||||||
|
|
| Picture position |
|
| OK | |||||||||
2 |
|
| MENU Back | EXIT Watch TV | |||||||||||
Press | or | to select Manual setting, then press Q. | |||||||||||||
3 | Press | or | to select an item, then press or to | ||||||||||||
| select the item as shown below. | ||||||||||||||
|
|
|
|
|
|
|
|
|
|
|
|
|
| ||
|
|
|
|
| Manual setting |
| |||||||||
|
|
|
|
| Color system:Auto | ||||||||||
|
|
|
|
|
|
|
|
|
|
|
|
|
|
|
|
|
|
|
| EXT1 |
| A |
|
|
|
|
|
|
|
| |
|
|
|
|
|
|
|
|
|
|
|
|
|
|
|
|
|
|
| OK Store |
|
|
|
|
|
|
|
|
|
|
| |
|
|
| MENU Back |
|
|
| EXIT Watch TV |
| |||||||
|
|
|
|
|
|
|
| B | |||||||
|
|
|
|
|
| A | |||||||||
| A. Color System |
|
|
|
|
|
|
|
|
|
|
| |||
| Confirm that color system is set to “A” (Auto). If not, | ||||||||||||||
| select “A” with |
| or . |
|
|
|
|
|
| ||||||
| B. Video label |
|
|
|
|
|
|
|
|
|
|
| |||
| The video label allows you to label each input source | ||||||||||||||
| for your TV. |
|
|
|
|
|
|
|
|
|
|
| |||
| To change or create video labels: | ||||||||||||||
| 1) Press | or | repeatedly to select a character for | ||||||||||||
the first space, then press .
*(blank space)
2)Repeat step 1) to enter the rest of the characters. If you would like a blank space in the label name, you must choose a blank space from the list of characters.
3)Press Qto store your settings.
Note:
When oC1 or oC2 is selected, Color System selection in the Manual setting is not available.
21
