Setting Up Your PCX5000 and Computers
The steps for connecting your PCX5000 to your home computer network are as follows:
1.Install the PCX5000 in your cable TV and home computer network.
2.Configure your computers’ Ethernet, USB or wireless interfaces.
3.Configure your computers’ TCP/IP network settings.
4.Configure the PCX5000 for operating in your environment.
Installing the PCX5000
To avoid overheating problems, do not place any objects on top of the PCX5000. Do not block the ventilation holes on the top of the unit. The top of the unit should be at least four inches from any obstruction.
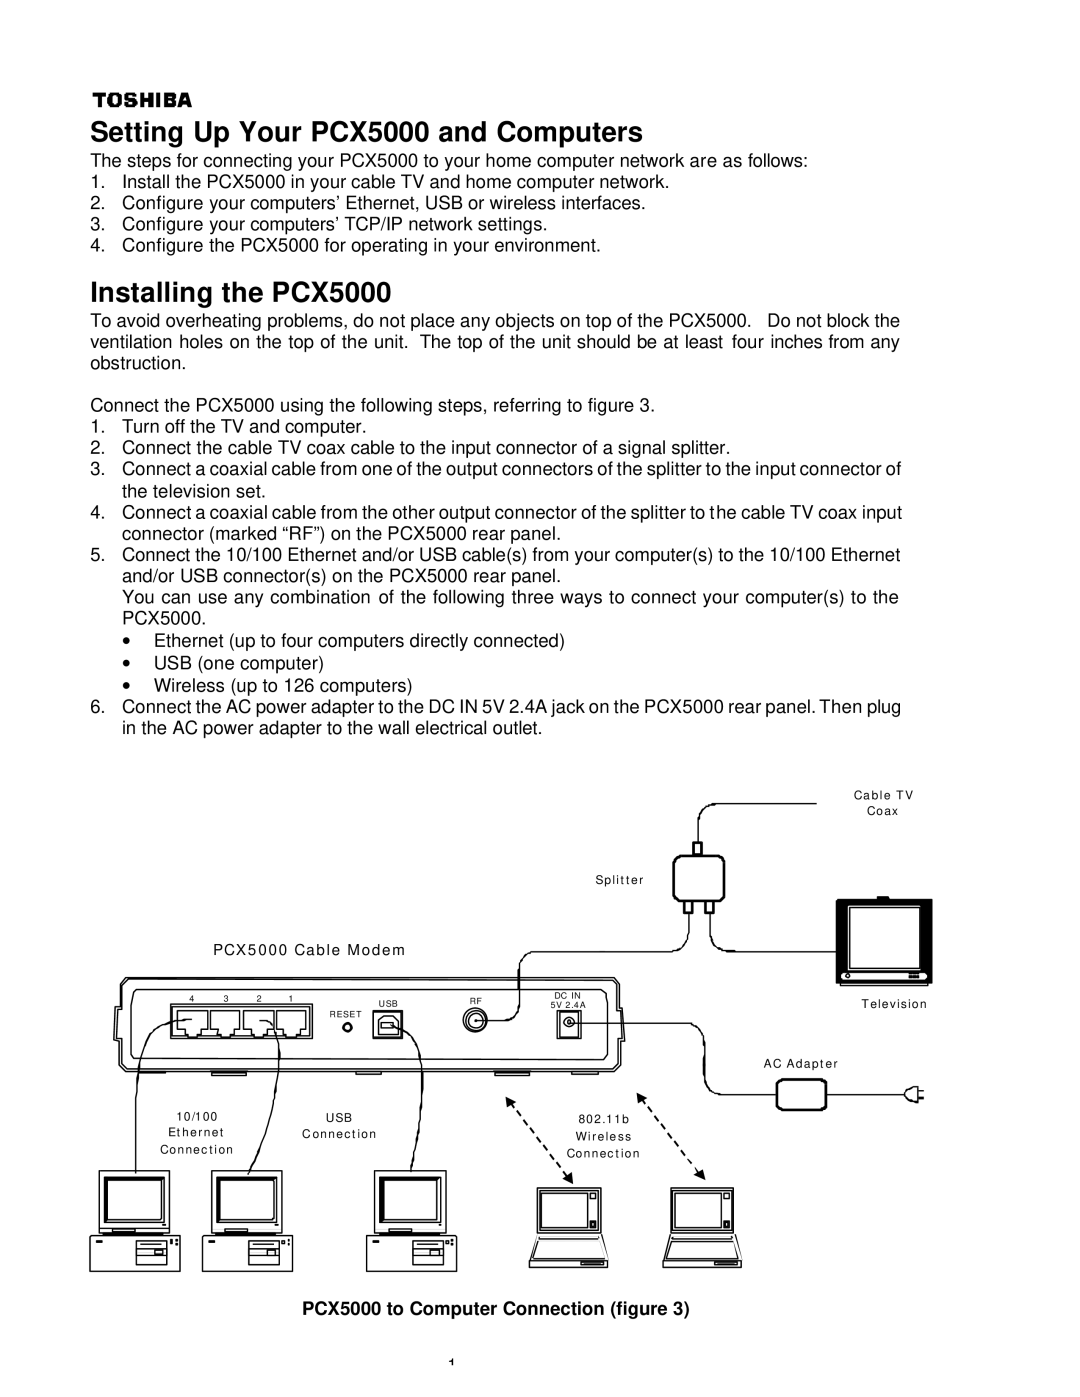
Connect the PCX5000 using the following steps, referring to figure 3.
1.Turn off the TV and computer.
2.Connect the cable TV coax cable to the input connector of a signal splitter.
3.Connect a coaxial cable from one of the output connectors of the splitter to the input connector of the television set.
4.Connect a coaxial cable from the other output connector of the splitter to the cable TV coax input connector (marked “RF”) on the PCX5000 rear panel.
5.Connect the 10/100 Ethernet and/or USB cable(s) from your computer(s) to the 10/100 Ethernet and/or USB connector(s) on the PCX5000 rear panel.
You can use any combination of the following three ways to connect your computer(s) to the PCX5000.
∙Ethernet (up to four computers directly connected)
∙USB (one computer)
∙Wireless (up to 126 computers)
6.Connect the AC power adapter to the DC IN 5V 2.4A jack on the PCX5000 rear panel. Then plug in the AC power adapter to the wall electrical outlet.
Splitter
| PCX5000 Cable Modem |
|
| |||
4 | 3 | 2 | 1 | USB | RF | DC IN |
|
|
|
| 5V 2.4A | ||
|
|
|
| RESET |
|
|
10/100 |
|
|
|
|
| USB |
|
| 802.11b | |||||||||||||||||||||
|
|
|
|
| Ethernet | Connection |
|
| Wireless | |||||||||||||||||||||
|
|
|
| Connection |
|
|
|
|
|
|
|
|
|
|
|
| Connection | |||||||||||||
|
|
|
|
|
|
|
|
|
|
|
|
|
|
|
|
|
|
|
|
|
|
|
|
|
|
|
|
|
|
|
|
|
|
|
|
|
|
|
|
|
|
|
|
|
|
|
|
|
|
|
|
|
|
|
|
|
|
|
|
|
|
|
|
|
|
|
|
|
|
|
|
|
|
|
|
|
|
|
|
|
|
|
|
|
|
|
|
|
|
|
|
|
|
|
|
|
|
|
|
|
|
|
|
|
|
|
|
|
|
|
|
|
|
|
|
|
|
|
|
|
|
|
|
|
|
|
|
|
|
|
|
|
|
|
|
|
|
|
|
|
|
|
|
|
|
|
|
|
|
|
|
|
|
|
|
|
|
|
|
|
|
|
|
|
|
|
|
|
|
|
|
|
|
|
|
|
|
|
|
|
|
|
|
|
|
|
|
|
|
|
|
|
|
|
|
|
|
|
|
|
|
|
|
|
|
|
|
|
|
|
|
|
|
|
|
|
Cable TV
Coax
Television |
AC Adapter
PCX5000 to Computer Connection (figure 3)
1