OWNER’S MANUAL

INSTALLATION

Continued

DECORATIVE FACING

Any noncombustible material may be used for facing (glass, tile, brick, etc.) as long as

Air Shutter

Orifice

Burner


WARNING: Improper installa- tion, adjustment, alteration, ser- vice, or maintenance can cause injury or property damage. Refer to this manual. For assistance or

the proper clearances are observed (see Clearances, page 4). IMPORTANT: Lou- vered openings must not be obstructed, and upper and lower panels must remain remov- able for servicing. Use only heat-resistant, noncombustible mortar or adhesive when

Firebox Bottom

Venturi

Tube

Burner Gas Line

additional information, consult a qualified installer, service agency, or gas supplier.


Left

Back

Front

Right

Figure 44 - Installing Logs “A” (Top View)


Left


Back


A

Front

B

B


A


Right

Figure 45 - Installing Logs “B ” (Top View)


Left


D


C


Back


E

Front


C D

Right

Figure 46 - Installing Twigs “C, D, E ” (Top View)

securing facing material.

Note: Combustible material, such as wood, that has been fireproofed is not considered noncombustible.

PILOT ASSEMBLY ADJUSTMENT

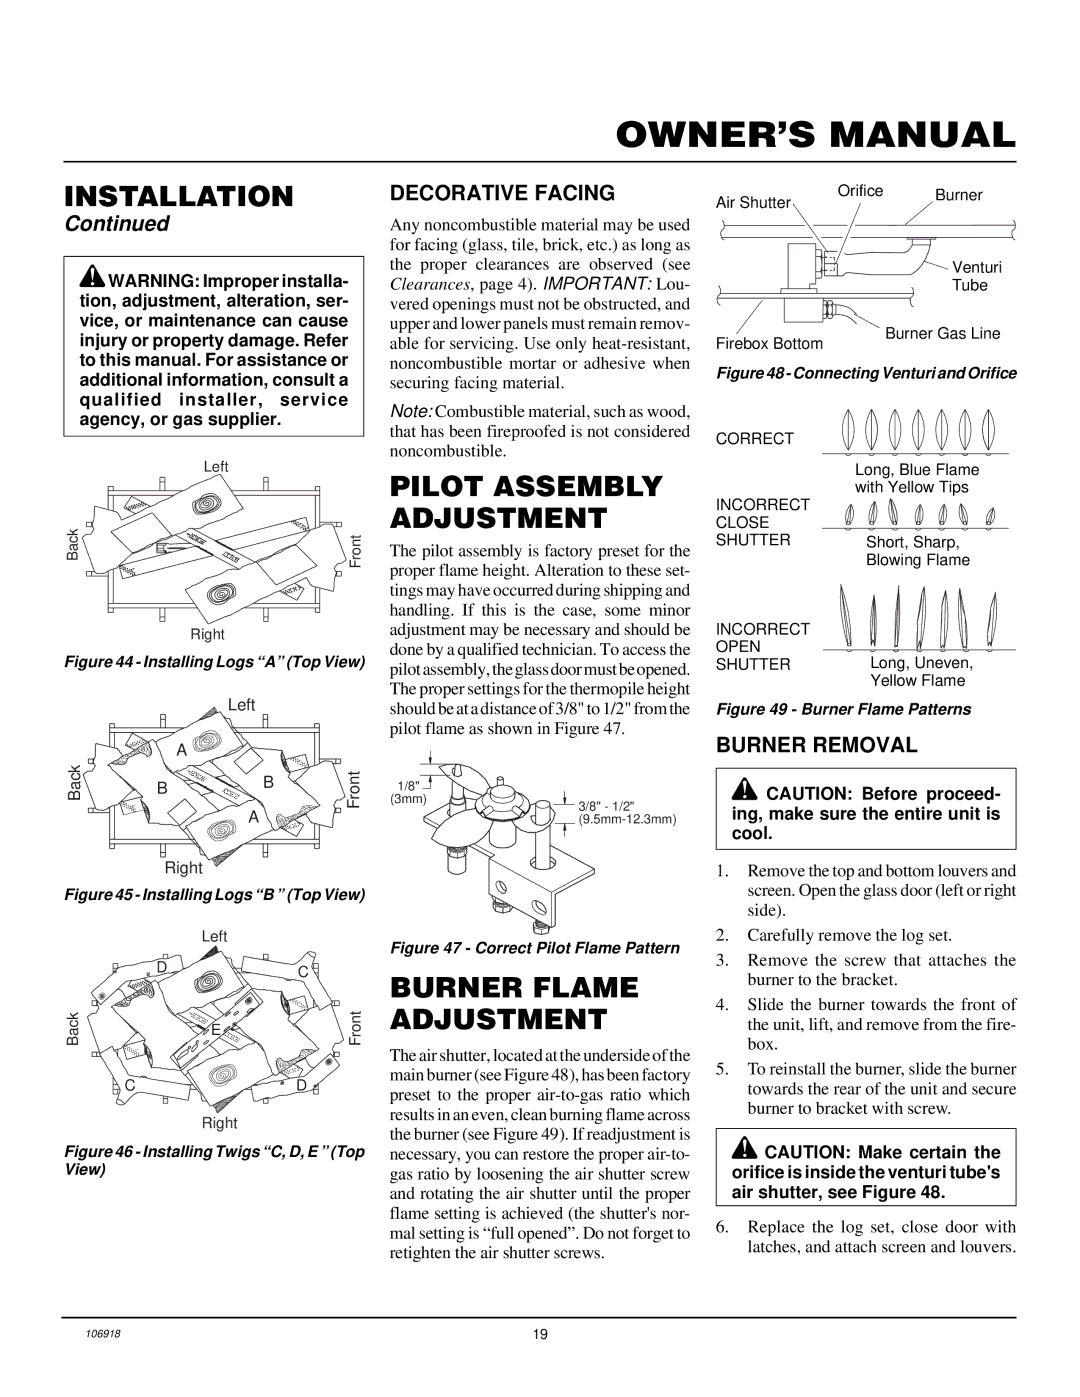
The pilot assembly is factory preset for the proper flame height. Alteration to these set- tings may have occurred during shipping and handling. If this is the case, some minor adjustment may be necessary and should be done by a qualified technician. To access the pilot assembly, the glass door must be opened. The proper settings for the thermopile height should be at a distance of 3/8" to 1/2" from the pilot flame as shown in Figure 47.

1/8"


(3mm)

3/8" - 1/2"


(9.5mm-12.3mm)

Figure 47 - Correct Pilot Flame Pattern

BURNER FLAME ADJUSTMENT

The air shutter, located at the underside of the main burner (see Figure 48), has been factory preset to the proper air-to-gas ratio which results in an even, clean burning flame across the burner (see Figure 49). If readjustment is necessary, you can restore the proper air-to- gas ratio by loosening the air shutter screw and rotating the air shutter until the proper flame setting is achieved (the shutter's nor- mal setting is “full opened”. Do not forget to retighten the air shutter screws.

Figure 48 - Connecting Venturi and Orifice

CORRECT


Long, Blue Flame

INCORRECT

with Yellow Tips


CLOSE


SHUTTER

Short, Sharp,


Blowing Flame

INCORRECT


OPEN

Long, Uneven,

SHUTTER


Yellow Flame

Figure 49 - Burner Flame Patterns

BURNER REMOVAL

CAUTION: Before proceed- ing, make sure the entire unit is cool.

1.Remove the top and bottom louvers and screen. Open the glass door (left or right side).

2.Carefully remove the log set.

3.Remove the screw that attaches the burner to the bracket.

4.Slide the burner towards the front of the unit, lift, and remove from the fire- box.

5.To reinstall the burner, slide the burner towards the rear of the unit and secure burner to bracket with screw.

CAUTION: Make certain the orifice is inside the venturi tube's air shutter, see Figure 48.

6.Replace the log set, close door with latches, and attach screen and louvers.

106918

19

Page 19
Image 19
Vanguard Heating VDDVF36STN/STP Pilot Assembly Adjustment, Burner Flame Adjustment, Decorative Facing, Burner Removal

VDDVF36STN/STP, VDDVF36PN/PP specifications

The Vanguard Heating VDDVF36PN/PP and VDDVF36STN/STP are premium direct vent gas fireplaces that seamlessly blend contemporary design with advanced heating technologies. These models are perfect for homeowners looking to enhance their living spaces while ensuring optimal warmth and comfort.

One of the key features of the VDDVF36 series is its powerful heating capacity. With a maximum input of 36,000 BTUs, these fireplaces can efficiently warm large rooms, making them an excellent choice for both new constructions and renovations. Their direct vent system allows for flexible installation options, as it can draw air from outside and exhaust gases without needing an existing chimney.

The design aesthetic of the VDDVF36PN/PP and VDDVF36STN/STP models is notably sleek and modern. Available in either a pristine perfect black finish or a striking stainless steel option, these units can complement a variety of interior styles. The large viewing area, framed by a stylish bezel, ensures that the flames are the focal point of the room, establishing a cozy ambiance.

Equipped with advanced electronic ignition, these fireplaces offer ease of use and reliability. The ignitor provides a fast and safe startup, eliminating the need for manual lighting and enhancing the user experience. Additionally, these units come with a built-in thermostatic control, allowing users to regulate temperatures effectively, ensuring consistent comfort while optimizing energy use.

The VDDVF36 series is also designed with safety in mind. An integrated safety shut-off system ensures that the fireplace will automatically turn off if any issues are detected, providing peace of mind for users. Furthermore, the screens and barriers are designed to prevent accidental contact with the flames, making them safe for households with children and pets.

In terms of maintenance, the VDDVF36 models are designed for easy access to components, making regular cleaning and servicing straightforward. The durable construction materials used in these fireplaces ensure longevity and reliability, promising years of efficient heating.

Overall, the Vanguard Heating VDDVF36PN/PP and VDDVF36STN/STP models represent the pinnacle of modern gas fireplace technology, combining powerful heating capabilities, stylish aesthetics, and advanced safety features into one outstanding unit. For homeowners seeking a reliable and attractive heating solution, these fireplaces are an excellent choice.