Chapter 4: ADVANCED OPERATION (OSD Menu)
1. Main Menu | 2. Setup Menu |
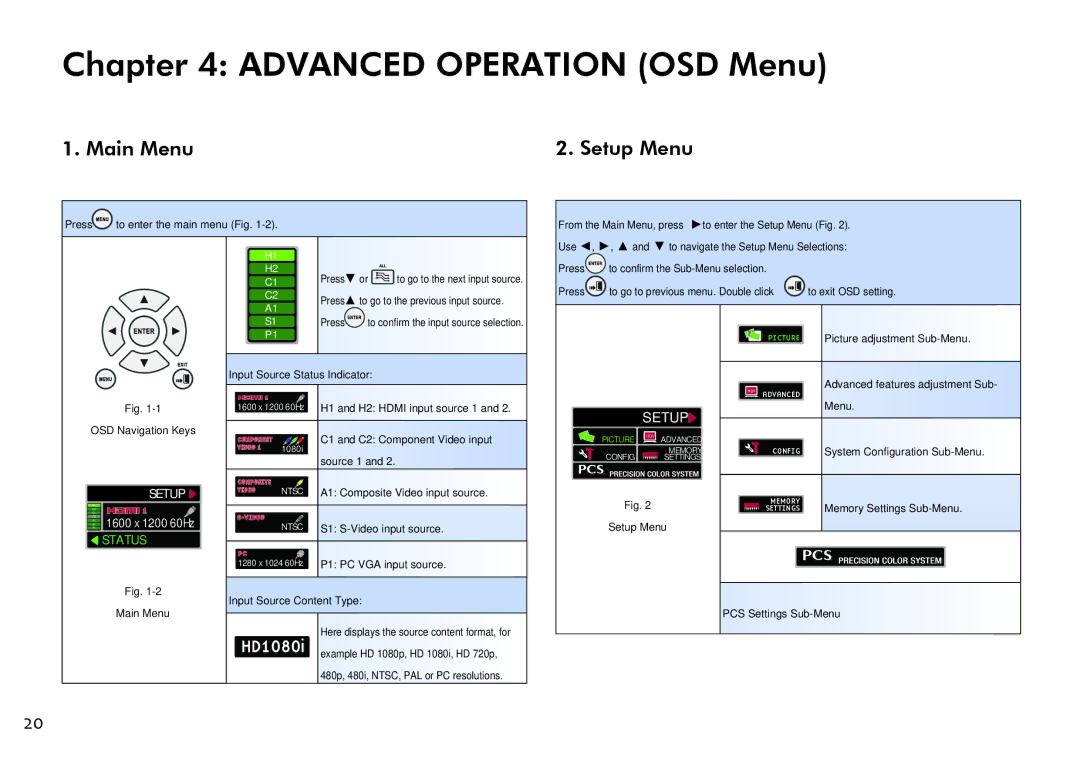
Press  to enter the main menu (Fig.
From the Main Menu, press ►to enter the Setup Menu (Fig. 2). Use ◄, ►, ▲ and ▼ to navigate the Setup Menu Selections:
H1 |
|
|
| |
H2 | Press | ▼ or | to go to the next input source. | |
C1 | ||||
C2 | Press | ▲ to go to the previous input source. | ||
A1 | ||||
|
|
| ||
S1 | Press | to confirm the input source selection. | ||
Press  to confirm the
Press  to go to previous menu. Double click
  to exit OSD setting.
Fig.
OSD Navigation Keys
| SETUP |
H1 | 1 |
C1 | |
H2 | 1600 x 1200 60Hz |
P1S1 | |
C2 |
|
A1 |
|
STATUS
Fig.
P1 |
|
|
Input Source Status Indicator: | ||
1 |
|
|
1600 x 1200 60Hz | H1 and H2: HDMI input source 1 and 2. | |
COMPONENT | 1080i | C1 and C2: Component Video input |
VIDEO 1 | source 1 and 2. | |
|
| |
COMPOSITE | NTSC |
|
VIDEO | A1: Composite Video input source. | |
| ||
NTSC |
| |
| S1: | |
PC |
|
|
1280 x 1024 60Hz | P1: PC VGA input source. | |
Input Source Content Type: | ||
SETUP
 PICTURE HQV ADVANCED MEMORY
CONFIG 

 SETTINGS
Fig. 2
Setup Menu
|
| PICTURE | Picture adjustment |
|
|
|
|
|
|
| Advanced features adjustment Sub- |
| HQV | ADVANCED | |
|
| ||
|
| Menu. | |
|
|
| |
|
|
|
|
|
| CONFIG | System Configuration |
|
|
|
|
|
| MEMORY | Memory Settings |
|
| SETTINGS |
Main Menu
HD1080i | Here displays the source content format, for |
example HD 1080p, HD 1080i, HD 720p, | |
| 480p, 480i, NTSC, PAL or PC resolutions. |
PCS Settings
20