ViewSonic
Following information is only for EU-member states
FCC Statement
For Canada
CE Conformity for European Countries
Important Safety Instructions
Declaration of RoHS Compliance
Copyright Information
Trademark acknowledgment
About this manual
Thank you for purchasing this projector
Contents
Specifications
Troubleshooting
Network setting
Warranty and after-service
Fastening the lens cover
Contents of package
HOT
Part names
Projector
HOT
Rear panel
Control panel
Laser Indicator
Remote control
Setting up
Suspended from the ceiling
Arrangement
On a horizontal
Surface
Using the security bar and slot
Adjusting the projectors elevator
Monitor
Connecting your devices
About Plug-and-Play capability
Connecting your devices
Connecting power supply
Hitachi MAXELL, Part No.LR6
Remote control
Laser pointer
Putting batteries
Back sensor
About the remote control signal
Changing the frequency of remote control signal
Front and top sensors
Using as a simple PC mouse & keyboard
Using as a wired remote control
Turning off the power
Power on/off
Turning on the power
Temporarily muting the sound
Adjusting the volume
Selecting an input signal
Operating
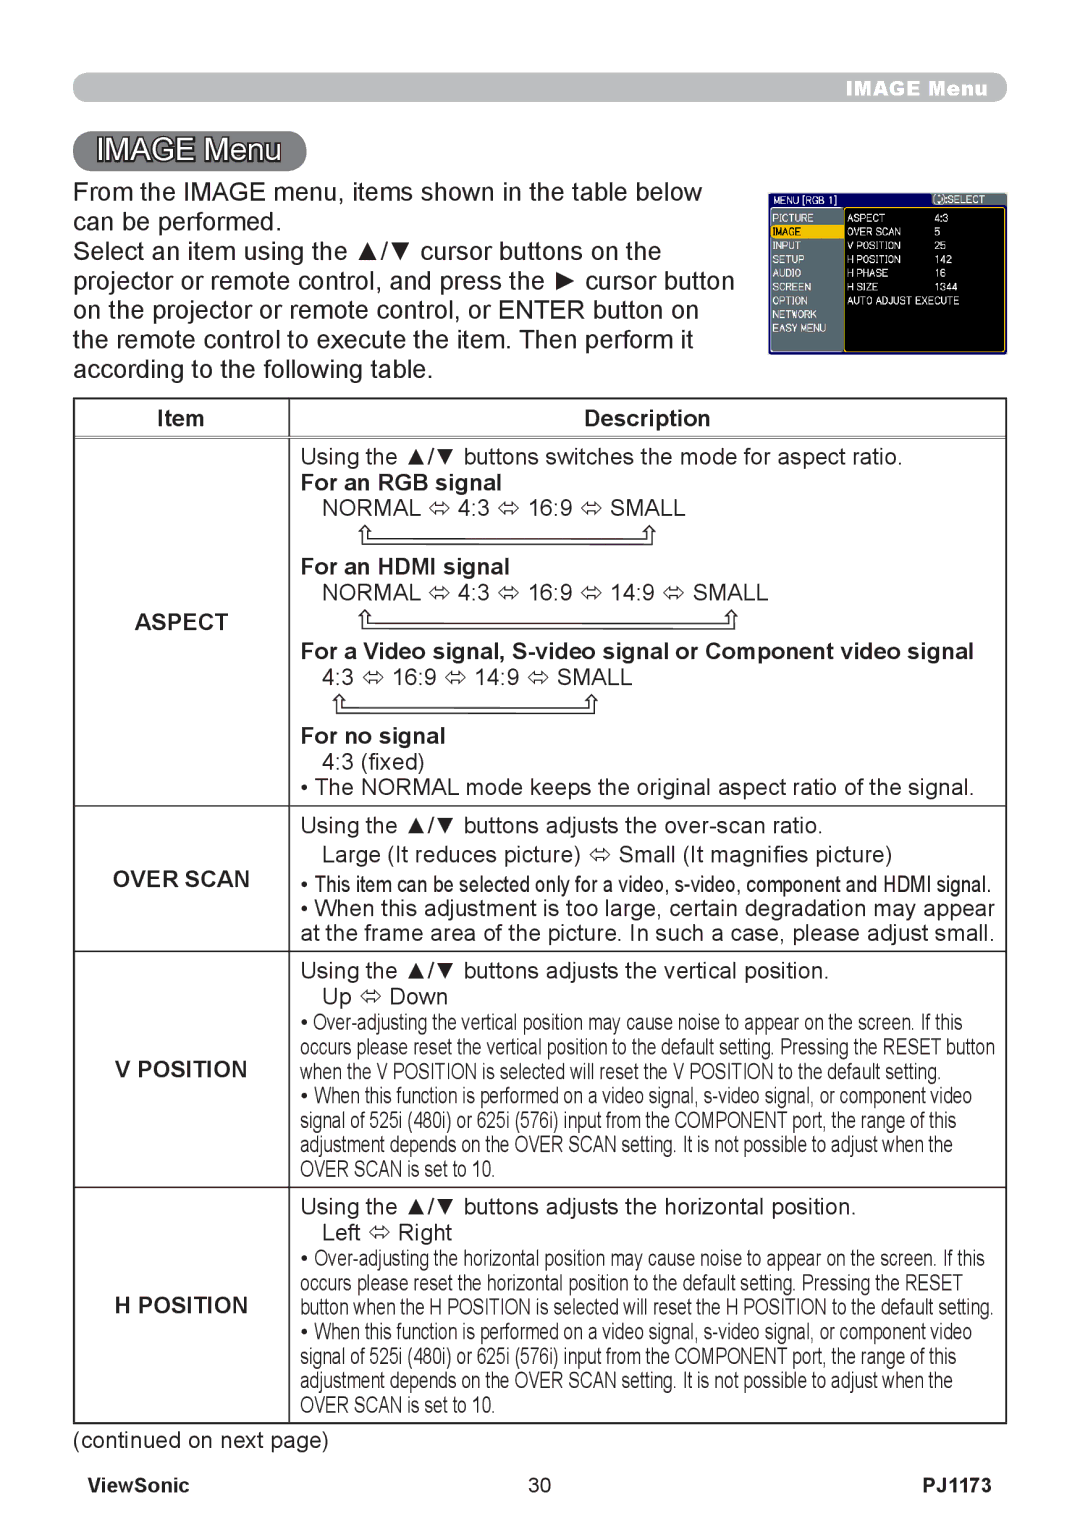
For an Hdmi signal
Searching an input signal
Selecting an input signal
For an RGB signal
For a video signal and s-video signal
Adjusting the zoom and focus
Adjusting the lens shift
Using the automatic adjustment feature
Correcting the keystone distortions
Adjusting the position
Freezing the screen
Using the magnify feature
Temporarily blanking the screen
Advanced Menu
Using the menu function
Easy Menu
Keystone
Picture Mode
Aspect
Auto
Easy Menu
Gamma
Picture Menu
Color Temp
Picture Menu
SAVE-1, SAVE-2, SAVE-3, SAVE-4
Active Iris
LOAD-1, LOAD-2, LOAD-3, LOAD-4
MY Memory
Position
Image Menu
Over Scan
Size
Phase
Auto Adjust
Image Menu
Input Menu
Hdmi
Input Menu
Component
Video Format
Description
Resolution
Setup Menu
Setup Menu
Audio Menu
Blank
Screen Menu
Start UP
Screen Menu
MyScreen Lock
Capturing error has occurred. Please try again
MyScreen
MyScreen registration is finished
Source Name
Message
Auto on
Option Menu
Auto Search
Lamp Time
Option Menu
Auto OFF
FAN Speed
Service
MY Button
Lens Type
Ghost
Filter Message
Remote Freq
Factory Reset
KEY Lock
Remote Receiv
Security
Using Security Features
Inputting the Password
Changing the Password
Setting the Password
Using the MyScreen Password Function
Description If you have forgotten your Password
Turning on the MyScreen Password Function
Registering the PIN Code
Using the PIN Lock Function
Turning the Password off
Security
If you have forgotten your PIN Code
Description Security
Turning Off the PIN Lock Function
Turning On the Transition Detector Function
Using the Transition Detector Function
Setting the Transition Detector Password
Writing the MY Text
Using the MY Text Password function
Description Setting the Transition Detector off
Displaying the MY Text
Turning on the MY Text Password
Password and the screen will return to
Network Menu
Setup
Network Menu
Enter or Input button
Projector
Name
To return to the menu
To switch the image displayed
Shot
For confirming the network settings
Shot Still Image Transfer Display
Configuring and controlling via a web browser
Main functions
Web control
Required equipment preparation
Equipment connection and network setting
Shot Still image Transfer Display
Open Network Connections
Manual network connection setting
Network settings
Equipments connection
Set IP address, subnet mask and default gateway for PC
Manual network connection setting
Setting automatically
About IP address Setting manually
Click
Internet Option setting
Check connection
Uncheck all boxes in Local Area Network LAN Settings window
Management with Web browser software
Configuring and controlling the projector via a web browser
Configuring and controlling the projector via a web browser
Logon
Password
Dhcp
Network Information
Dhcp OFF
Displays and configures network settings
Click Apply button to save the settings
Dhcp on
Configuring and controlling the projector via a web browser
Displays and configures communication port settings
Port Settings
Displays and configures e-mail addressing settings
Mail Settings
Portion has become heated
Alert Settings
Displays and configures failure & alert settings
Alert Items are shown below
Displays and configures schedule settings
Schedule Settings
Specific date event items are shown below
Daily and weekly event items are shown below
First, 2, 3, 4, Last
Date/Time Settings
Displays and configures the date and time settings
Address
Time difference
Sntp
Sntp Server IP
Security Settings
Snmp
Configures the community name if Snmp is used
Projector Control
3D-YCS
Selects the 3D-YCS setting
Selects the Hdmi setting
Speaker
Audio Volume
Treble
Bass
Projector Status
Displays and configures the current projector status
Logoff
When Logoff is clicked, the Logon menu is displayed
Network Restart
Restarts the projector’s network connection
Mail Alerts
Mail Alerts
Snmp Settings
Projector Management using Snmp
Event Scheduling
Event Scheduling
Date/Time Settings
Shot Still Image Transfer Display
Network Restart on the main menu
Shot Still Image Transfer Display
Example If the IP address of the projector is set to
Communication Port
Command Control via the Network
Command Control Settings
Command Control via the Network
Send Data format
Command Format
Reply Error code
Header Data length RS-232C command Check sum Connection
Reply Data format
Automatic Connection Break
Authentication
Type number = RLC-038 DT00871 Replacing the lamp
Maintenance
Case of replacement by yourself
Lamp
Lamp
Lamp warning
Lamp
Air filter
Cleaning the air filter
Air filter
Replace battery with Hitachi MAXELL, Part No.CR2032 only
Internal clock battery
Caring for the lens
Caring for the cabinet and remote control
Other care
Inside of the projector
Related messages
Troubleshooting
Message Description There is no input signal
Internal temperature is rising
Regarding the indicator lamps
Regarding the indicator lamps
Signal source does not correctly work
Electrical power cord is not plugged
Power switch is not set to the on position
Signal cables are not correctly connected
Phenomena that may be easily mistaken for machine defects
Whisper function is working
Color settings are not correctly adjusted
Color Space setting is not suitable
Not properly adjusted
Specifications
Warranty and after-service
Specifications
Specifications
Customer Support
What the warranty does not cover
What the warranty covers
How long the warranty is effective
Who the warranty protects
Sales outside the U.S.A. and Canada
Limitation of implied warranties
Exclusion of damages
Effect of state law
Viewsonic Projector
Mexico Limited Warranty
Número Gratis DE Asistencia Técnica Para Todo México


 Menu
Menu