7

Top Brackets


Tools Needed:

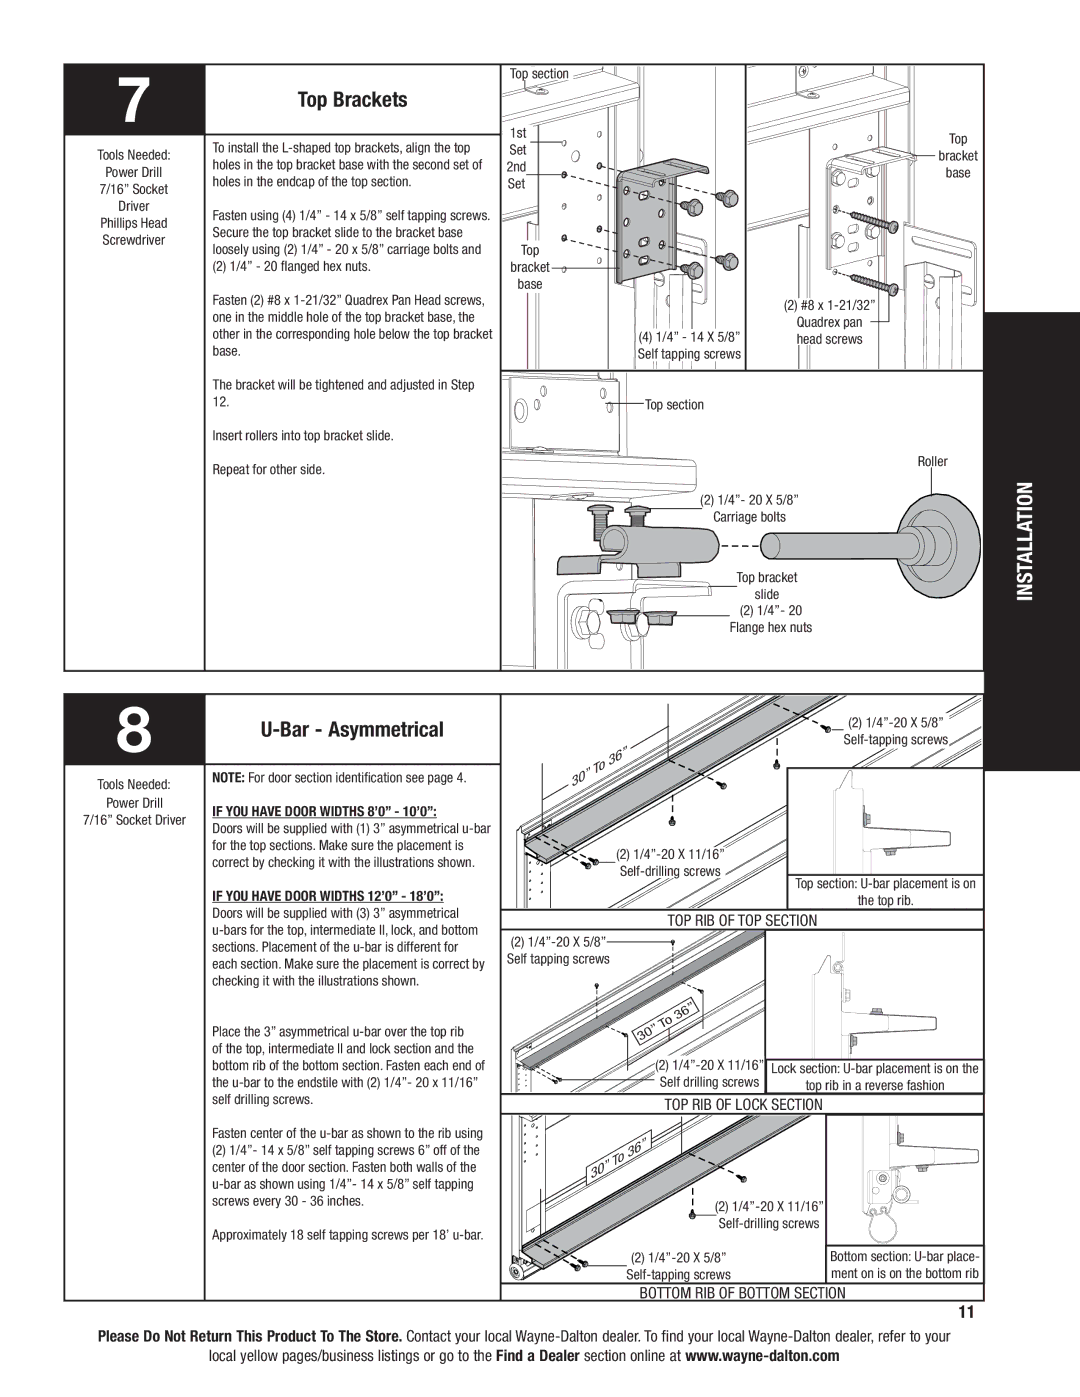
To install the L-shaped top brackets, align the top

holes in the top bracket base with the second set of

Power Drill

holes in the endcap of the top section.

7/16” Socket


Driver

Fasten using (4) 1/4” - 14 x 5/8” self tapping screws.

Phillips Head

Secure the top bracket slide to the bracket base

Screwdriver

loosely using (2) 1/4” - 20 x 5/8” carriage bolts and


(2) 1/4” - 20 flanged hex nuts.


Fasten (2) #8 x 1-21/32” Quadrex Pan Head screws,


one in the middle hole of the top bracket base, the


other in the corresponding hole below the top bracket


base.


The bracket will be tightened and adjusted in Step

Top section

1st Set 2nd Set

Top

bracket

base

(4) 1/4” - 14 X 5/8” Self tapping screws

Top

bracket

base

(2)#8 x 1-21/32” Quadrex pan head screws

12.

Insert rollers into top bracket slide.

Repeat for other side.

Top section

Roller

(2)1/4”- 20 X 5/8”

Carriage bolts

Top bracket

slide

(2)1/4”- 20 Flange hex nuts

INSTALLATION

8

U-Bar - Asymmetrical


Tools Needed:

NOTE: For door section identification see page 4.


Power Drill

If you have DOOR WIDTHS 8’0” - 10’0”:

7/16” Socket Driver

Doors will be supplied with (1) 3” asymmetrical u-bar


for the top sections. Make sure the placement is


correct by checking it with the illustrations shown.


If you have DOOR WIDTHS 12’0” - 18’0”:

To

36”


30”


(2) 1/4”-20 X 11/16” Self-drilling screws

(2)1/4”-20 X 5/8” Self-tapping screws

Top section: U-bar placement is on

the top rib.

Doors will be supplied with (3) 3” asymmetrical

u-bars for the top, intermediate II, lock, and bottom

Top rib of top section

sections. Placement of the u-bar is different for

each section. Make sure the placement is correct by

checking it with the illustrations shown.

Place the 3” asymmetrical u-bar over the top rib

of the top, intermediate II and lock section and the

bottom rib of the bottom section. Fasten each end of

the u-bar to the endstile with (2) 1/4”- 20 x 11/16”

(2) 1/4”-20 X 5/8” Self tapping screws

To36” 30”

(2) 1/4”-20 X 11/16” Self drilling screws

Lock section: U-bar placement is on the

top rib in a reverse fashion

self drilling screws.

Fasten center of the u-bar as shown to the rib using

(2) 1/4”- 14 x 5/8” self tapping screws 6” off of the

center of the door section. Fasten both walls of the

u-bar as shown using 1/4”- 14 x 5/8” self tapping

screws every 30 - 36 inches.

Approximately 18 self tapping screws per 18’ u-bar.

Top rib of lock section

To

36”


30”


(2) 1/4”-20 X 11/16”


Self-drilling screws


(2) 1/4”-20 X 5/8”

Bottom section: U-bar place-


Self-tapping screws

ment on is on the bottom rib


Bottom Rib of bottom section


11

Please Do Not Return This Product To The Store. Contact your local Wayne-Dalton dealer. To find your local Wayne-Dalton dealer, refer to your

local yellow pages/business listings or go to the Find a Dealer section online at www.wayne-dalton.com

Page 11
Image 11
Wayne-Dalton 6100 installation instructions Top Brackets, Bar Asymmetrical, Top rib of top section, Top rib of lock section

6100 specifications

The Wayne-Dalton 6100 is a premium garage door that stands out for its combination of durability, aesthetics, and advanced technology. Renowned for its quality, the 6100 model offers a perfect blend of style and functionality, making it a popular choice among homeowners and builders alike.

One of the key features of the Wayne-Dalton 6100 is its construction. The door is built with a robust steel frame and a thick fiberglass exterior. This design not only ensures long-lasting performance but also provides excellent insulation. The door’s insulation is particularly noteworthy, as it helps to regulate indoor temperatures, keeping garages warmer in the winter and cooler during the summer months. This feature is essential for homeowners who use their garages as workspaces or additional storage.

In terms of design, the 6100 model offers a customizable aesthetic. It comes in various colors and finishes, allowing homeowners to select an option that complements their home’s exterior. The smooth fiberglass surface can mimic the look of wood, giving the appearance of an upscale, wooden garage door without the associated maintenance. Additionally, the door is available in multiple panel designs, catering to specific architectural styles.

The 6100 is equipped with advanced technologies that enhance usability and security. For instance, it features a user-friendly operating system that allows for smooth and quiet opening and closing. This is particularly beneficial in residential areas where noise can be a concern. Moreover, the door can be integrated with garage door openers that come with smart technology, enabling users to control the door remotely through mobile apps.

Safety is another priority with the Wayne-Dalton 6100. The door incorporates safety features such as pinch-resistant panels and an automatic reverse mechanism, which ensures that the door will stop and reverse immediately if it detects an obstacle in its path. This is essential for preventing accidents and ensuring the safety of family members and pets.

In summary, the Wayne-Dalton 6100 model combines durability, insulation, customizable aesthetics, advanced technology, and essential safety features, making it a versatile choice for any garage. Its ability to harmonize practicality with elegance truly sets it apart in the competitive garage door market. Whether for functionality or style, the 6100 delivers on all fronts, making it a worthwhile investment for homeowners looking to enhance their property.