Installation

Step 7: Configuration

4 Wire Heat Pump without Auxiliary Heat + C Wiring and Jumper Configuration


STEP A: Verify your labeled wires match the ones shown in the


Your Labeled Wires


box to the left.


C B or O Y RH G

NOTE: Do not allow the wires to contact another terminal,


touch each other or touch other parts of the thermostat.


C B O W2 W Y RH RC G A

SEE NOTE

C B O

Y

RH G

STEP B: Connect your wires to the corresponding terminals on the thermostat base. Wrap wire around terminal screw and tighten securely using a Phillips or slotted screwdriver.

NOTE: Connect O wire to the O terminal OR B wire to the B terminal. If you have both O and B, connect O wire to the O terminal. Do not connect B to B terminal. See page 10 and call or e-mail customer support.

16

JP5 JP3 JP4 JP1 JP2

STEP C: On the Control Unit PCB, install jumpers as shown. See the


jumper reference guide on page 11 for jumper number designations.


Black indicates position of jumper, otherwise remove or do not


place jumper. Be certain jumpers are fully seated and in the correct


position.

Step D: Go to Page 18 to continue your installation.

5 Wire Heat Pump with Auxiliary Heat + C Wiring and Jumper Configuration


Your Labeled Wires


STEP A: Verify your labeled wire match the ones shown in the


box to the left.


C B or O W2 Y


RH G


NOTE: Do not allow the wires to contact another terminal,


touch each other or touch other parts of the thermostat.


C


B O W2 W Y RH RC G A

STEP B: Connect your wires to the corresponding terminals


on the thermostat base. Wrap wire around terminal screw and


tighten securely using a Phillips or slotted screwdriver.


SEE NOTE


NOTE: Connect O wire to the O terminal OR B wire to the


C

B O W2


Y RH

G

B terminal. If you have both O and B, connect O wire to


the O terminal. Do not connect B to B terminal. See page


10 and call or e-mail customer support.


JP5


JP3 JP4 JP1

JP2

STEP C: On the Control Unit PCB, install jumpers as shown. See the


A

jumper reference guide on page 11 for jumper number designations.


Black indicates position of jumper, otherwise remove or do not place


OR

jumper. Be certain jumpers are fully seated and in the correct position.

B NOTE: For Gas Auxiliary Heat do not install or remove jumper

SEE NOTEon jumper JP2, for Electric Auxiliary Heat set jumper JP2 in position B.

Step D: Go to Page 18 to continue your installation.

Page 16
Image 16
Wayne-Dalton WDTC-20 user manual Or O Y RH G, O W2 W Y RH RC G a, JP5 JP3 JP4 JP1 JP2

WDTC-20 specifications

The Wayne-Dalton WDTC-20 is an innovative and versatile garage door opener that stands out in terms of performance, security, and user-friendliness. Designed by Wayne-Dalton, a leader in the garage door industry, the WDTC-20 incorporates modern technologies to provide homeowners with a complete solution for their garage access needs.

One of the main features of the WDTC-20 is its powerful motor which delivers reliable lifting force suitable for standard and heavier doors. The unit is engineered to ensure smooth and quiet operation, making it ideal for residential use where noise reduction is a priority. The opener is compatible with various door types, allowing for easy integration with sectional or one-piece garage doors.

The WDTC-20 incorporates advanced security technology with its rolling code feature. This system generates a new code every time the remote is used, significantly reducing the risk of unauthorized access. Additionally, the opener includes a secure manual release system, providing peace of mind in case of power outages.

A hallmark of the WDTC-20 is its user-friendly interface. The opener features a bright LED lighting system that illuminates the garage space, enhancing visibility during entry and exit. The unit also boasts a wireless keypad option that allows users to open the garage door without needing to carry a remote. This is particularly convenient for households with multiple users.

For tech-savvy homeowners, the WDTC-20 offers smartphone compatibility through its smart hub. By connecting to a home Wi-Fi network, users can control and monitor the garage door remotely via a mobile app. This feature allows notifications for door status, facilitating enhanced security and operability.

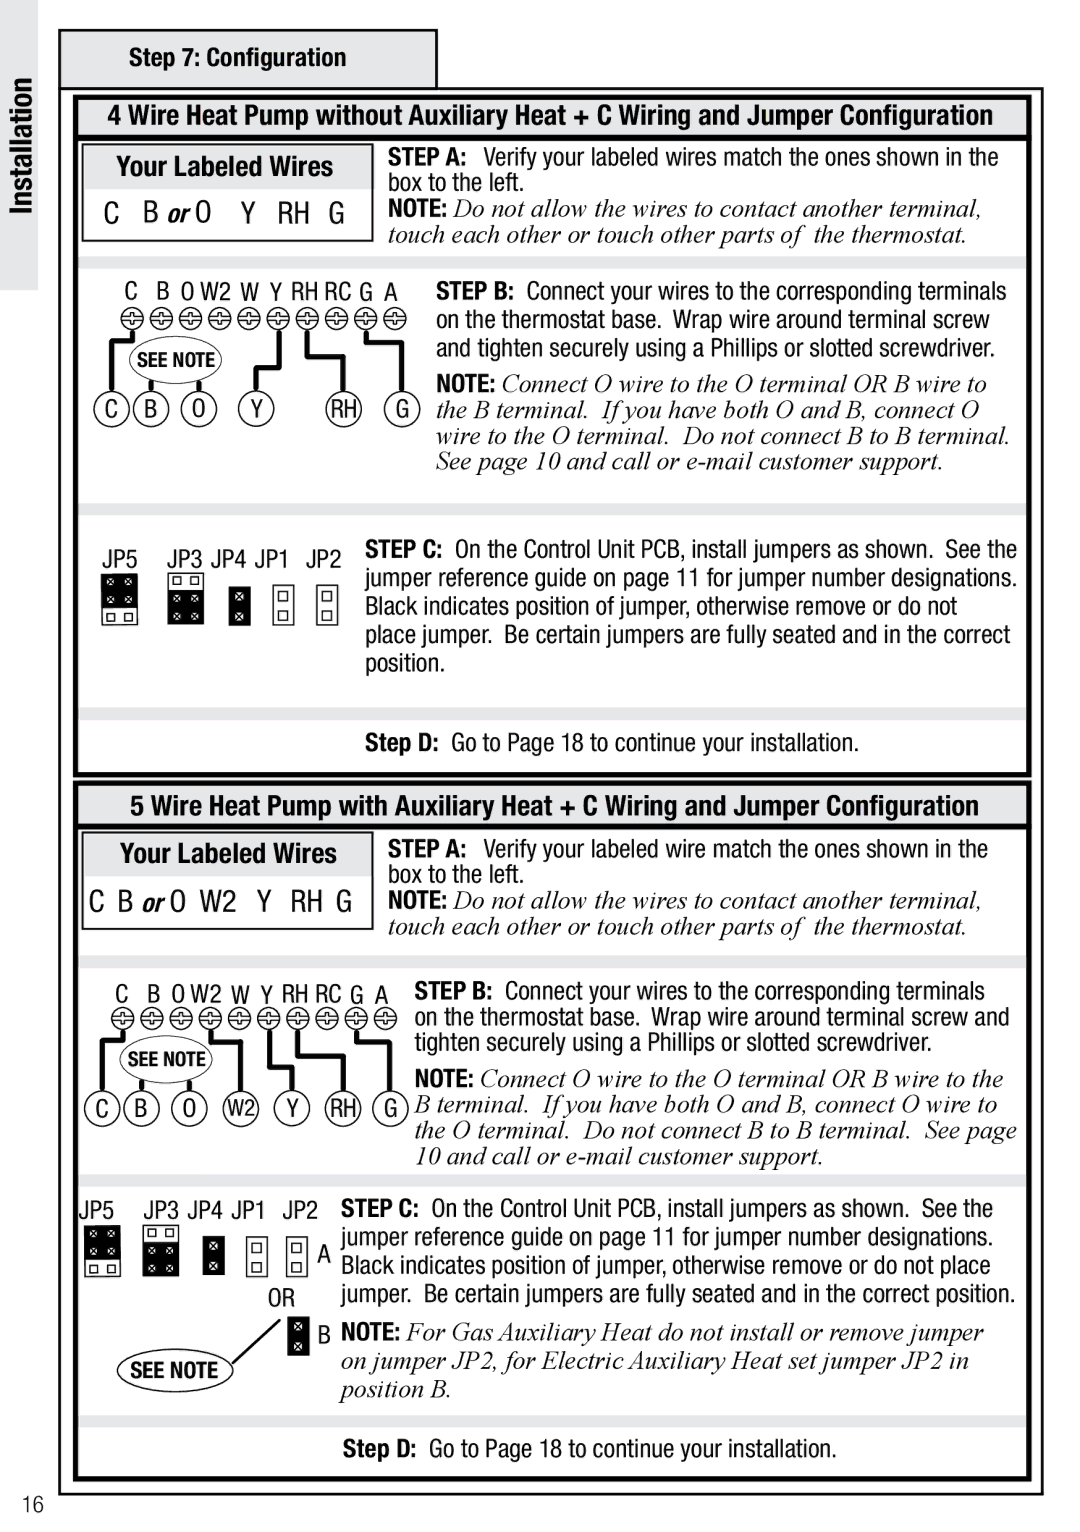
In terms of installation, the WDTC-20 is designed for easy and straightforward setup, enabling users to quickly benefit from its extensive features. Additionally, Wayne-Dalton offers robust customer support and a warranty program for peace of mind.

Overall, the Wayne-Dalton WDTC-20 combines strength, security, and technological innovation, making it a compelling choice for anyone in need of a modern garage door opener. Its blend of convenience and safety features ensures that it caters well to the dynamic needs of contemporary living.